Preparing APIs for subscribers Last updated 17-Dec-2024
Preparing APIs for subscribers
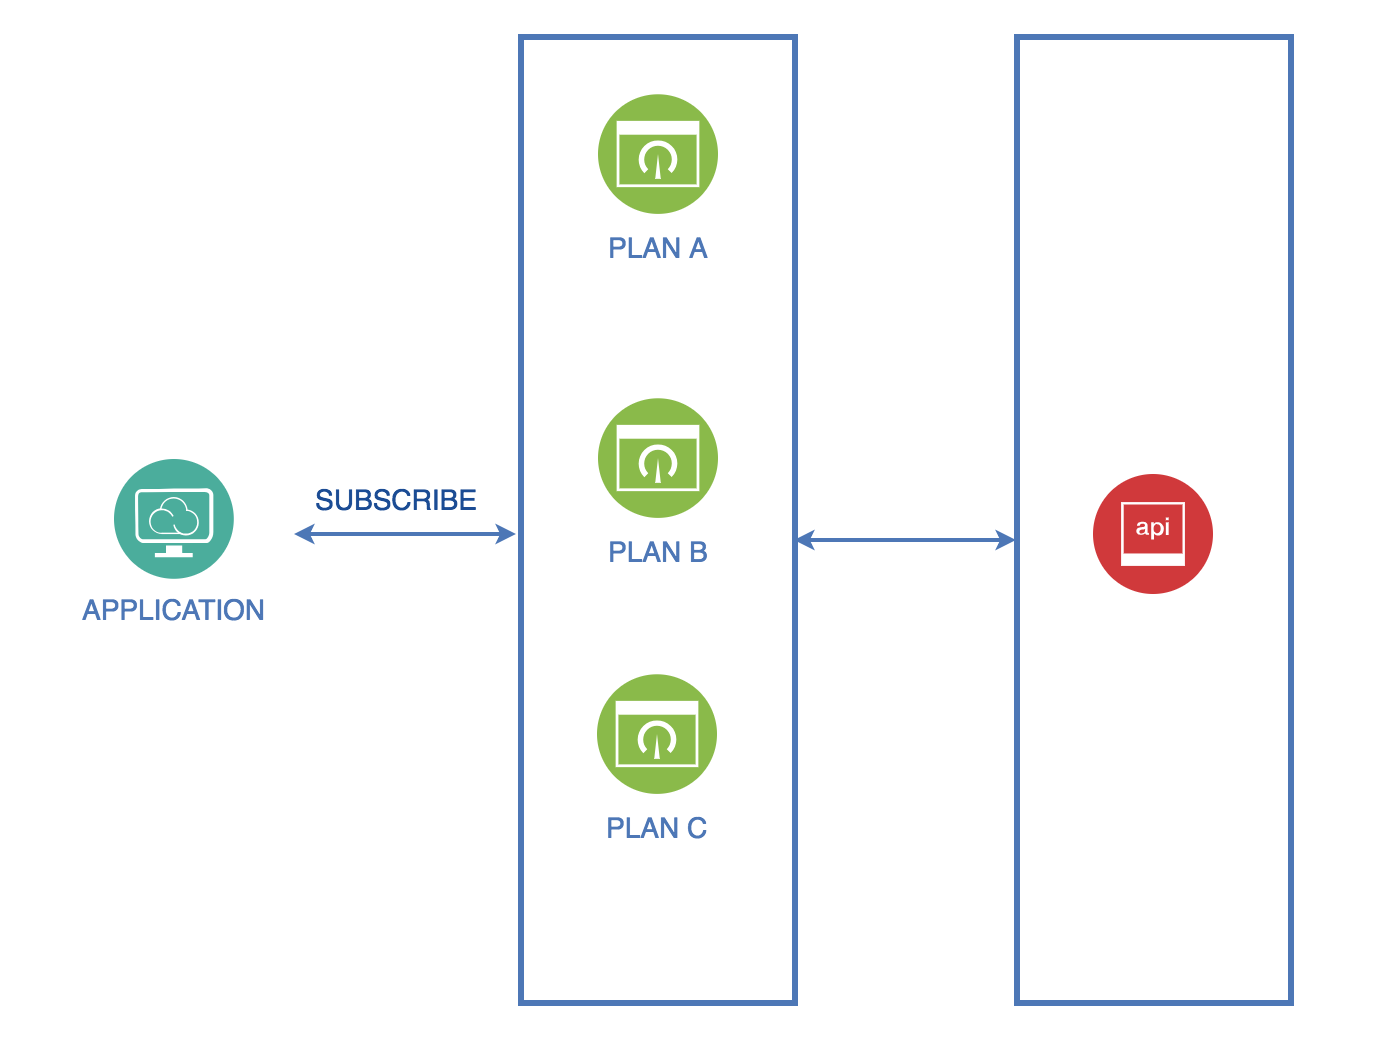
DSAPI APIM uses plans, applications, and subscriptions to govern API exposure. A published Gateway API is visible in the Developer Portal but cannot be consumed without a published plan. A Keyless plan can be consumed immediately, but all other authentication types require the API consumer to register an application and subscribe to a published plan. This system promotes granular control over API access.
For more information about preparing your APIs for subscribers, see the following articles:
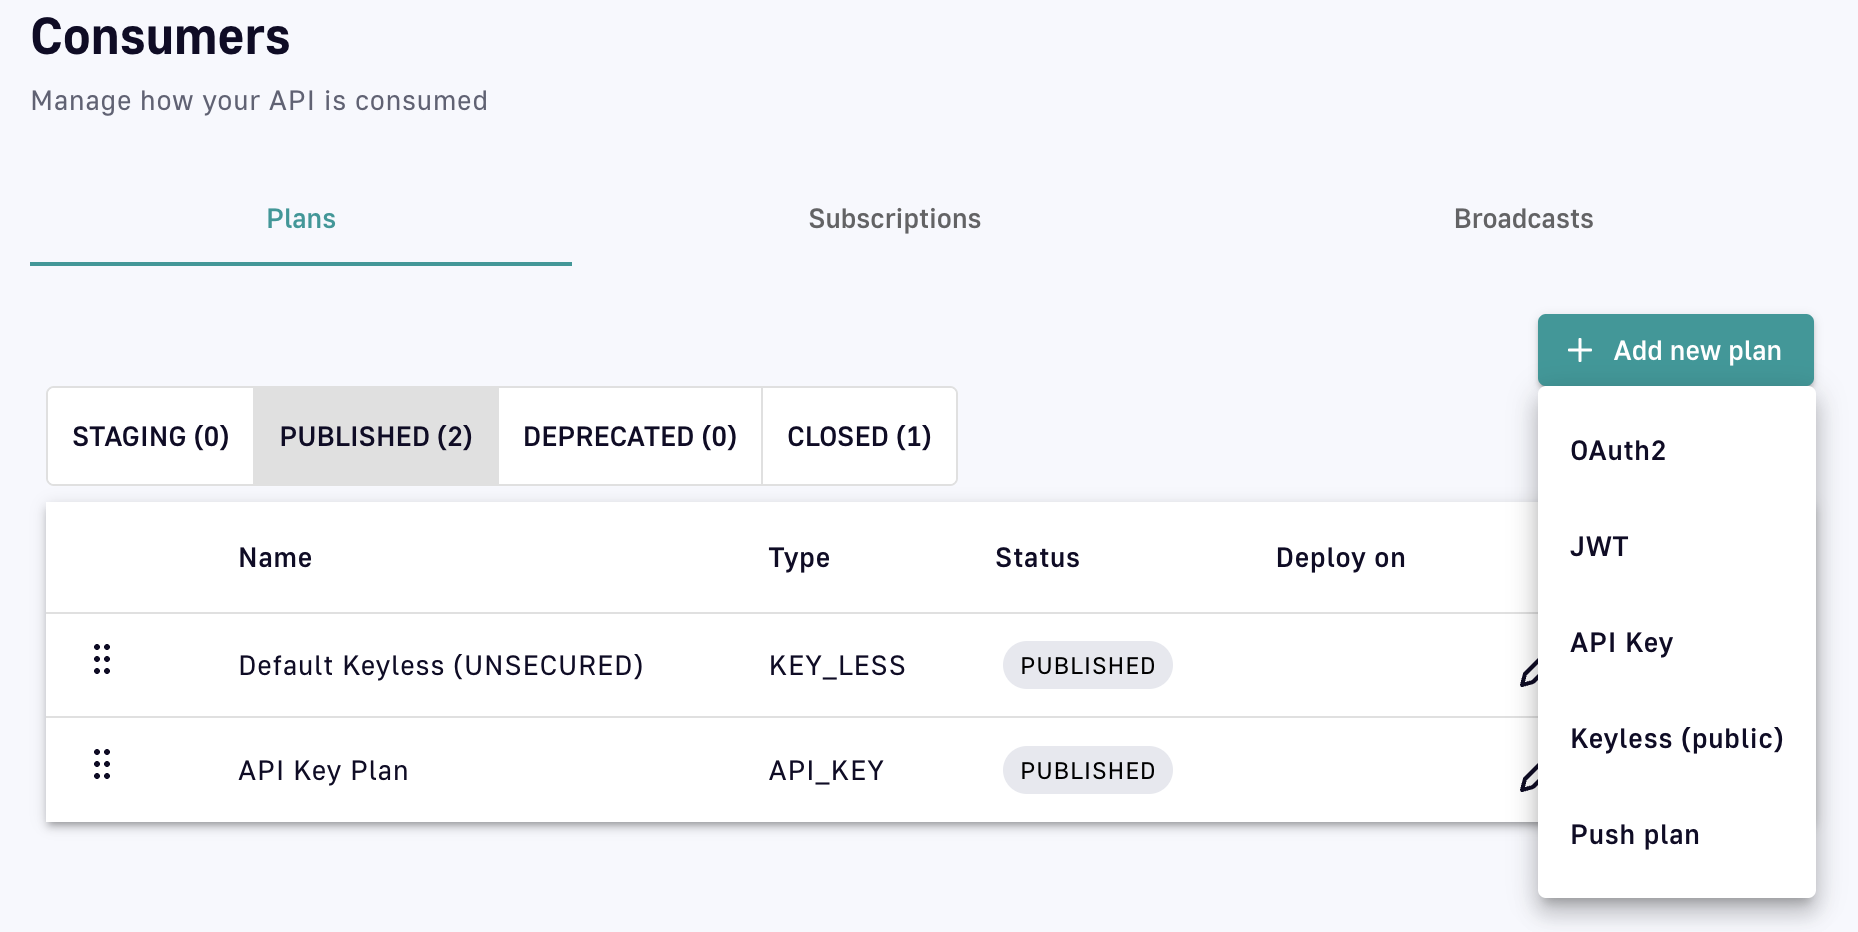
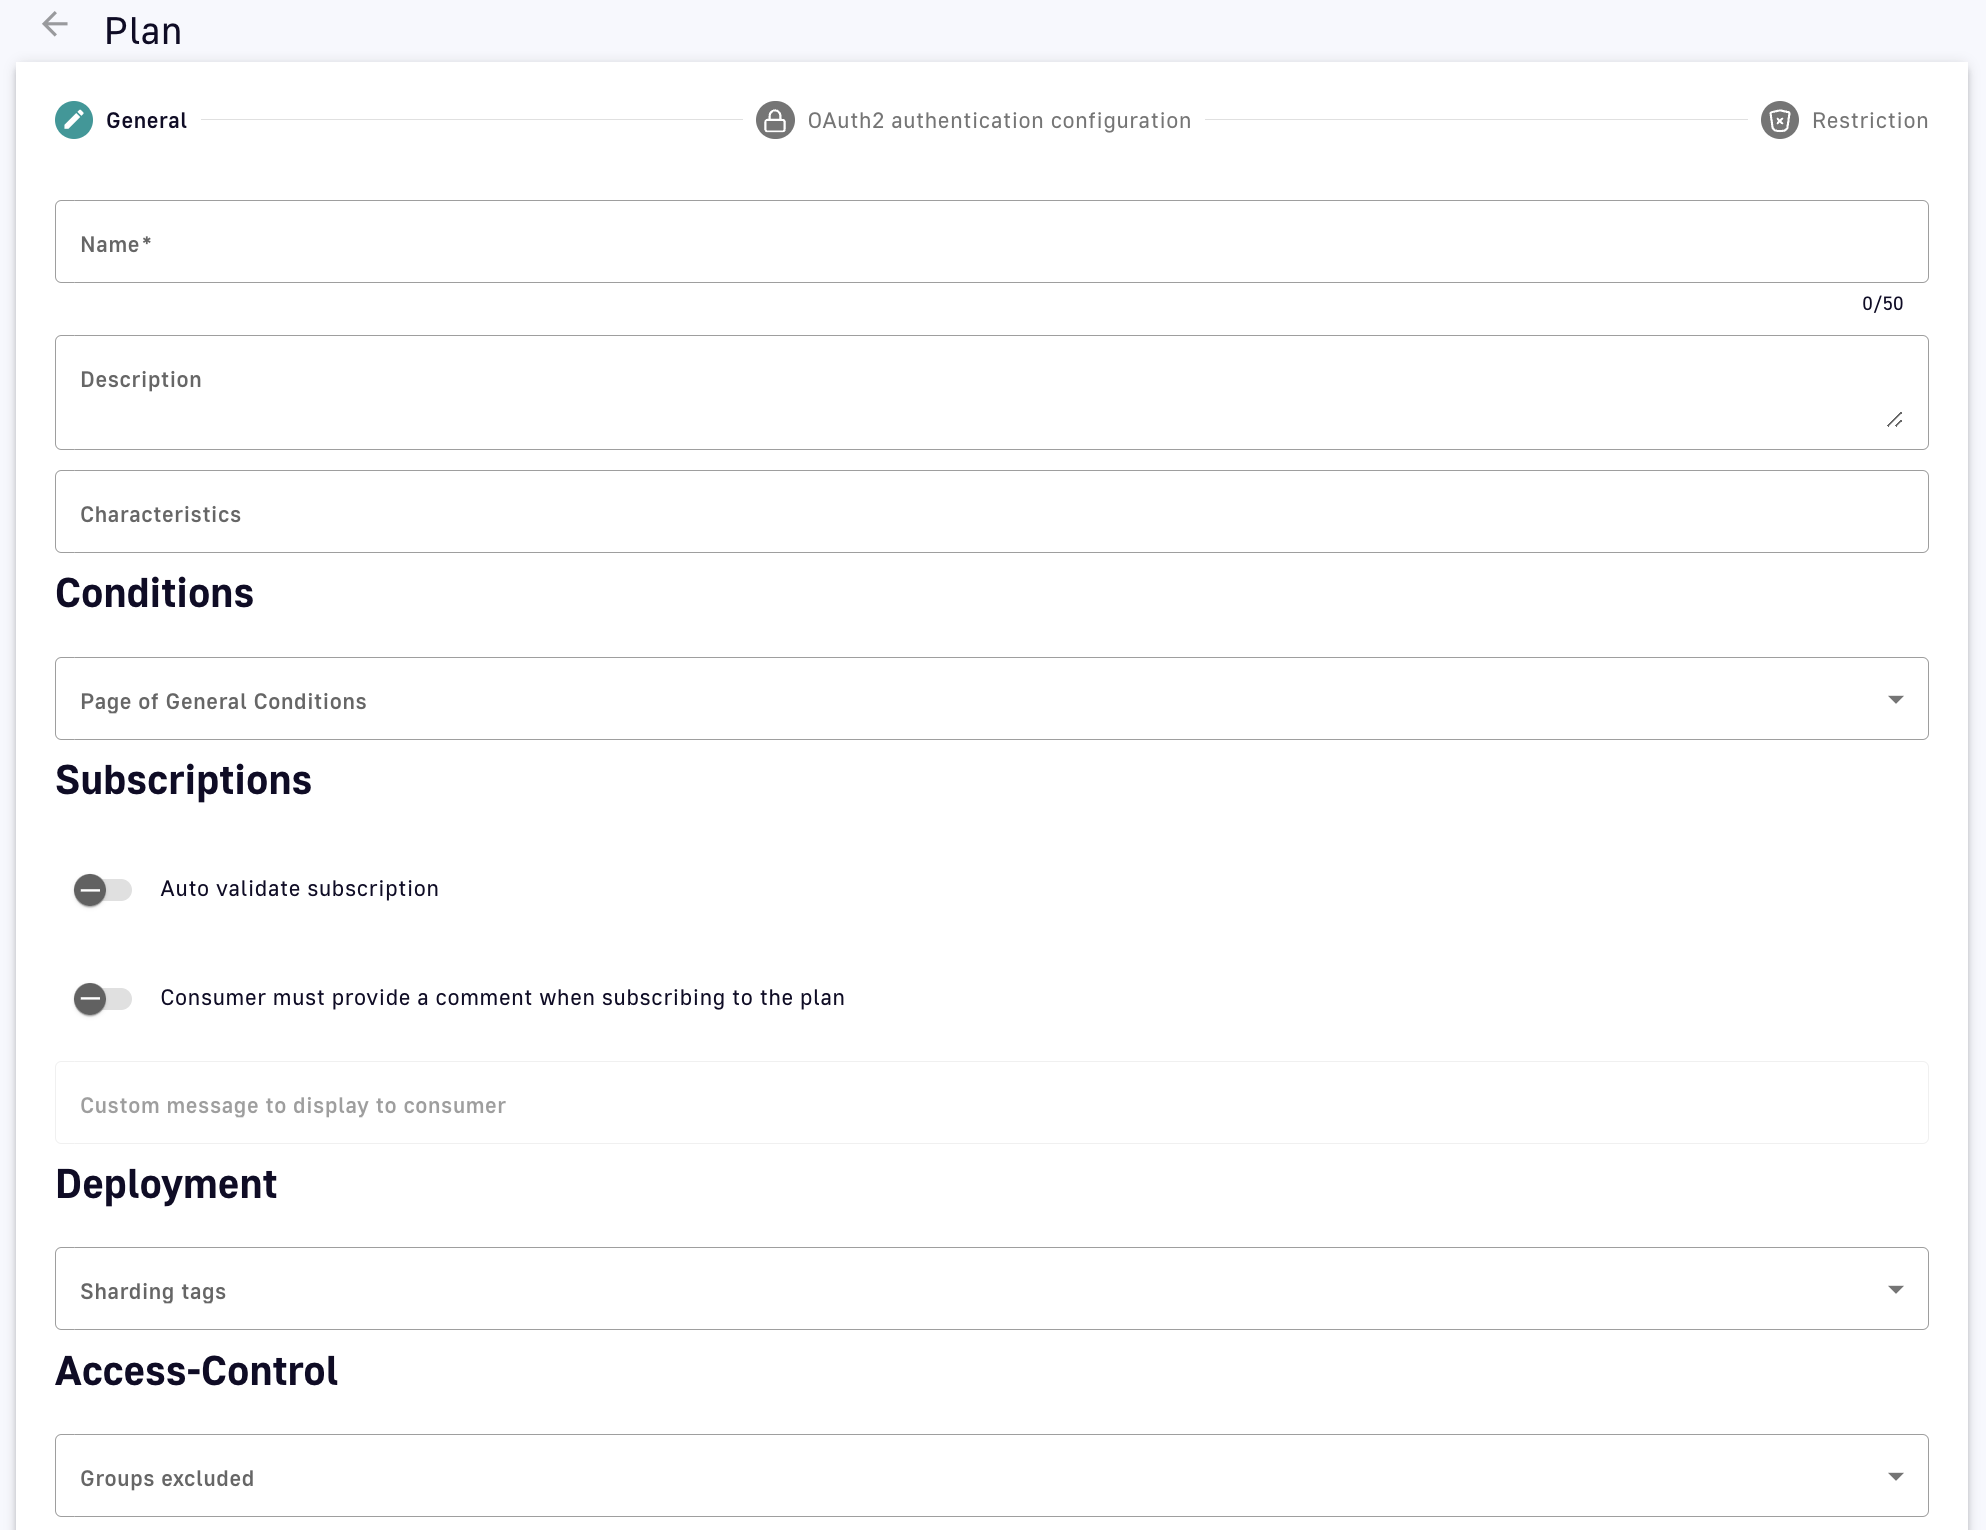
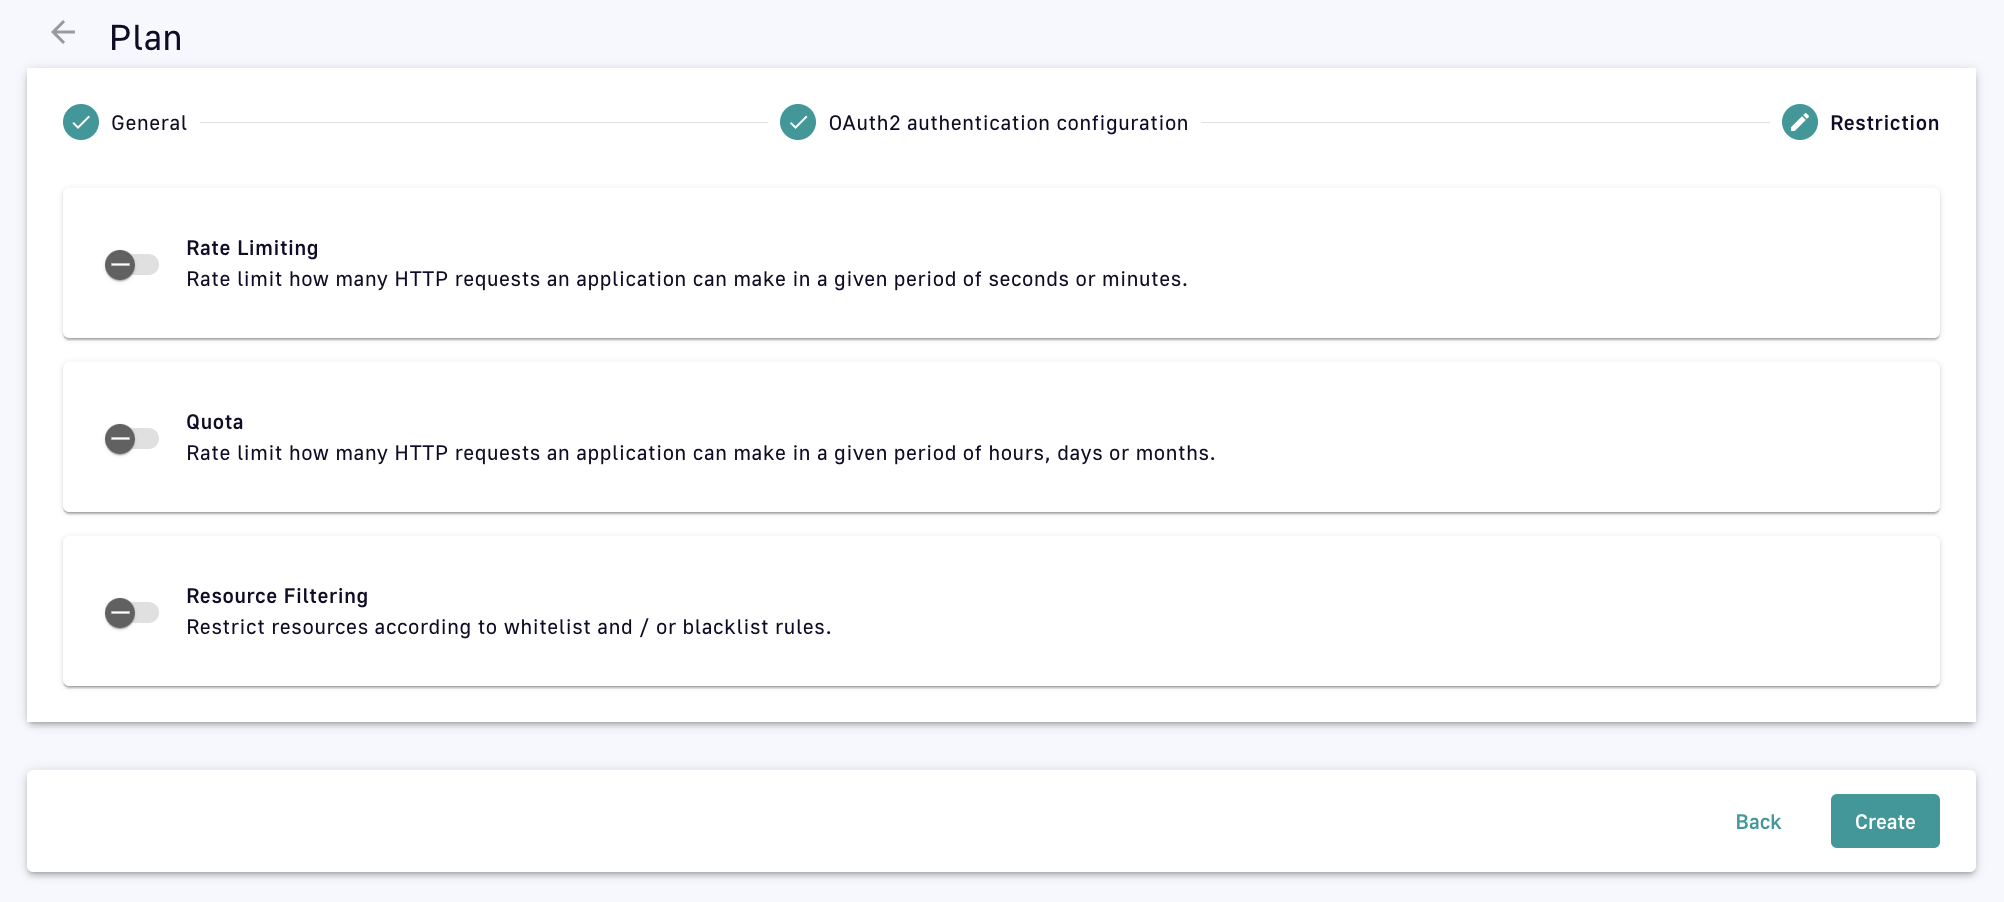
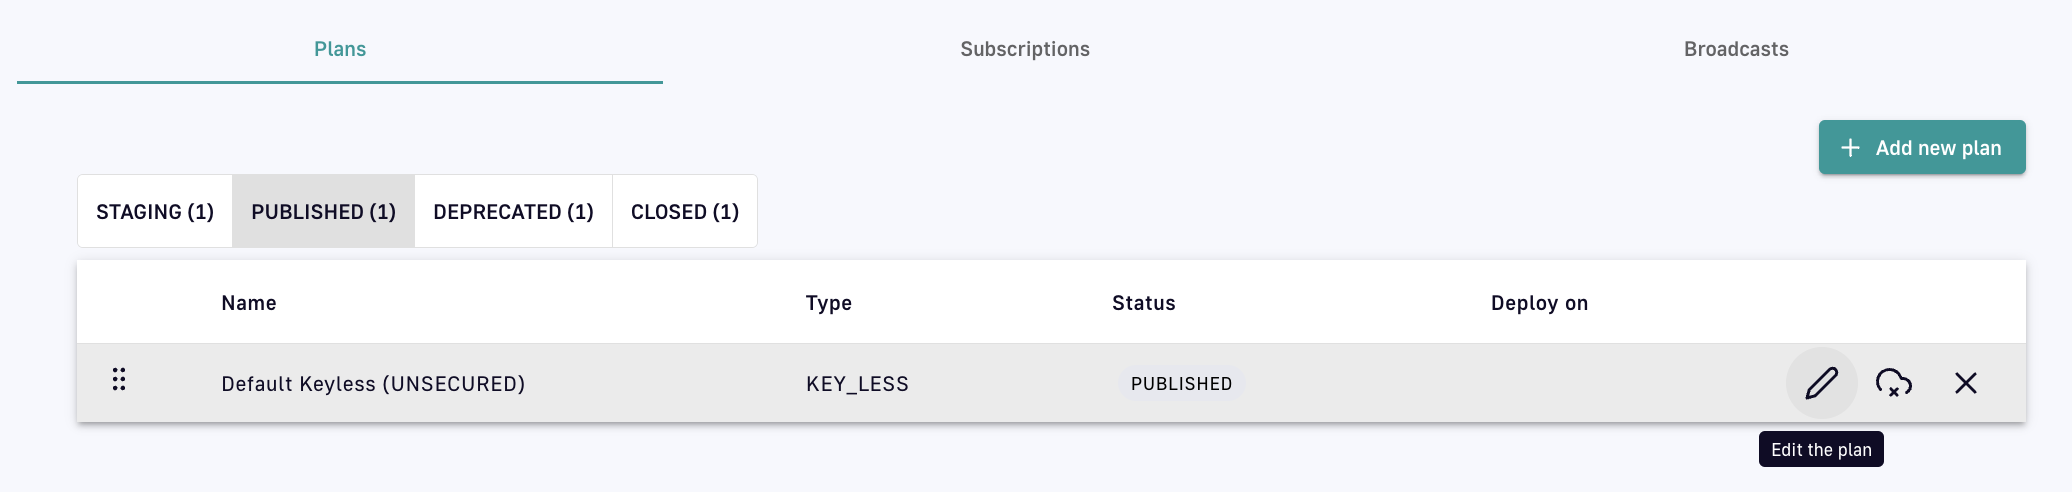
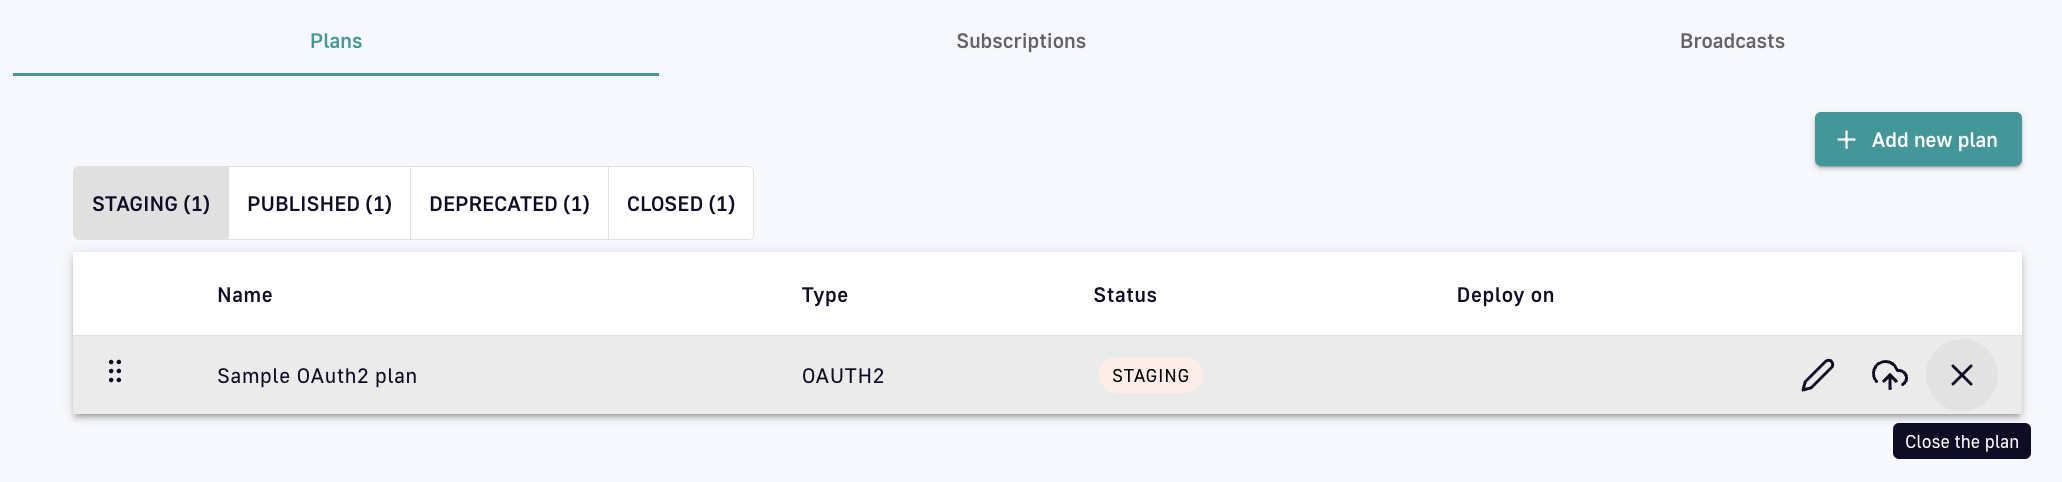
To expose your API to internal or external consumers, it must have at least one plan. A plan provides a service and access layer on top of your API that specifies access limits, subscription validation modes, and other configurations to tailor it to an application. Example access scenarios APIM can manage with plans include: High-level plan diagram Each plan must include at least one security type by which subscribers can be authenticated. A security type is a policy integrated directly into a plan. Once a plan is created, the security type can not be changed. However, you can add additional security at the API or plan level with policies. The sections below describe: To create a plan: Log in to your APIM Console Select APIs from the left nav Select your API Select Consumers from the inner left nav Under the Plans header tab, click + Add new plan and select your plan security type: Add a new plan Configure the general plan settings: Configure general plan settings Click Next Define the security configuration details appropriate to and required by your selected security type, e.g., OAuth2. OAuth2 configuration Select any plan restrictions: Select plan restrictions Click Create A plan can exist in one of four stages: STAGING, PUBLISHED, DEPRECATED, and CLOSED: Depending on the stage it's in, a plan can be edited, published, deprecated, or closed via the icons associated with it:
To edit a plan, click on the pencil icon: Edit a plan
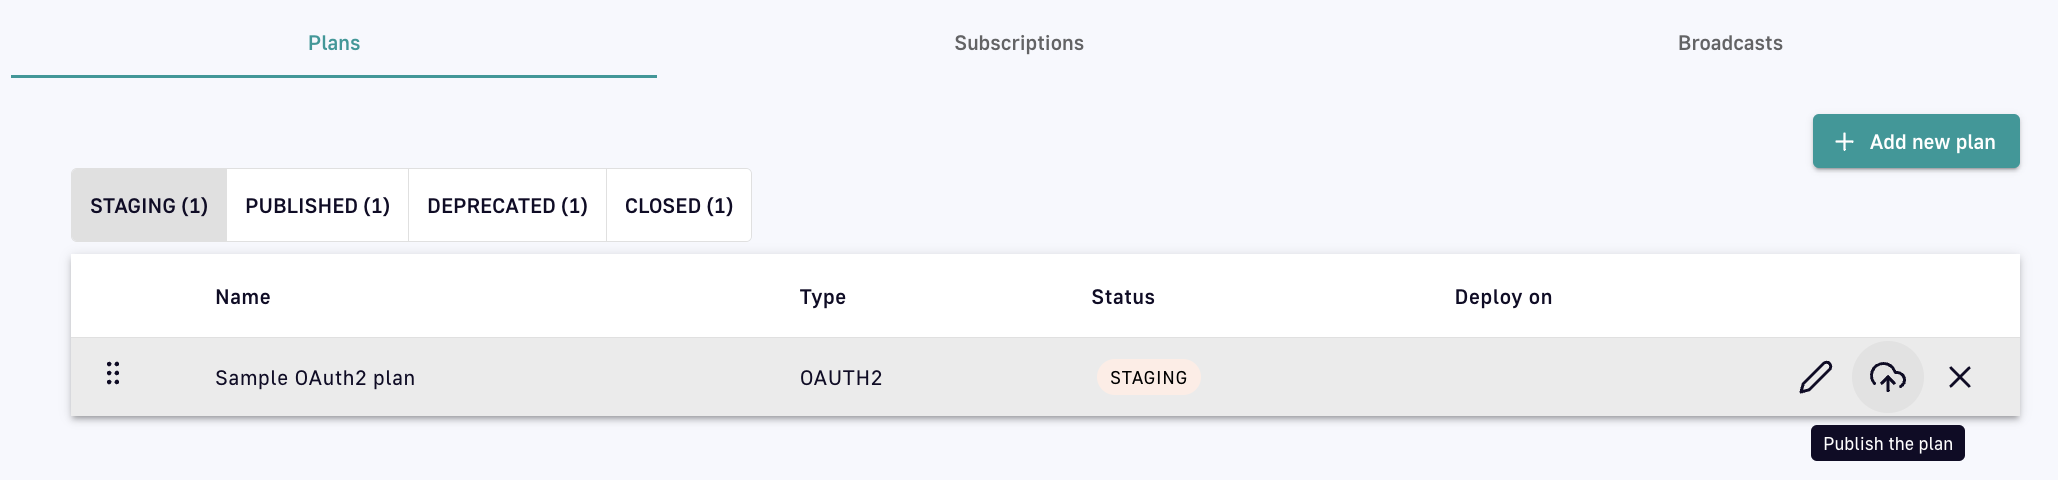
To publish a plan, click on the icon of a cloud with an arrow: Publish a plan Once a plan has been published, it must be redeployed.
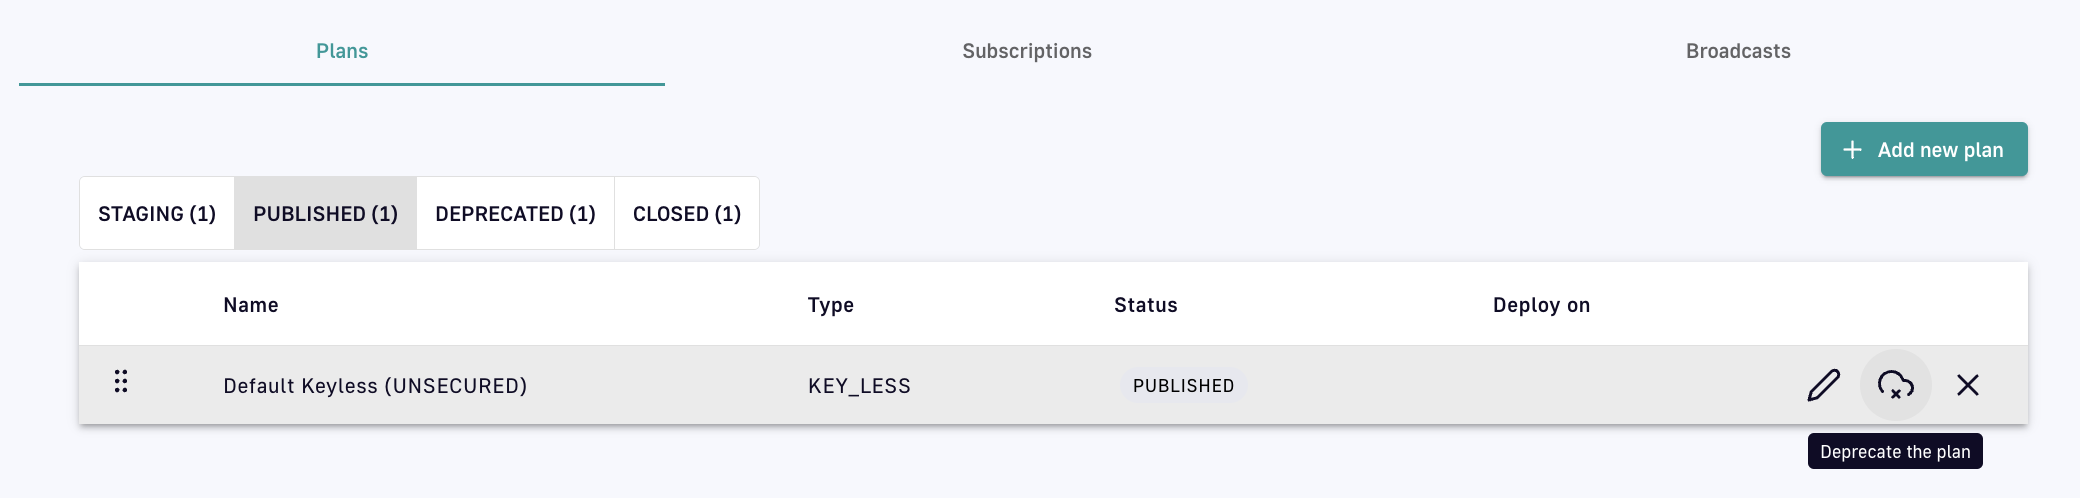
To deprecate a plan, click on the icon of a cloud with an 'x': Deprecate a plan
To close a plan, click on the 'x' icon: Close a plan APIM automatically routes each API request to the correct plan. The plan selection workflow parses all published plans in the following order: JWT, OAuth2, API Key, Keyless.
This workflow only applies to v4 APIs and v2 APIs in emulation mode.
Applying Plans to you APIs
Introduction
Create a plan
Plan stages
Plan selection rules
The parsing rules for each plan type are detailed below:
- Retrieve JWT from the
Authorizationheader or query parameters - Ignore an empty
Authorizationheader or any type other than Bearer - An empty Bearer token is considered invalid
- Retrieve OAuth2 from the
Authorizationheader or query parameters - Ignore an empty
Authorizationheader or any type other than Bearer - An empty Bearer token is considered invalid
- Retrieve the API key from the request header or query parameters (default header:
X-DSAPI-Api-Key; default query parameter:api-key) - An empty Bearer token is considered invalid
- Will ignore any type of security (API key, Bearer token, etc.)
- If another plan has detected a security token, valid or invalid, all flows assigned to the Keyless plan will be ignored
- If an API has multiple plans of different types and the incoming request contains a token or an API key that does not match any of the existing plans, then the Keyless plan will not be activated and the user will receive a generic
401response without any details
- If an API has multiple plans of different types and the incoming request contains a token or an API key that does not match any of the existing plans, then the Keyless plan will not be activated and the user will receive a generic
The parsed plan is selected for execution if all the following conditions are met:
- The request contains a token corresponding to the plan type (e.g., an
X-DSAPI-Api-Keyheader for an API Key plan) - The plan condition rule is valid or not set
- There is an active subscription matching the incoming request
mTLS
You can apply mTLS plans to only v4 APIs
The mTLS authentication type enforces the use of a client certificate to connect to an API. For more information about mTLS, see the following articles:
mTLS plans overview
The mTLS authentication type enforces the use of a client certificate to connect to an API. The client certificate is added to an application, and then a subscription is created for that application. At runtime, the gateway checks that an incoming request contains a client certificate matching one associated with an application that has an active subscription.
You can use the mTLS with or without TLS enabled between the client and the gateway. The gateway server can require client authentication, which uses the truststore at the server level to determine which clients to trust. The mTLS plan checks the client certificate with the gateway-level TLS. The client certificate is either found in either of the following locations:
- The TLS session between the client and the gateway
- In a pre-specified header in plaintext, base64-encoded.
This can be done if a load balancer is placed in front of the gateway that terminates TLS. For more information about the configuration, See configuration.
Limitations
mTLS plans have the following limitations:
- You can apply mTLS plans to only v4 APIs.
- You cannot use mTLS plans in DSAPI Cloud.
- Only one client certificate can be added per application. This means that to rotate certificates for an application, you need to pause the application’s subscriptions or schedule a maintenance window to avoid traffic for that API.
- Applications do not provide a warning that certificates are going to expire.
Adding a Client Certificate to an Application
To subscribe to an mTLS plan, the client must add a certificate to their application. To add a certification to an application, complete the following steps:
- In the console, navigate to Applications, and then click a specific application.
- For that application, click the setting the Tls Configuration. The client certificate is pasted in base64-encoded format.

Screenshot showing Tls configuration
Multiple applications in the same APIM instance must not share client certificates. You cannot save an application’s configuration if the added client certificate is already present for another application.
When you add a client certificate to an application, the gateway adds this application to its truststore. At runtime, the gateway checks whether the truststore has a certificate that matches an application with a valid subscription for the API.
Calling an API with mTLS
Before you begin
- You must have the client certificate
- You must have the private key
Procedure
- To call an API with mTLS, use the following command:
$ curl –-cert <client.cer> --key <client.key> https://my-gateway.com/mtls-api
- Replace <client.cer> and <client.key> with the name of the files where you have stored your client certificate and the file where you have stored the client key.
Also, this requires that your client trusts the certificate sent by the gateway.
Terminating TLS in front of the Gateway
From DSAPI APIM 4.5 onwards, when the certificates have been processed by NGINX, API Management only supports extracting client certificates from headers in plaintext.
To run a load balancer in front of the gateway like NGINX, and then terminate TLS at the load balancer. The load balancer forwards traffic to the gateway in plaintext. To use the mTLS plan in this situation, you can set a gateway configuration. For example:
http:
      # ...
      ssl:
        clientAuthHeader:
          name: X-DSAPI-Client-Cert
When executing an mTLS plan, the gateway checks if TLS is enabled. If it is enabled, the gateway uses the certificate from the TLS handshake , which occurs before plan selection. If TLS is not enabled, it checks for the certificate in the header. If the header contains a valid base64-encoded plaintext certificate matching a certificate for a subscribed application, the request will succeed.
Ensure that when you use this option that only trusted parties can set this header. If using a load balancer, it must be solely responsible for setting this header. In this setup, the gateway should only be directly accessible through the load balancer.
Types of plans
Plans provide a service and access layer on top of your API that specifies access limits, subscription validation modes, and other configurations to tailor it to an application. Here are the plans that you can apply to your APIs:
Keyless
Introduction
A Keyless (public) plan does not require authentication and allows public access to an API. By default, keyless plans offer no security and are most useful for quickly and easily exposing your API to external users.
Configuration
A Keyless plan does not require configuration other than general plan settings and restrictions.
Due to not requiring a subscription and the lack of a consumer identifier token, Keyless consumers are set as unknown application in the API analytics section.
You can configure basic authentication for Keyless plans by associating a Basic Authentication policy that uses either an LDAP or inline resource.
API Key
Introduction
The API key authentication type enforces verification of API keys during request processing, allowing only applications with approved API keys to access an API. This plan type ensures that API keys are valid, i.e., not revoked or expired, and are approved to consume the specific resources associated with the API.
Configuration
An API Key plan offers only basic security, acting more like a unique identifier than a security token.
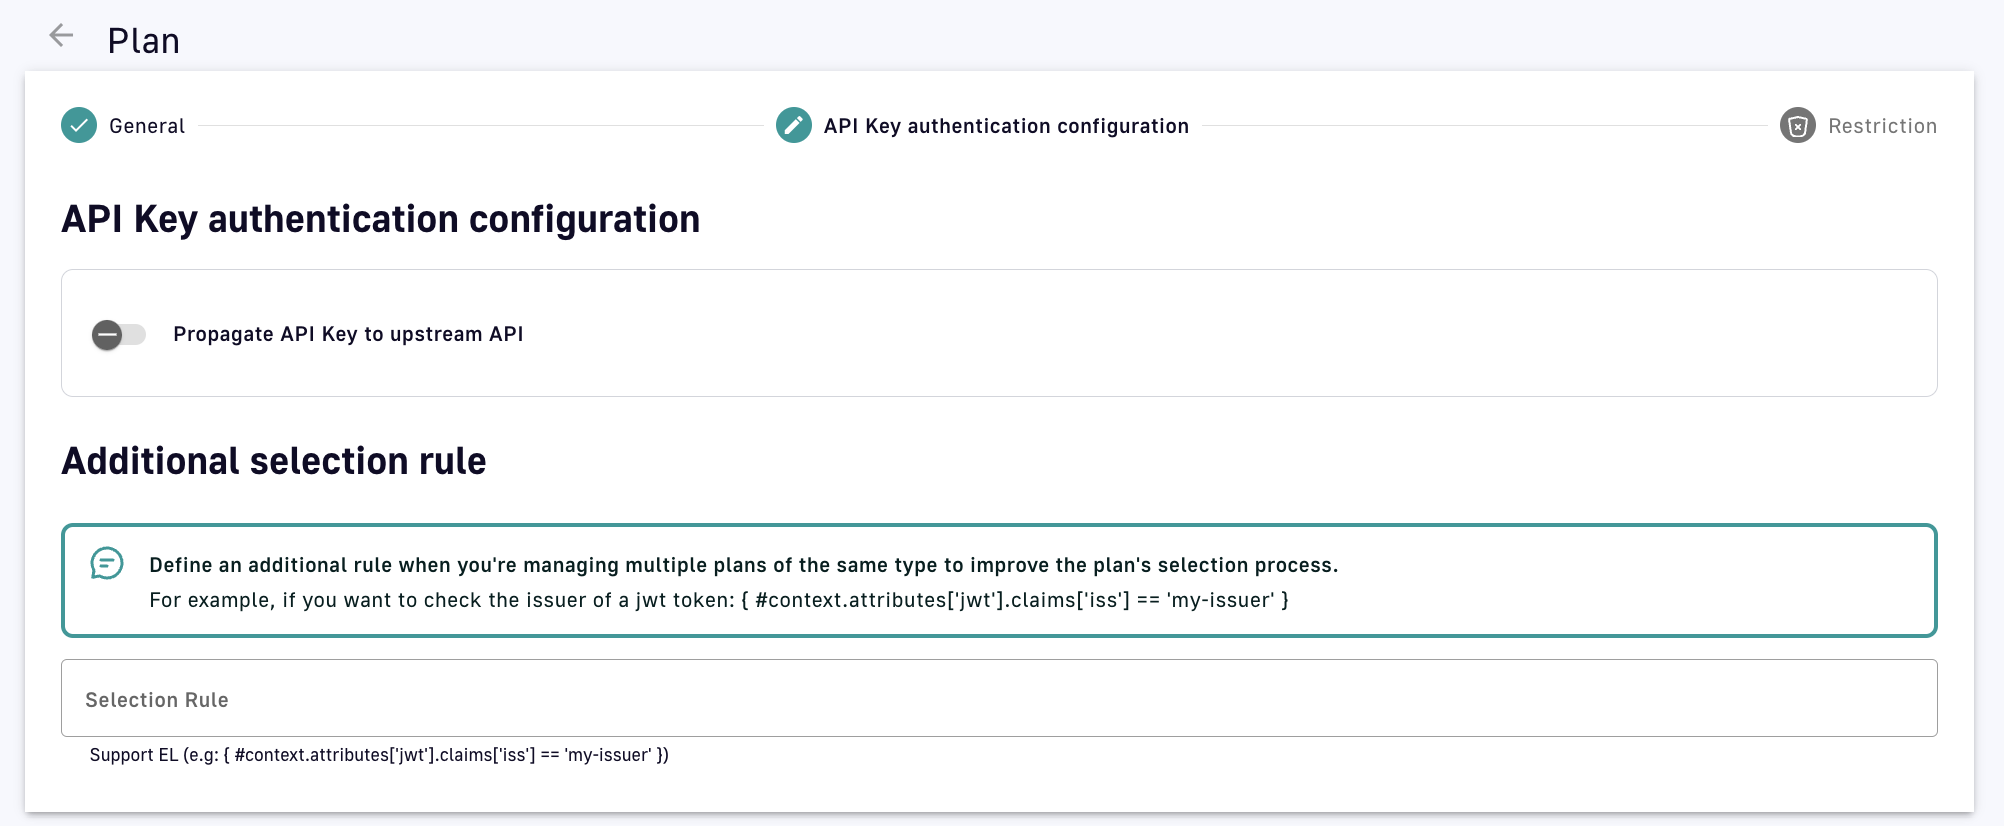
- Propagate API Key to upstream API: Toggle ON to ensure the request to the backend API includes the API key header sent by the API consumer. This is useful for backend APIs that already have integrated API key authentication.
- Additional selection rule: Allows you to use DSAPI Expression Language (EL) to filter plans of the same type by contextual data (request headers, tokens, attributes, etc.). For example, if there are multiple API key plans, you can set different selection rules on each plan to determine which plan handles each request.
API Key generation
By default, API keys are randomly generated for each subscription, but DSAPI also offers custom API key generation and shared API key generation. Both of these settings can be enabled at the environment level:
-
Log in to your APIM Console
-
Select Settings from the left nav
-
Select Settings from the inner left nav:
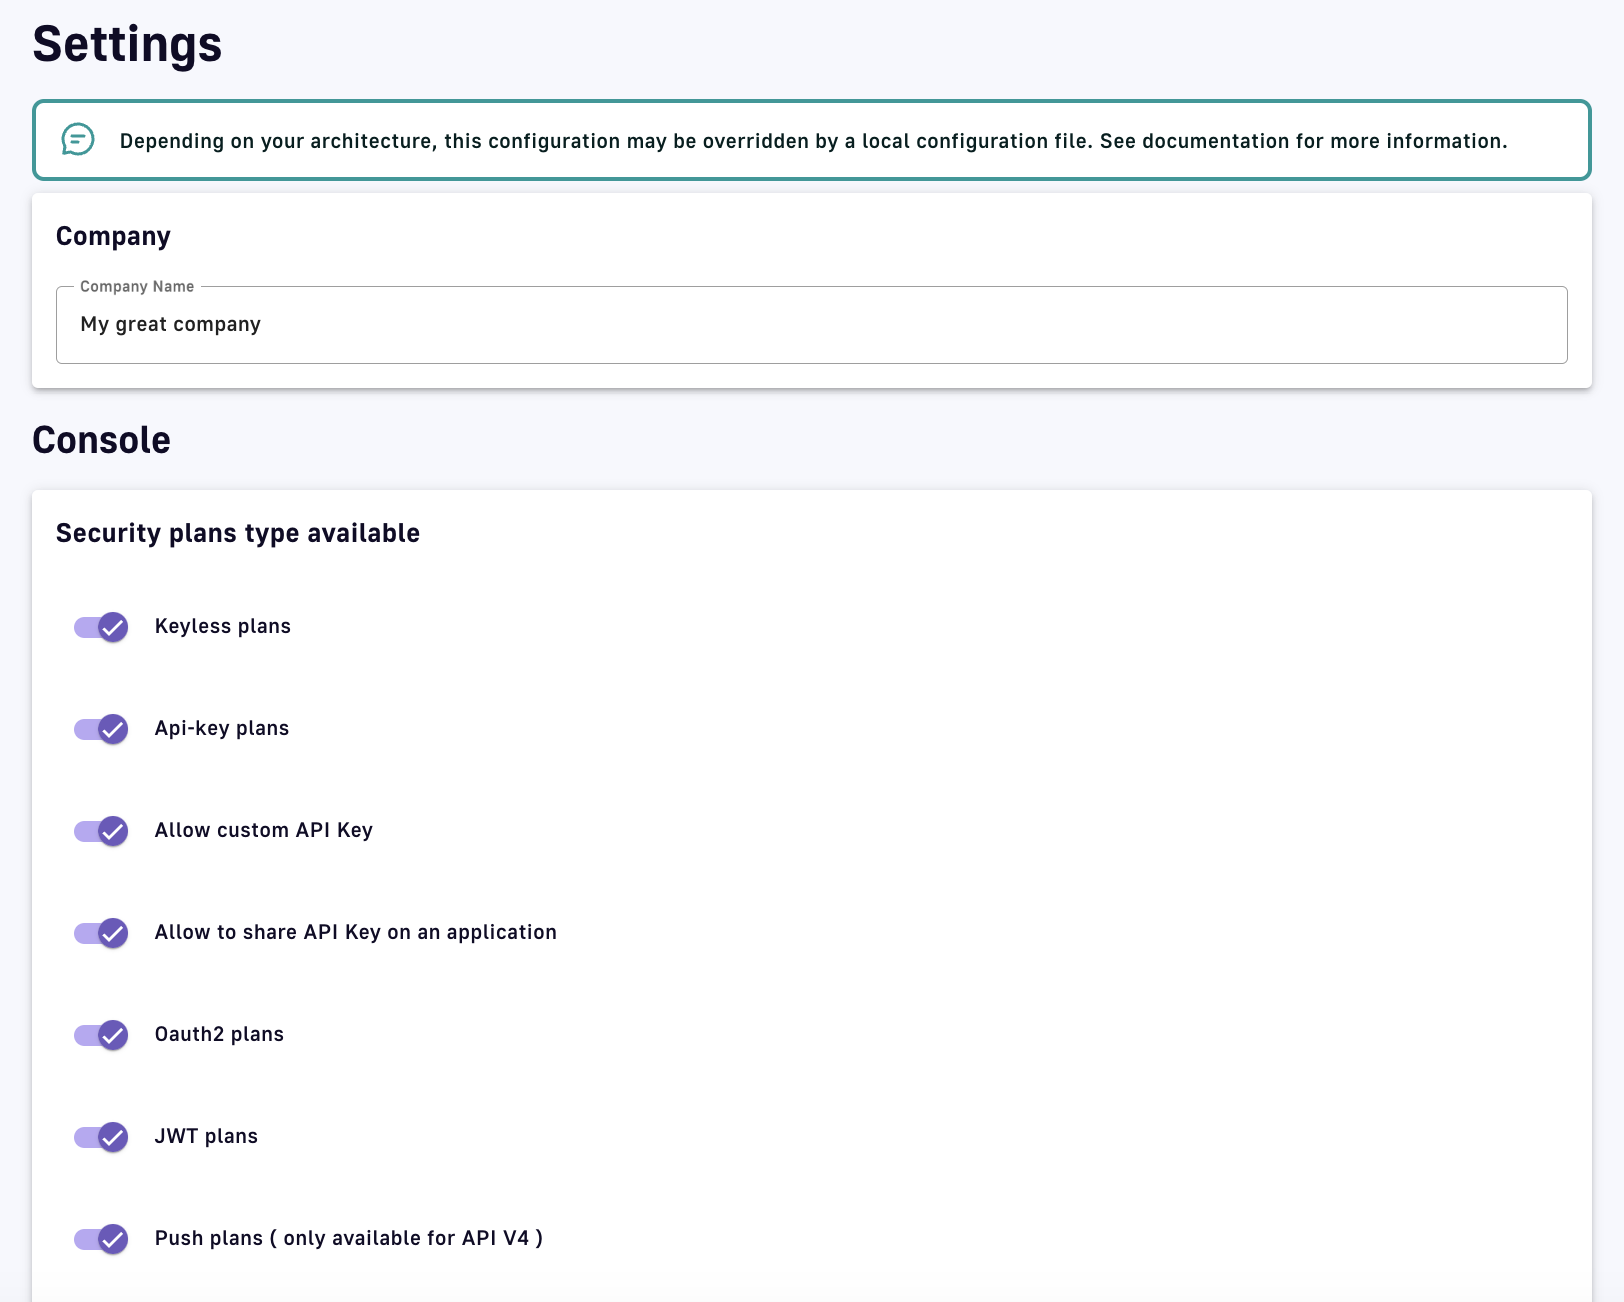
API key generation settings
Custom API key
You can specify a custom API key for an API Key plan. This is particularly useful when you want to silently migrate to APIM and have a pre-defined API key. When prompted, you can choose to provide your custom API key or let APIM generate one for you by leaving the field empty.
The custom API key must have between 8 and 64 characters and be URL-compliant. ^ # % @ \ / ; = ? | ~ ,and the 'space' character are invalid.
You can provide a custom API key when:
-
Creating a subscription
Manually create a subscription
-
Accepting a subscription
-
Renewing a subscription
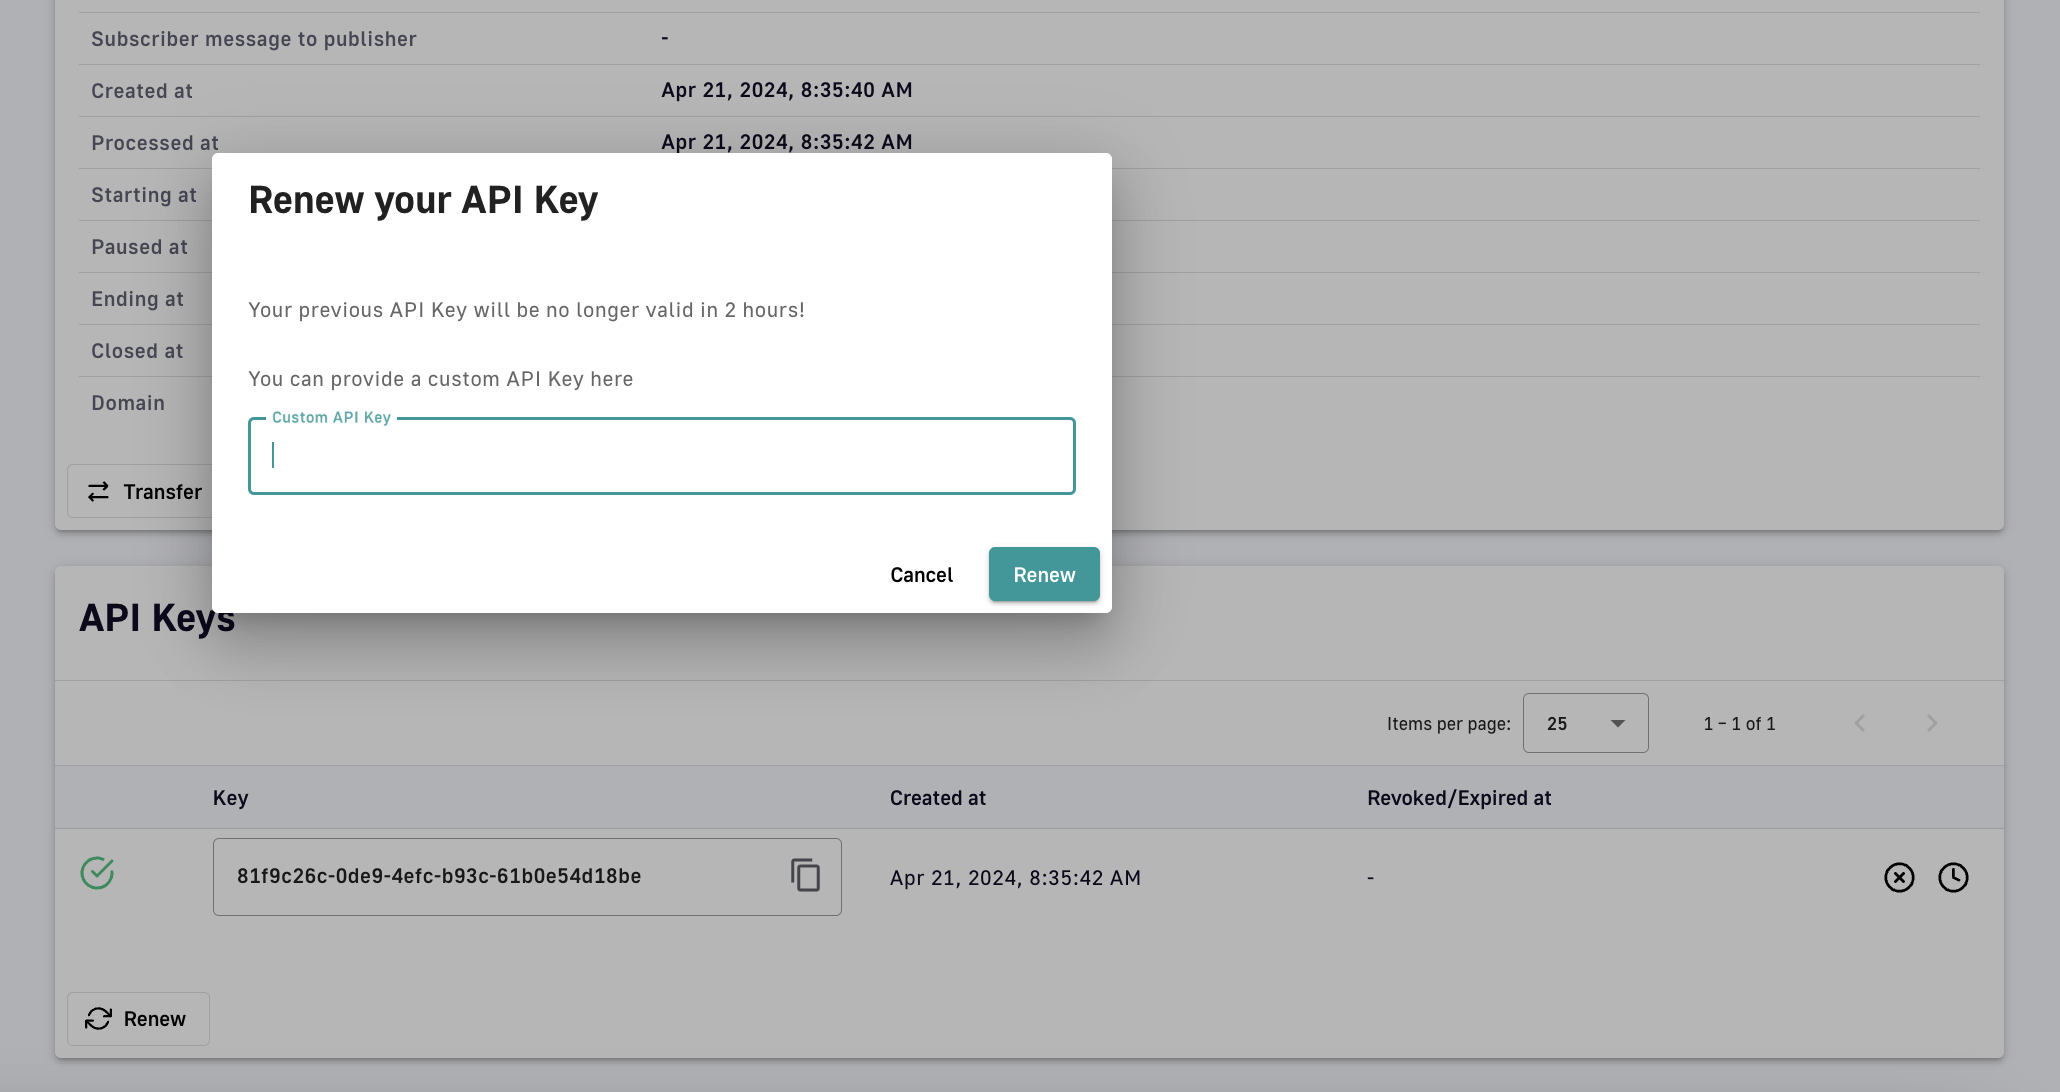
Renew a subscription
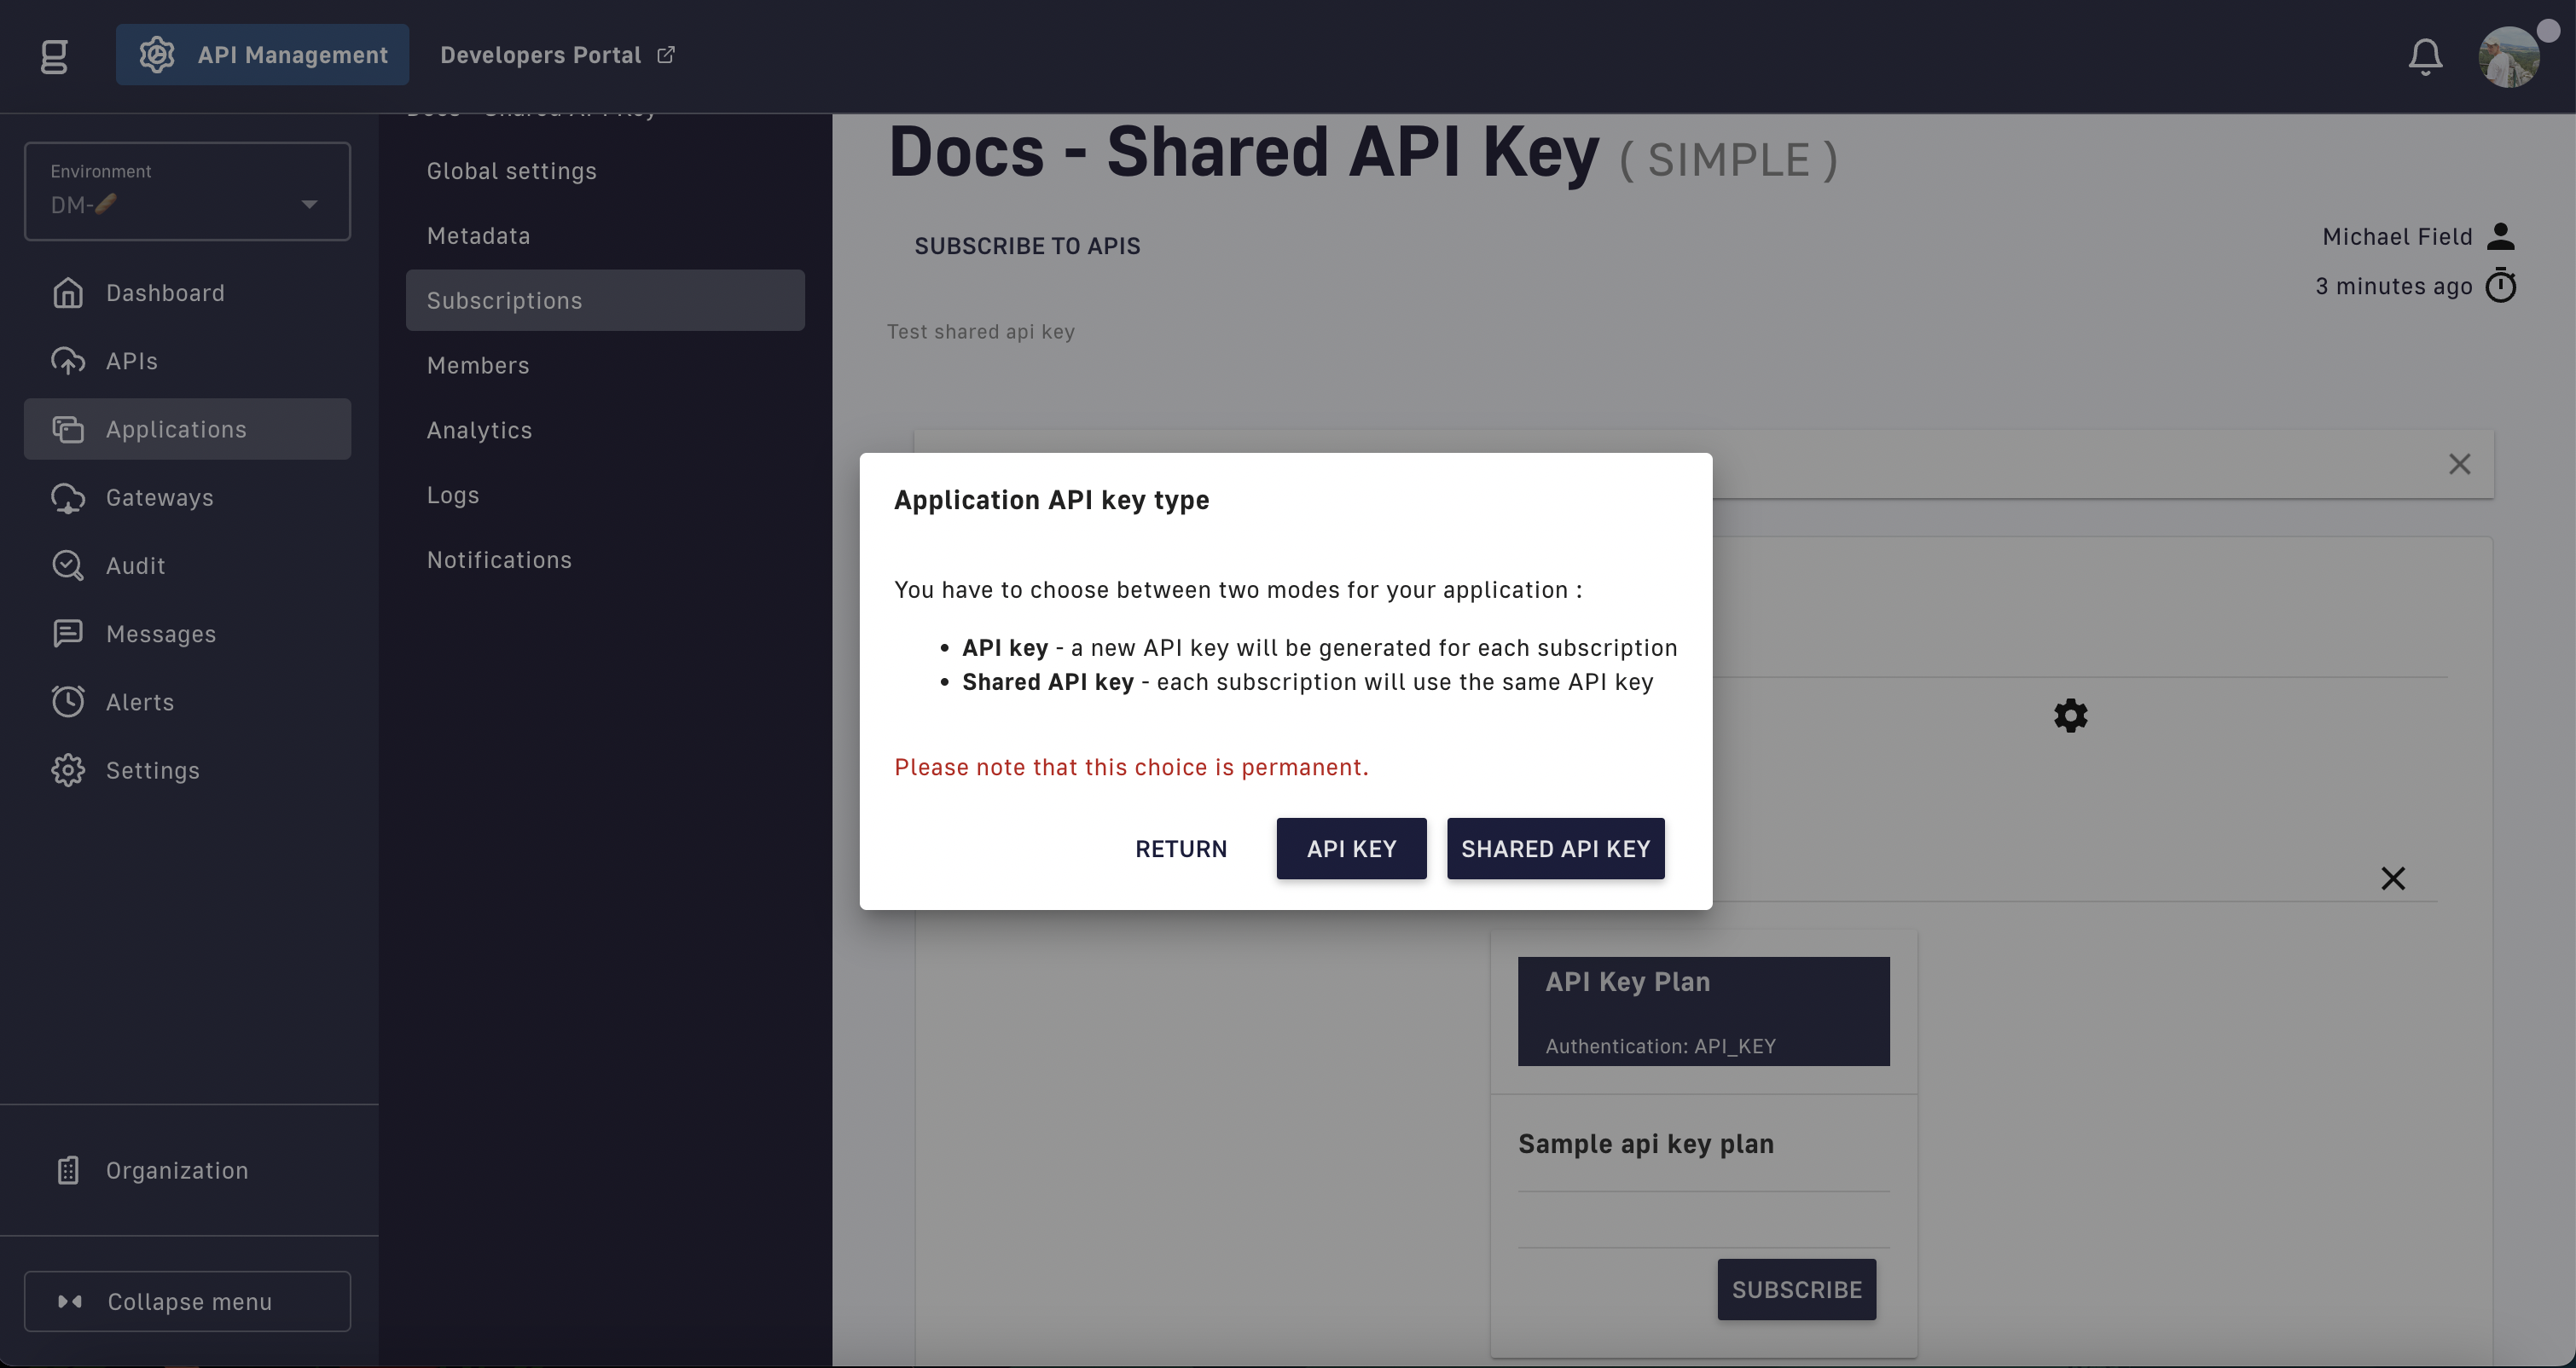
Shared API key
The shared API key mode allows consumers to reuse the same API key across all API subscriptions of an application. On their application's second subscription, the consumer is asked to choose between reusing their key across all subscriptions or generating one different API key for each subscription (default). This is known as the application API key type, which cannot be modified.
Shared API key limitations
API keys can only be shared across API Key plans that belong to distinct Gateway APIs. If you attempt to subscribe to two API Key plans on the same Gateway API, no prompt will be made to choose the application API key type and the default mode will be used automatically.
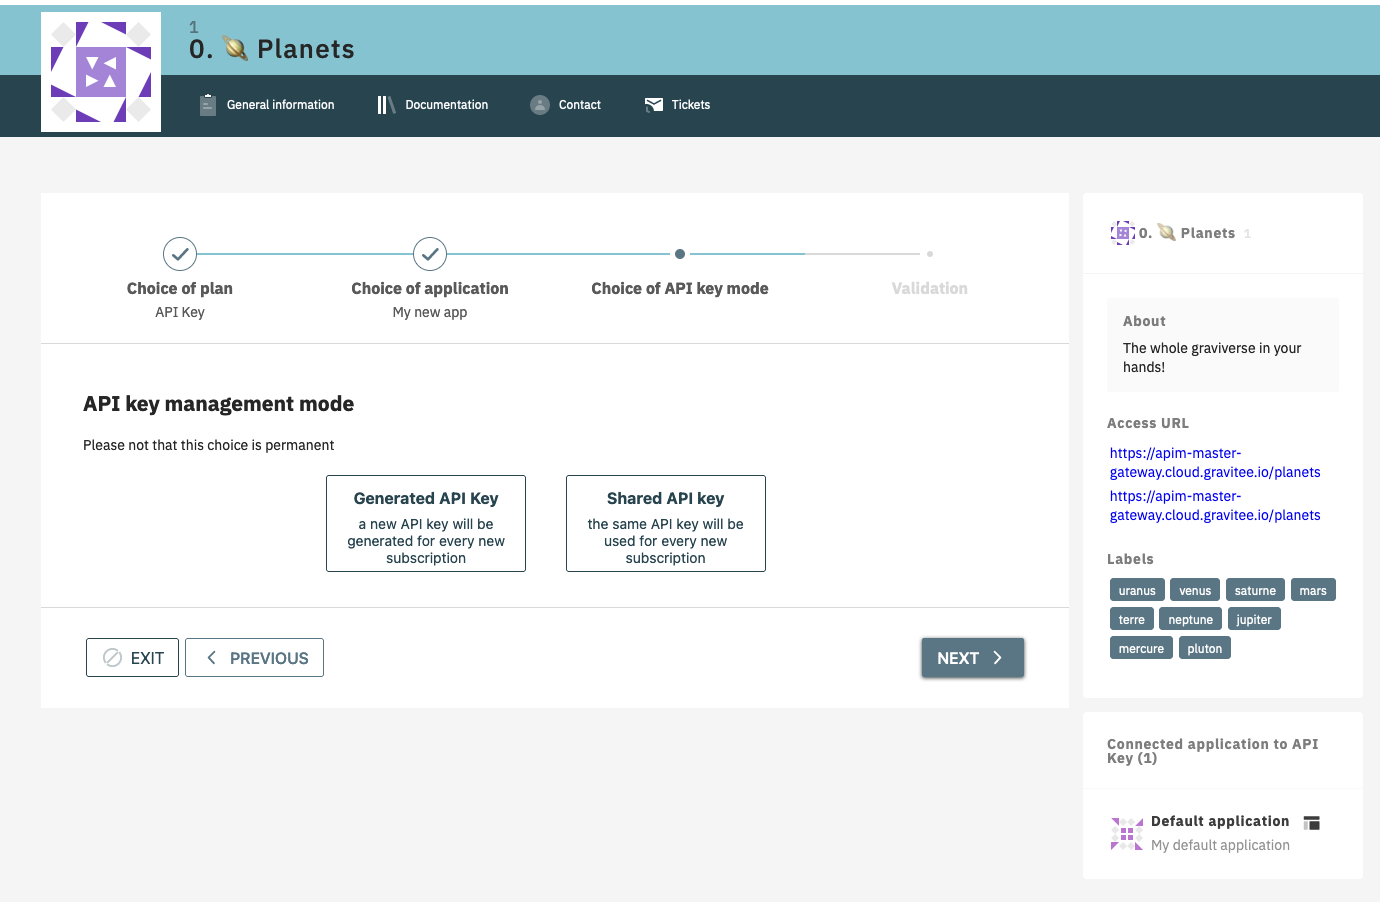
To select the API key type, the shared API key mode must be enabled before creating an application. To enable this option, create a new application and subscribe to two API Key plans.
If shared API key mode is disabled, applications that have already been configured to use a shared key will continue to do so, but consumers will no longer be asked to choose between modes on their second subscription.
Modifying shared API keys
A shared API key may be used to call APIs that are owned by other API publishers. Consequently:
-
Shared API keys cannot be edited from an API publisher's subscriptions
-
API publishers can read shared API keys, but cannot renew or revoke them
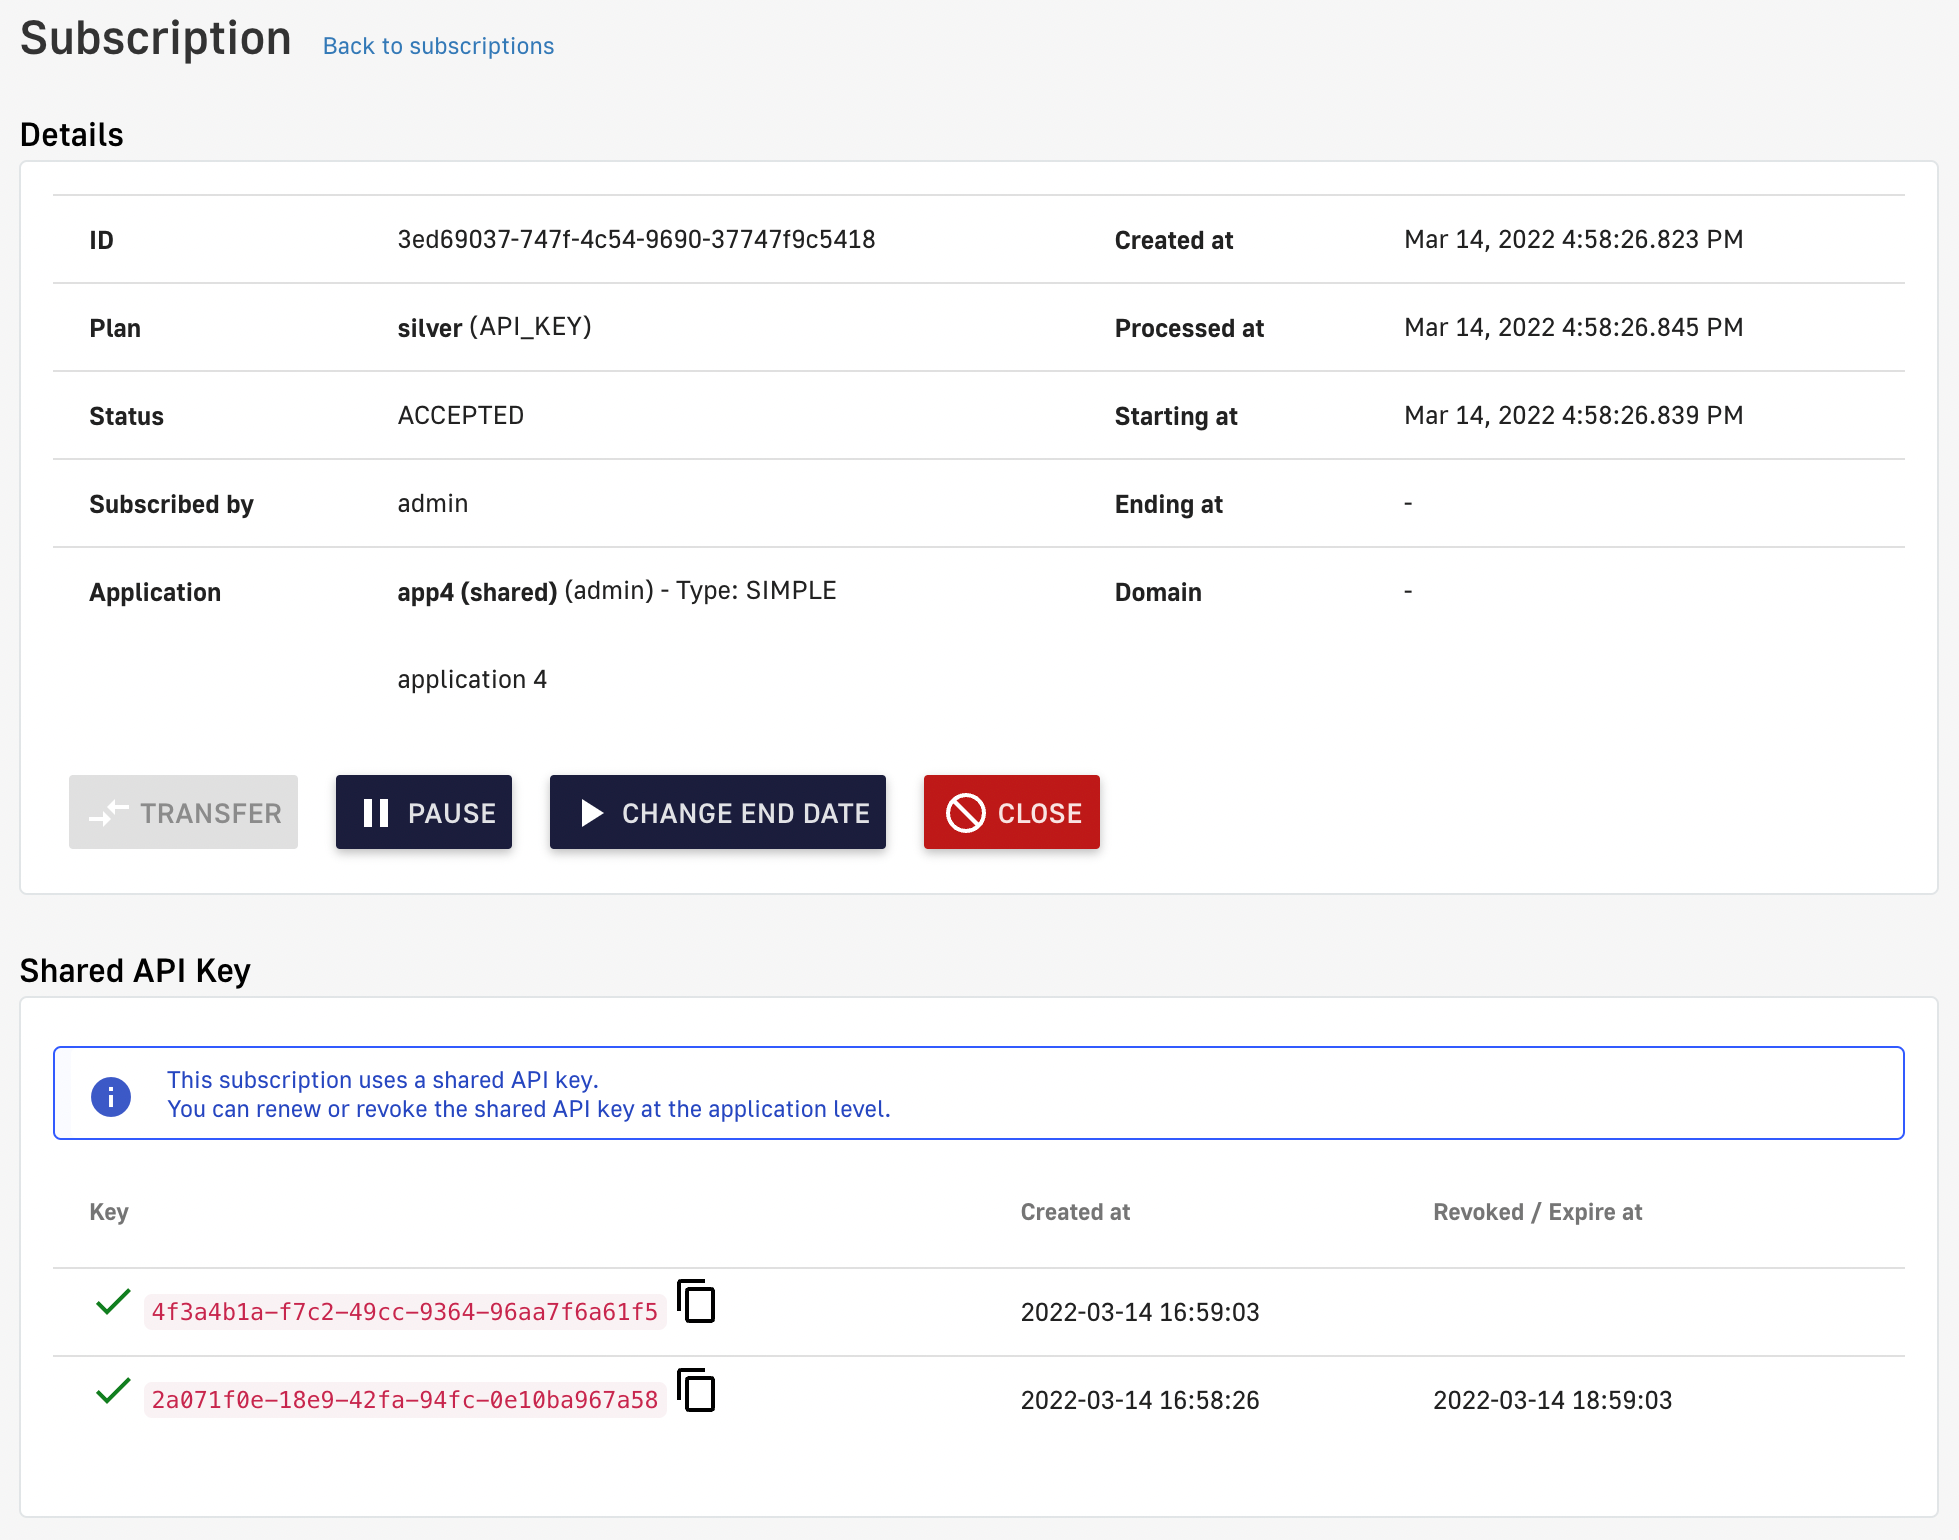
Shared API key administration limitations
-
Shared API keys can only be renewed/revoked by the application owner, from the subscription view of their APIM Console or Developer Portal
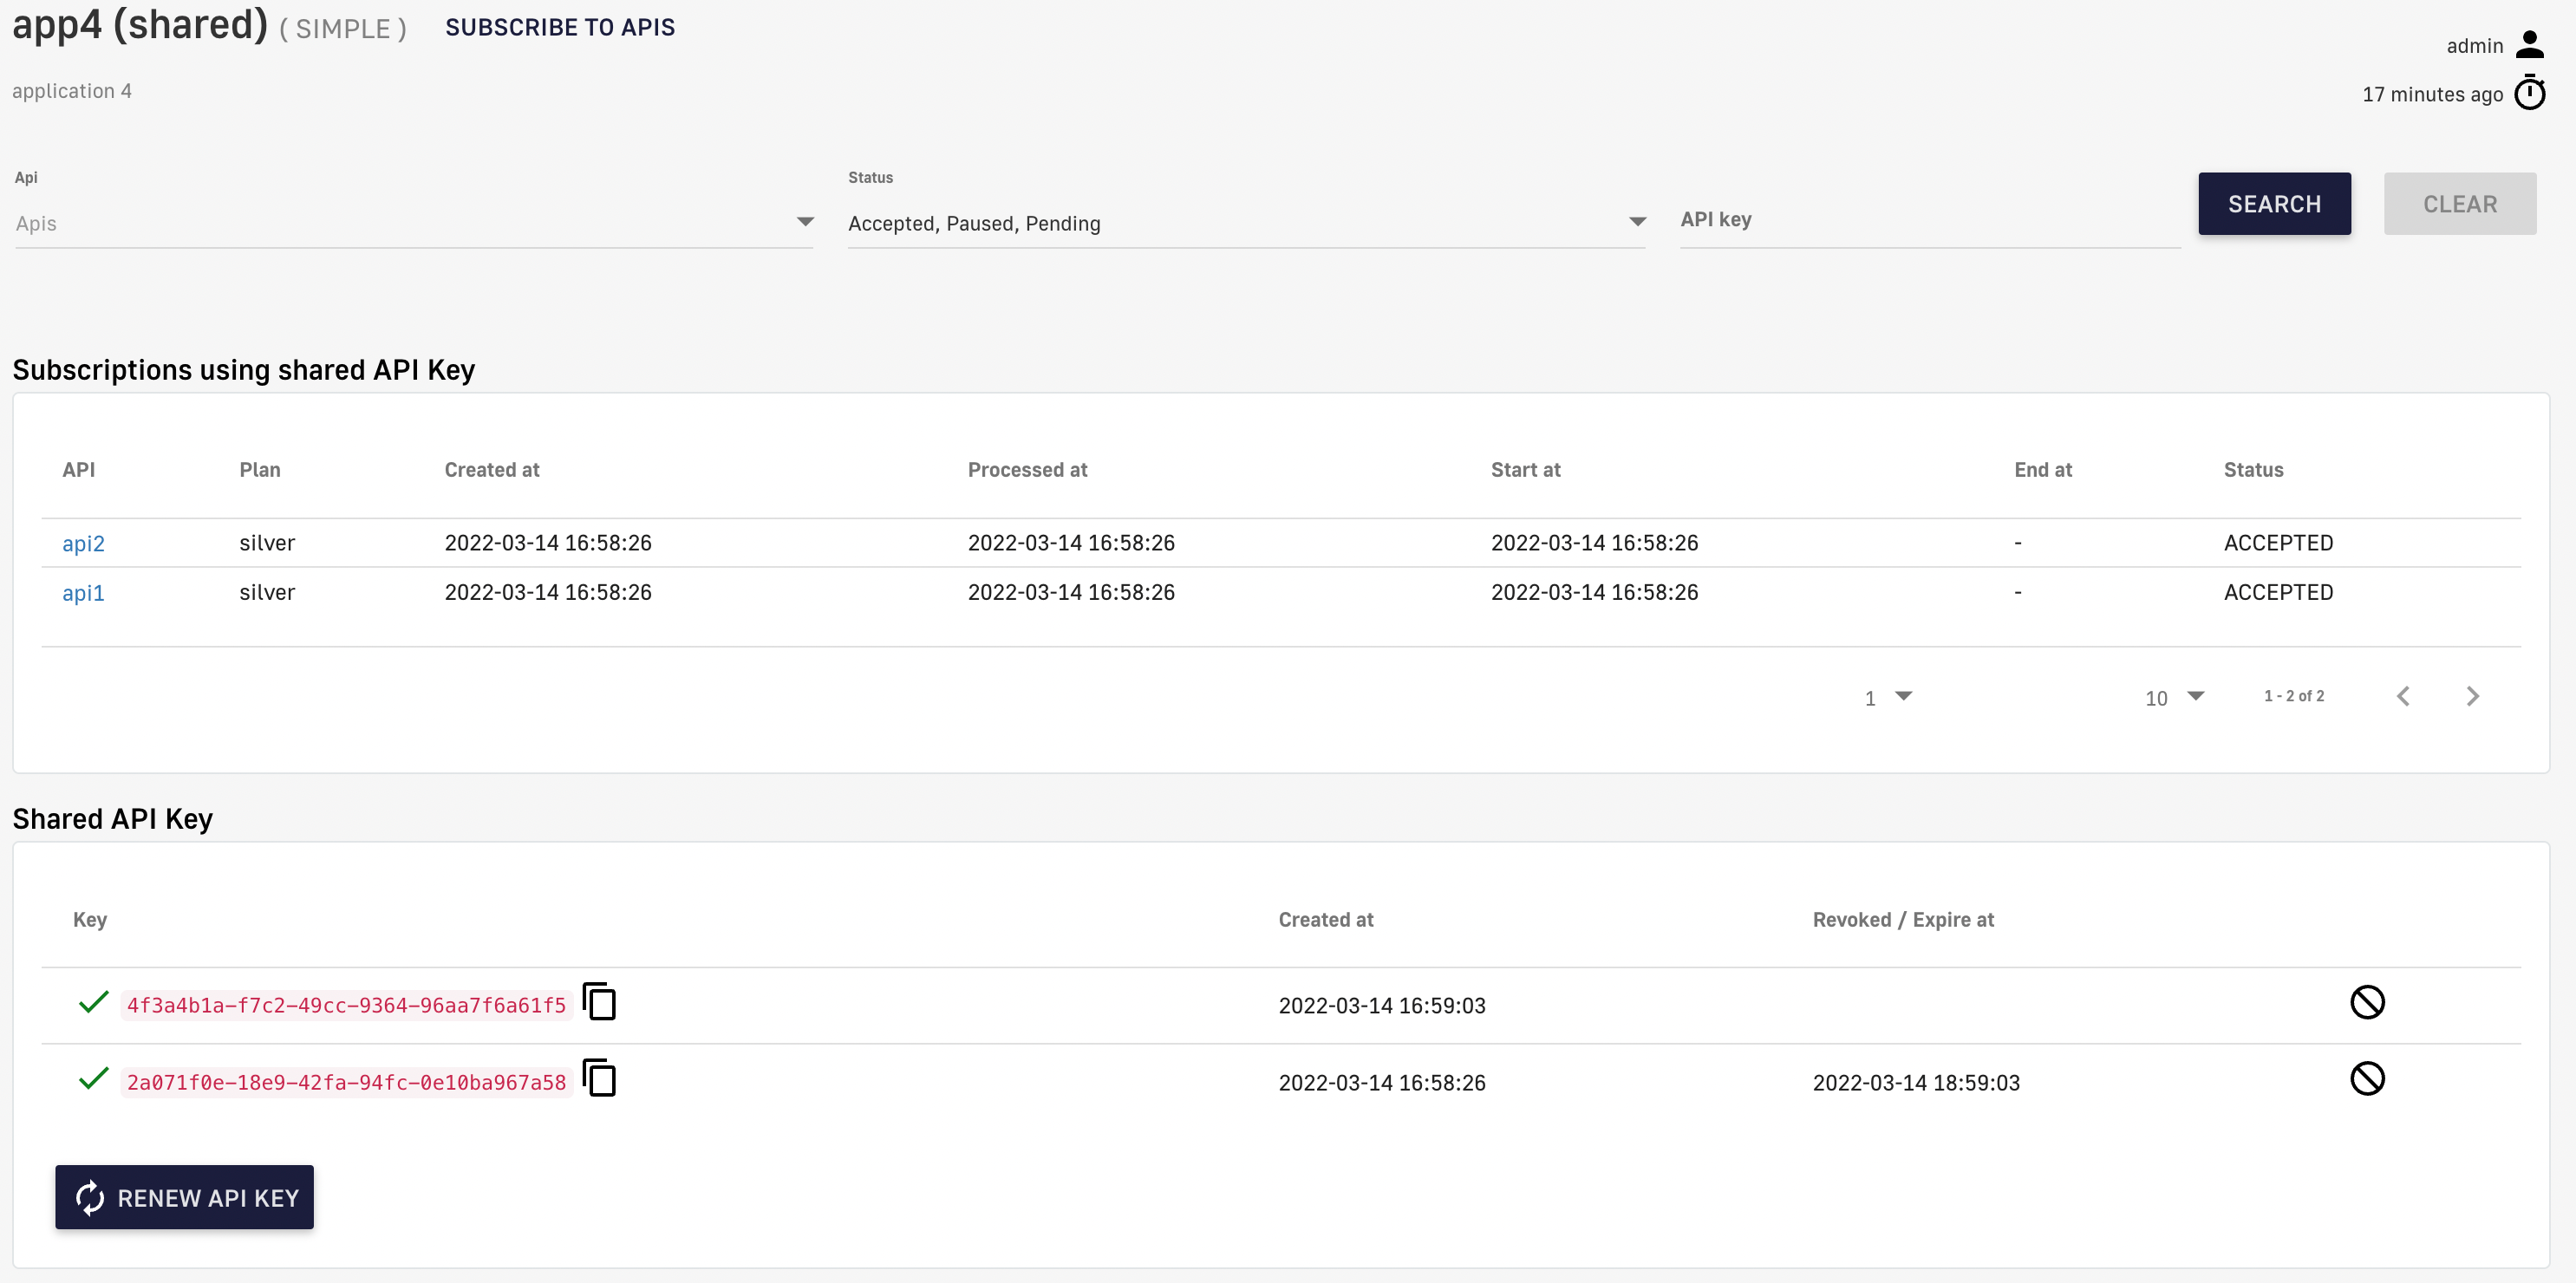
Manage shared API keys in APIM Console
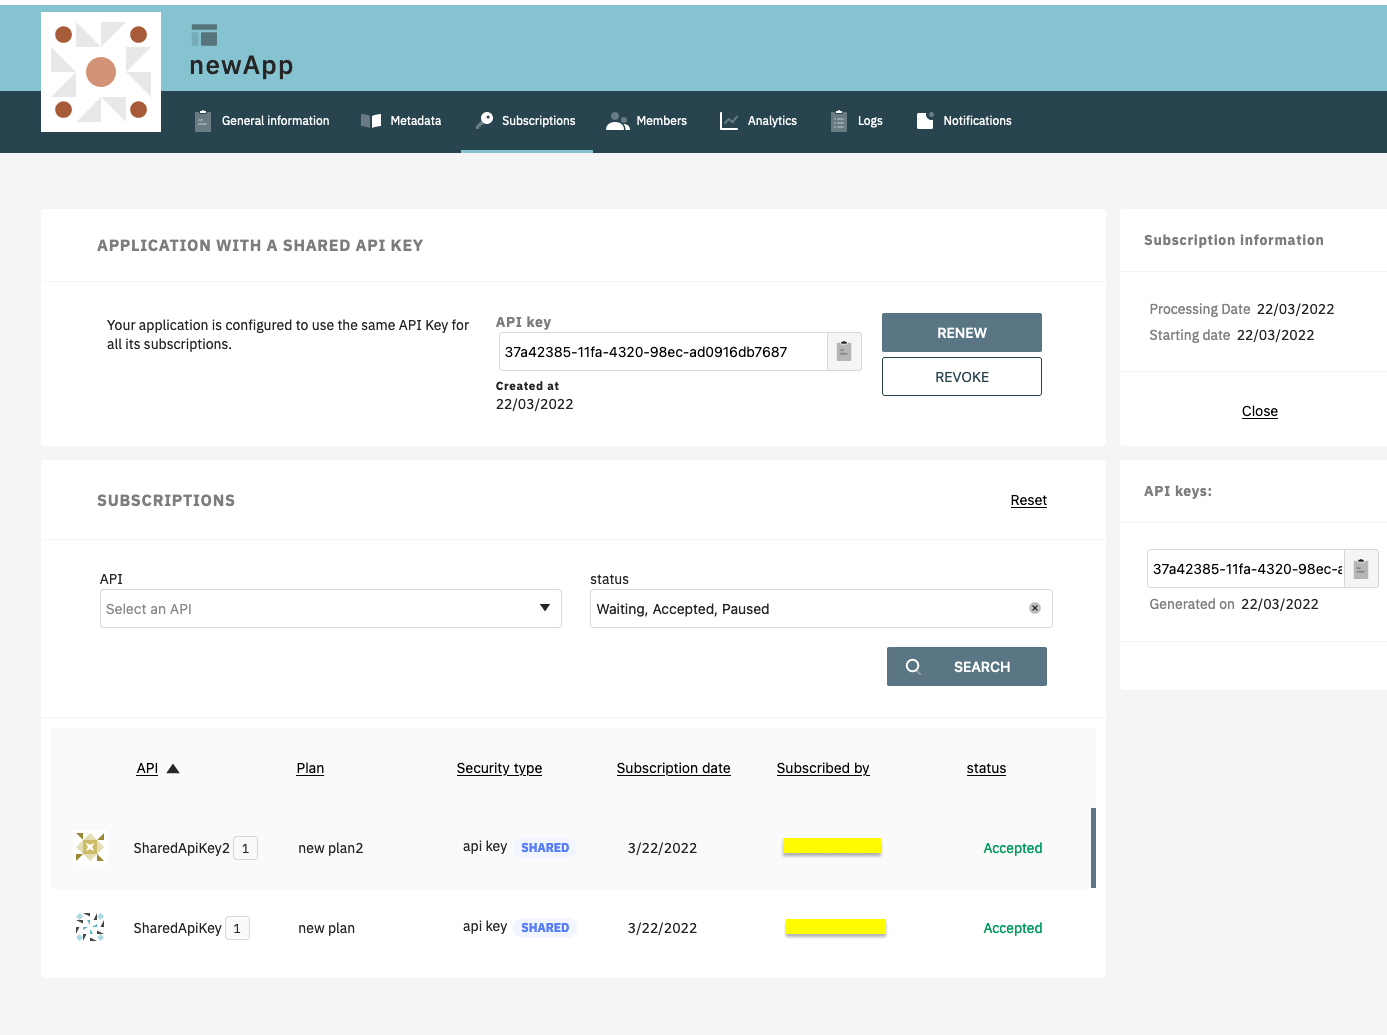
Manage shared API keys in the Developer Portal
OAuth2
Introduction
OAuth 2.0 is an open standard that applications can use to provide client applications with secure, delegated access. OAuth 2.0 works over HTTPS and authorizes devices, APIs, servers, and applications via access tokens instead of credentials.
The OAuth2 authentication type checks access token validity during request processing using token introspection. If the access token is valid, the request is allowed to proceed. If not, the process stops and rejects the request.
Configuration
To configure an OAuth2 plan, you must first create an OAuth2 client resource that represents your OAuth 2.0 authorization server.
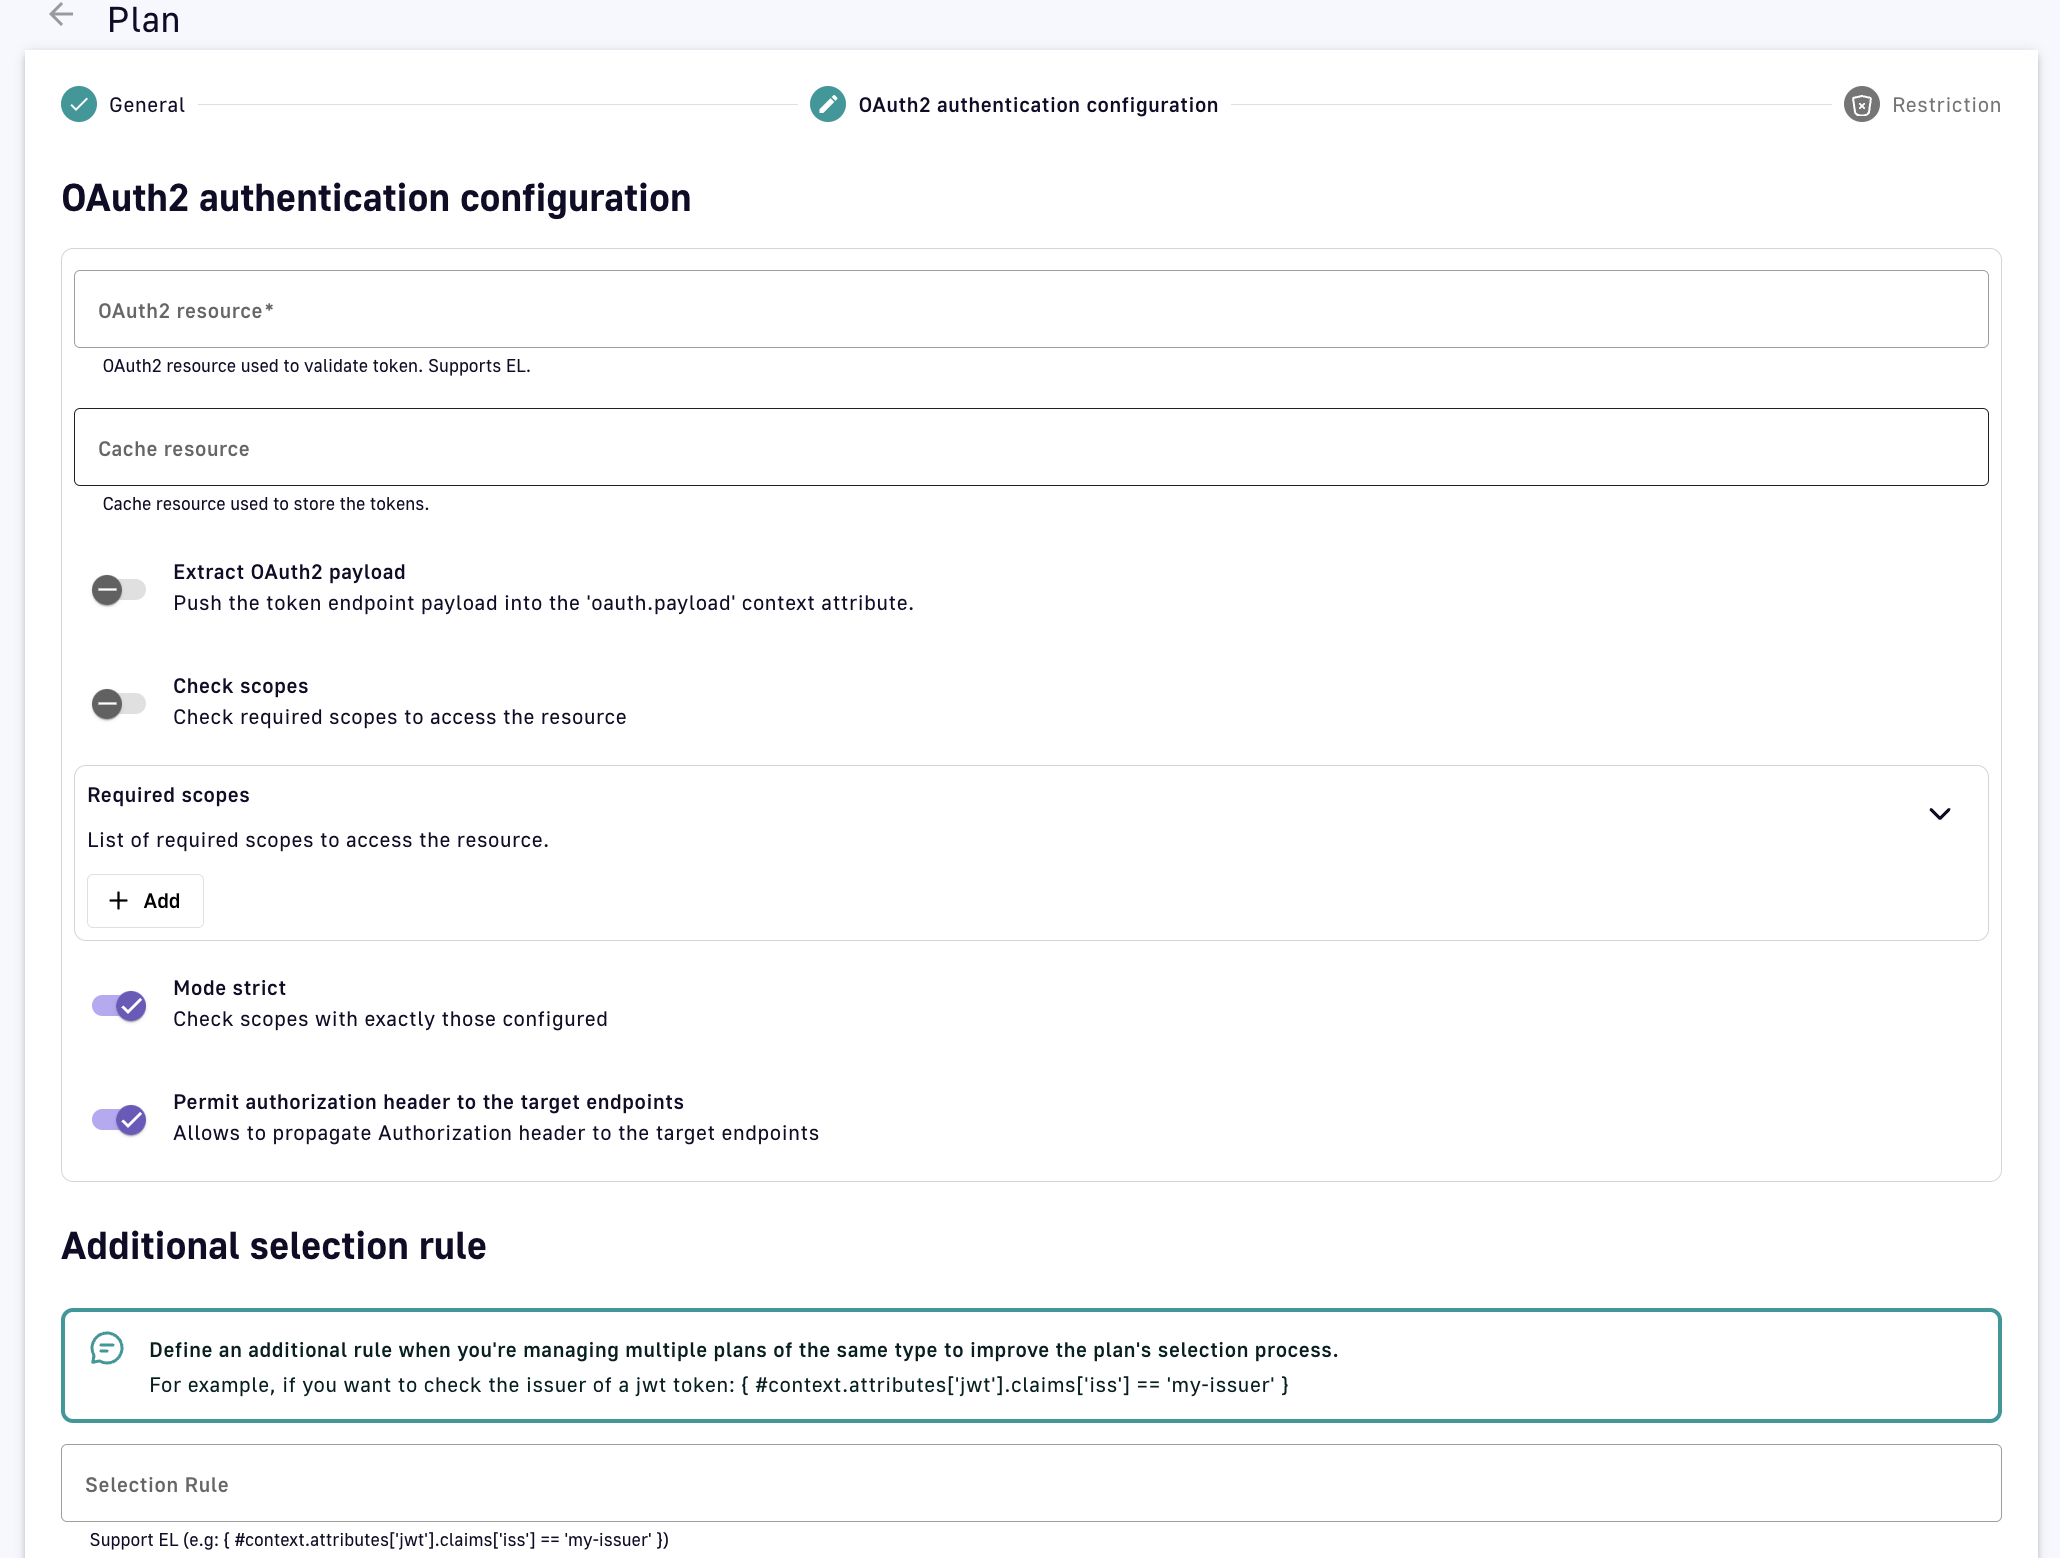
Configuring an OAuth2 plan presents the following options:
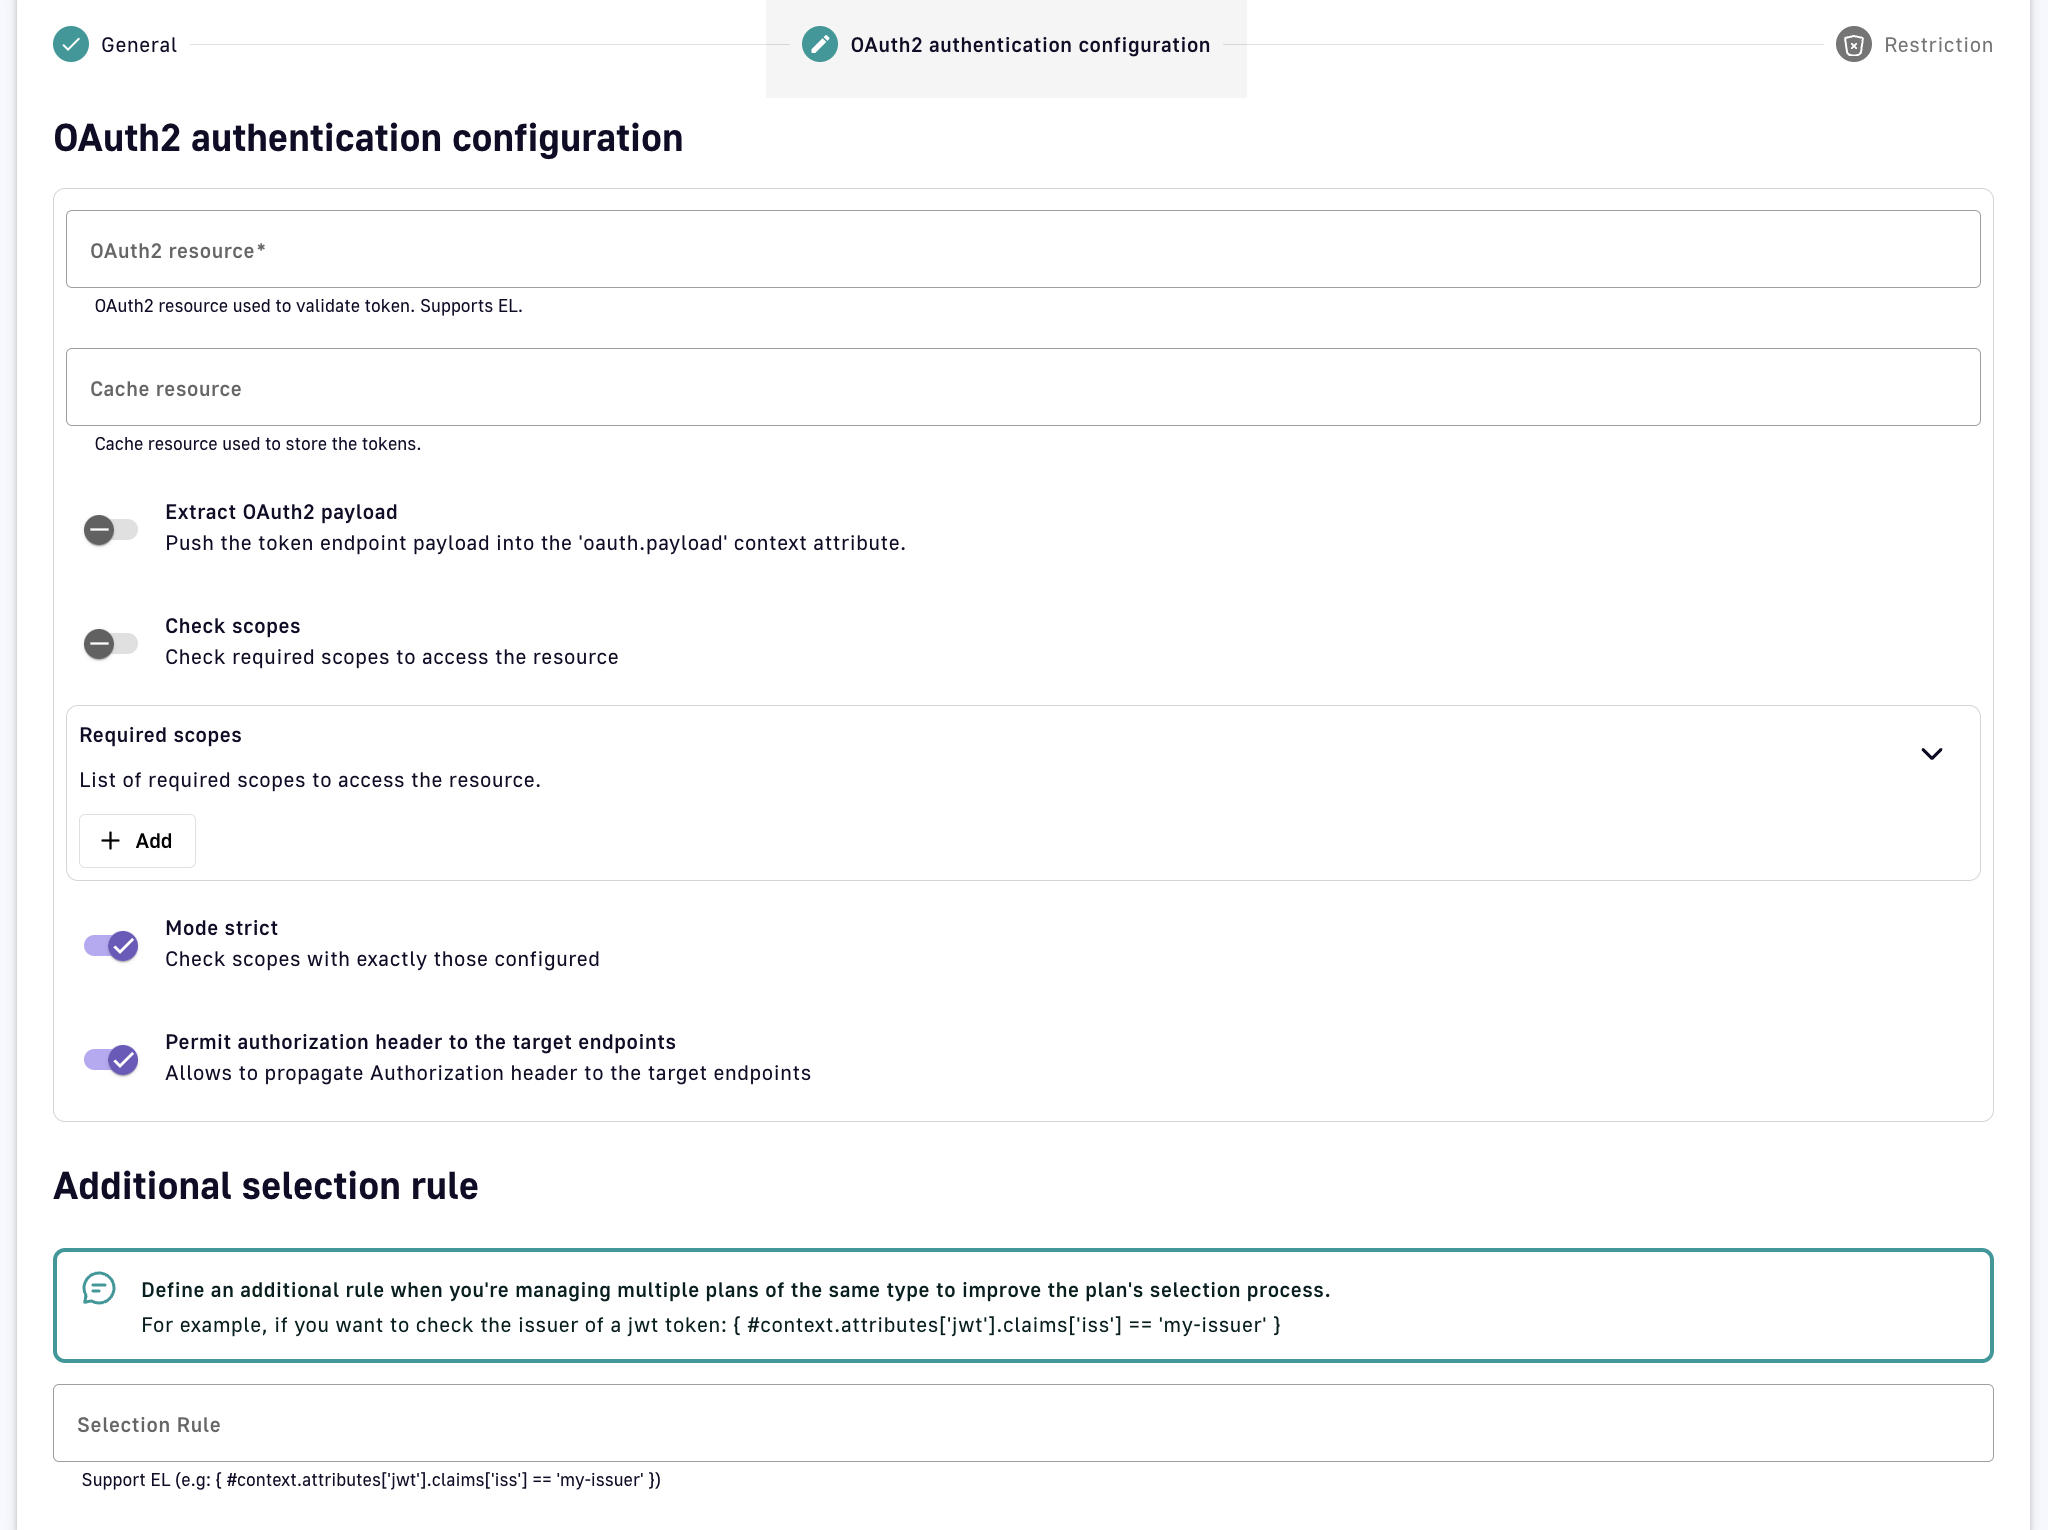
-
OAuth2 resource: Enter the name of the OAuth2 resource to use as the authorization server
-
Cache resource: Optionally enter the name of the cache resource to store responses from the authorization server
-
Extract OAuth2 payload: Allows the OAuth2 payload to be accessed from the
oauth.payloadcontext attribute via DSAPI Expression Language (EL) during request/response, e.g. using:{#context.attributes['oauth.payload']} -
Check scopes: An authorization server can grant access tokens with a scopes parameter, which the Gateway will check against the provided Required scopes to determine if the client application is allowed to access the API
-
Mode strict: When disabled, the Gateway will validate the API call if the access token contains at least one scope from the Required scopes list. When enabled, strict mode requires the access token to contain all scopes from the Required scopes list.
-
Permit authorization header to the target endpoints: Propagate the header containing the access token to the backend APIs
-
Additional selection rule: Allows you to use the EL to filter by contextual data (request headers, tokens, attributes, etc.) for plans of the same type (e.g., for two OAuth2 plans, you can set different selection rules on each plan to determine which plan handles each request)
Once OAuth2 configuration is complete and the plan is created and published, your API will be OAuth2-secured and subscribed consumers must call the API with an Authorization Bearer :token: HTTP header to access the API resources.
Subscription requirements
During the OAuth2 plan selection, a token introspection is completed to retrieve the client_id which allows searching for a subscription. Any applications wanting to subscribe to an OAuth2 plan must have an existing client with a valid client_id registered in the OAuth 2.0 authorization server. The client_id will be used to establish a connection between the OAuth 2.0 client and the APIM consumer application.
To mitigate performance concerns, a cache system is available to avoid completing the same token introspection multiple times. If there are multiple OAuth2 plans, it is recommended to use selection rules to avoid any unnecessary token introspection.
JWT
Introduction
A JSON Web Token (JWT) is an open method for representing claims securely between two parties. It is digitally signed using an HMAC shared key or RSA public/private key pair. The JWT authentication type ensures that a JWT issued by a third party is valid by verifying its signature and expiration date. Only applications with approved JWTs can access APIs associated with a JWT plan.
Configuration
APIM uses client IDs to recognize applications that have subscribed to a JWT plan. The inbound JWT payload must include the client_id claim to establish a connection between the JWT and the APIM application subscription.
A JWT plan presents the following configuration options:

-
Signature: Select the algorithm used to hash and encrypt your JWT
-
JWKS resolver: Select a method to retrieve the JSON Web Key (JWK), which is often stored inside a JSON Web Key Set (JWKS) and required by the Gateway to validate the signature of the JWT:
-
GIVEN_KEY: Provide a signature key as a resolver parameter according to the signature algorithm (
ssh-rsa,pem,crtorpublic-keyformat -
GATEWAY_KEYS: Search for public keys set in the API Gateway
DSAPI.ymlconfiguration that match the authorization serveriss(issuer) andkid(key ID) claims of the incoming JWTjwt: issuer: my.authorization.server: default: ssh-rsa myValidationKey anEmail@domain.com kid-2016: ssh-rsa myCurrentValidationKey anEmail@domain.com -
JWKS_URL: Provide a URL ending with
/.well-known/jwks.jsonfrom which the Gateway can retrieve the JWKS
-
-
Use system proxy: When using JWKS_URL, optionally make the HTTP call through a system-wide proxy configured in
DSAPI.yml -
Extract JWT Claims: Allow claims to be accessed in the
jwt.claimscontext attribute during request/response via DSAPI Expression Language (EL), e.g., extract the issuer claim from the JWT:{#context.attributes['jwt.claims']['iss']} -
Propagate Authorization header: Propagate the header containing the JWT token to the backend APIs
-
User claim: Set the payload claim where the user can be extracted. The default
subvalue is standard with JWTs. -
Client ID claim: Override the default claim where the client ID can be extracted. By default, the Gateway checks the
azpclaim, then theaudclaim, and finally theclient_idclaim. -
Ignore missing CNF: Ignores CNF validation if the token doesn't contain any CNF information
-
Enable certificate bound thumbprint validation: Validates the certificate thumbprint extracted from the
access_tokenagainst the one provided by the client -
Extract client certificate from headers: Extracts the client certificate from the request header (provided in Header name field). Necessary when the mTLS connection is handled by a proxy.
-
Additional selection rule: Allows you to use the EL to filter by contextual data (request headers, tokens, attributes, etc.) for plans of the same type (e.g., for two JWT plans, you can set different selection rules on each plan to determine which plan handles each request)
Once JWT configuration is complete and the plan is created and published, your API will be JWT-secured and subscribed consumers must call the API with an Authorization: Bearer your-JWT HTTP header.
Push
Introduction
A Push plan is used when an API contains an entrypoint that sends message payloads to API consumers (e.g., Webhook). This type of plan is unique in that the security configuration is defined by the API consumer, in the subscription request created in the Developer Portal. For example, when subscribing to a Webhook entrypoint, the API consumer specifies the target URL and authentication for the Gateway to use when sending messages.
Push plans do not apply to SSE entrypoints. Although messages are pushed from the server, the client application initiates message consumption.
Configuration
Push plans have the same configuration options as Keyless plans in APIM. The bulk of the configuration for a Push plan is set by the API consumer in the Developer Portal, and the content of the configuration varies by entrypoint type.
DSAPI currently supports Push plans for Webhook entrypoints
Creating and managing applications
Introduction
To access DSAPI APIs, consumers must register an application and subscribe to a published API plan. Applications act on behalf of the user to request tokens, provide user identity information, and retrieve protected resources from remote services and APIs.
This page contains the following sections:
Prerequisites
For an API consumer to create an application:
- An admin must define the allowed types of applications that API consumers can create:
- Default application type: API consumers can optionally define the
client_idwhen creating a simple application. - Dynamic Client Registration (DCR) for applications: The API publisher must enable and configure DCR for the allowed application types. The client registration provider is responsible for creating the
client_idandclient_secretfor each application that registers.
- Default application type: API consumers can optionally define the
- An API consumer must have a user account to register an application and subscribe to an API (see Administration)
Default application configuration
The default simple application enables an API consumer to define the client_id for use in JWT and OAuth API plans. To allow API consumers to create a simple application:
-
Log in to your APIM Console
-
Select Settings from the left nav
-
Select Client Registration from the inner left nav
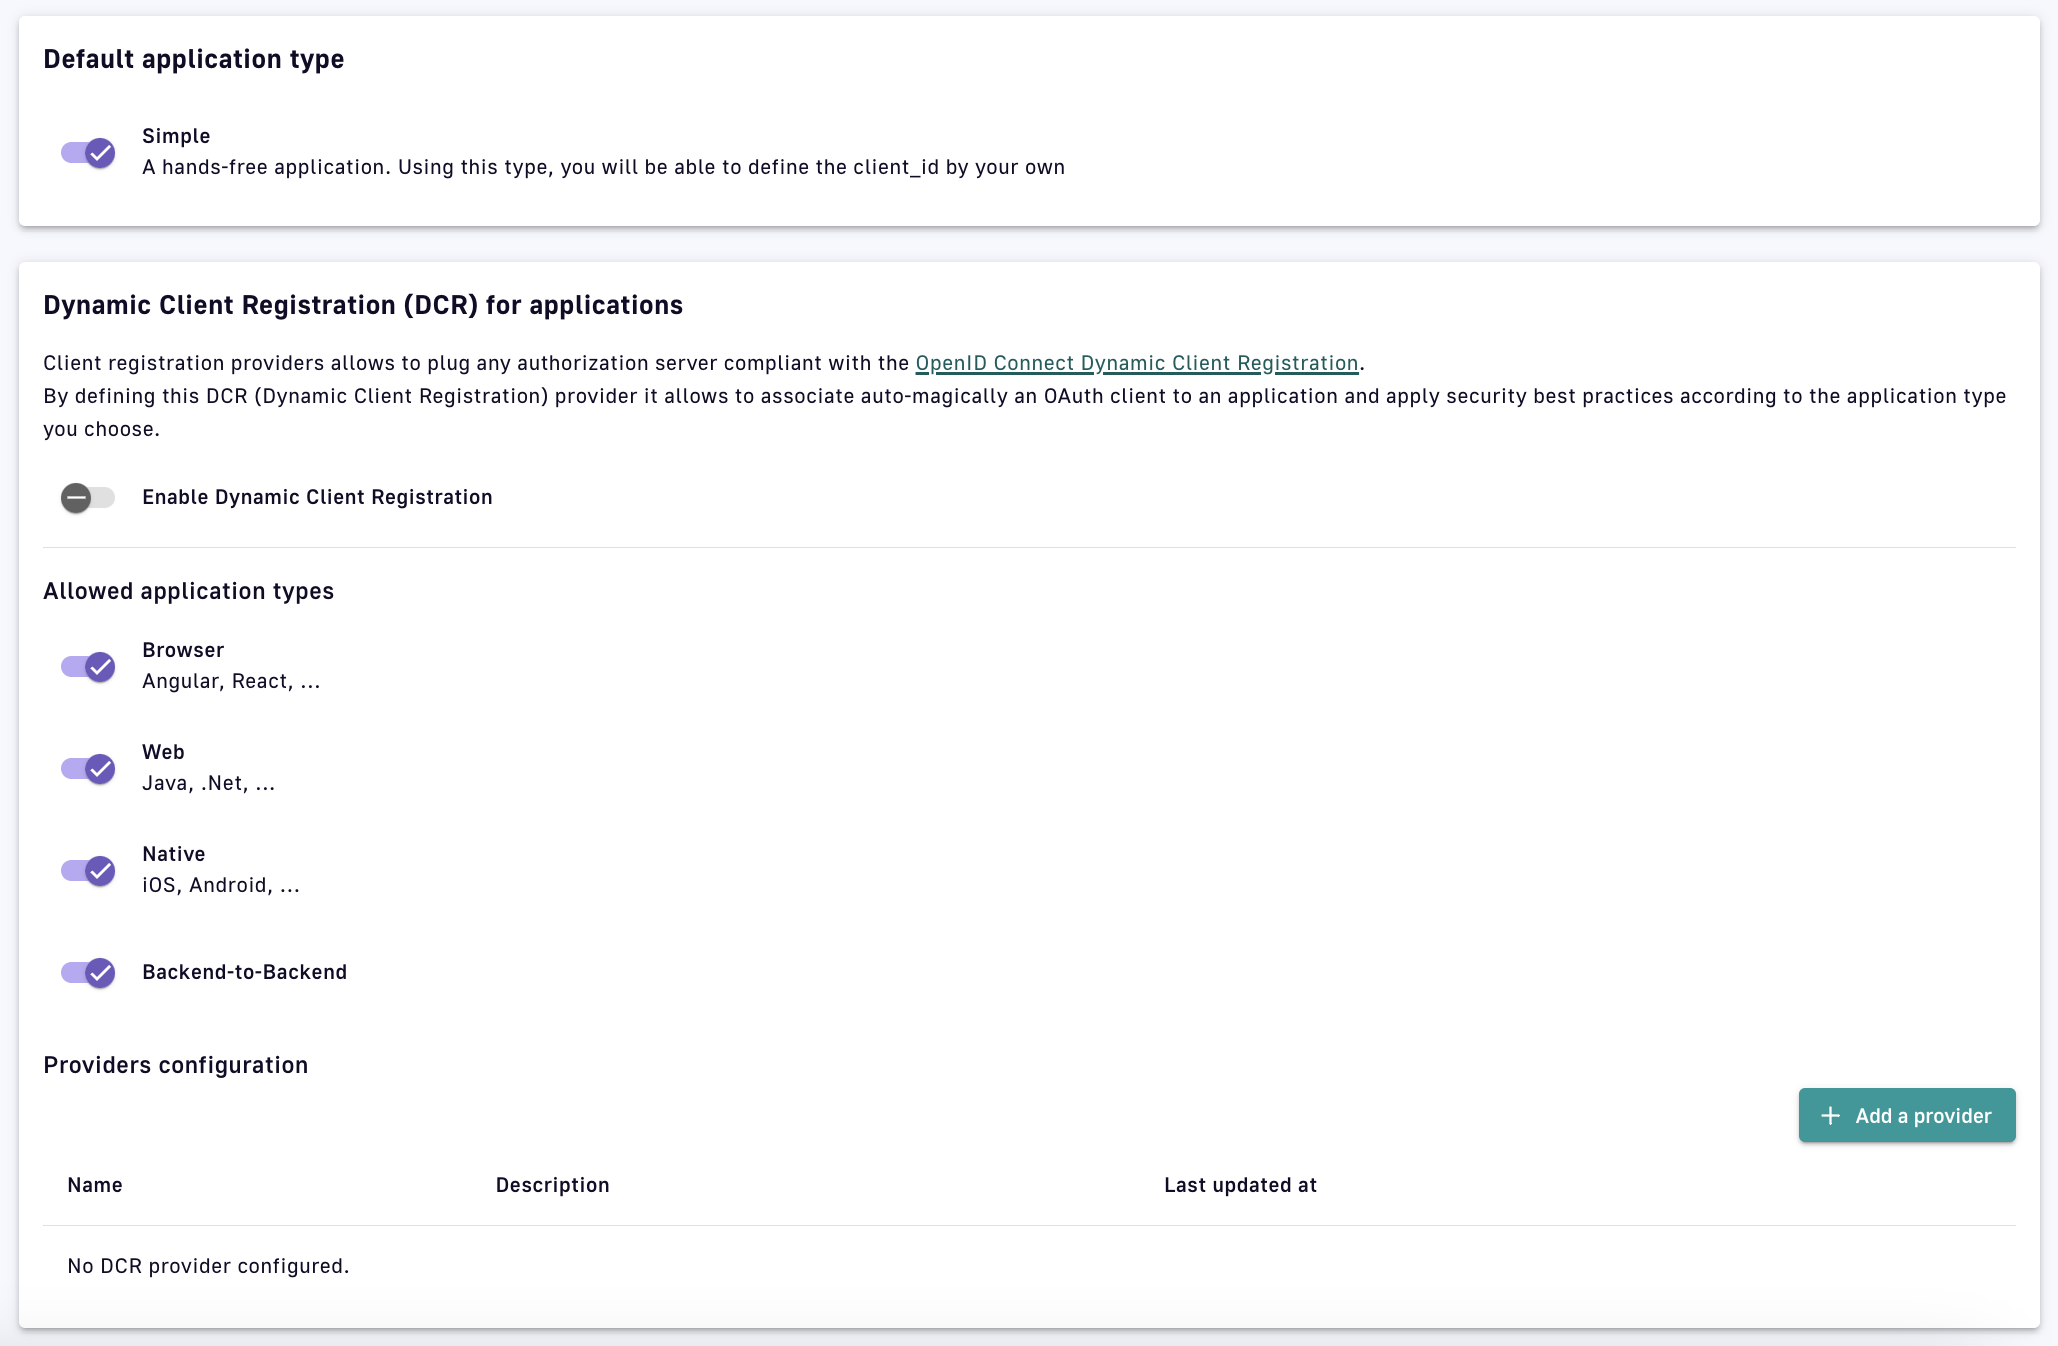
Client Registration
-
Under Default application type, toggle Simple ON
To expedite API consumption, a default application is automatically created for every new user (not including admins). This can be disabled in the DSAPI.yml file as shown below:
user:
    login:
       # Create a default application when user connects to the portal for the very first time (default true)
       defaultApplication: false
Manage applications
An application is usually shared through a developer application and retrieves information such as API keys and API analytics. Initially, only the application’s creator can view and manage the application. By default, APIM includes three membership roles:
| Role | Description |
|---|---|
| Primary owner | The creator of the applcation. Can perform all possible API actions. |
| Owner | A lighter version of the primary owner role. Can perform all possible actions except delete the application. |
| User | A person who can access the application in read-only mode and use it to subscribe to an API. |
Only users with the required permissions can manage application members. See User Management and Permissions.
Delete and restore applications
To delete an application, the primary owner must:
-
Log in to your APIM Console
-
Select Applications from the left nav
-
Select your application
-
Select Global Settings from the inner left nav
-
In the Danger Zone, click Delete
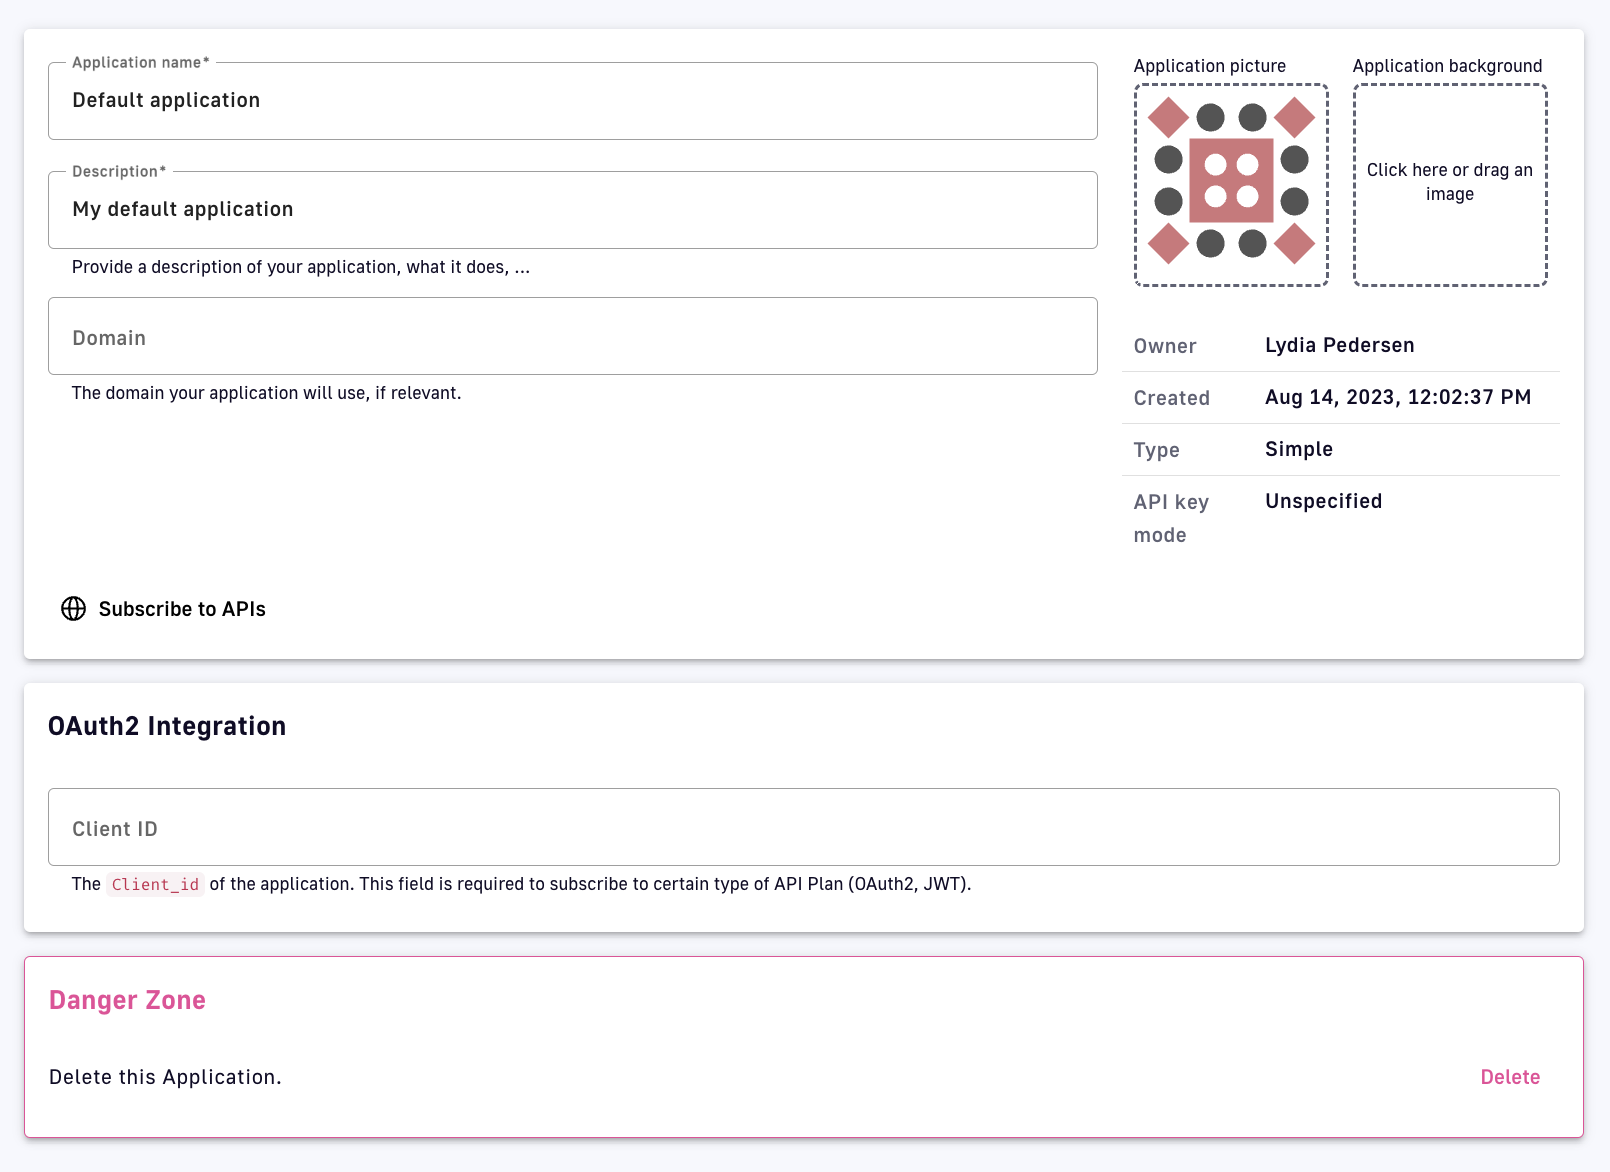
Delete an application
- A deleted application has a status of
ARCHIVED, meaning:- The link to the primary owner of the application is deleted.
- Its subscriptions are closed. In the case of a subscription to an API Key plan, the keys are revoked.
- Notification settings are deleted.
- An
ADMINcan restore applications in the APIM Console and will become the primary owner of the application- An application’s subscriptions will be restored with
PENDINGstatus. The API publisher must manually reactivate previous subscriptions.
- An application’s subscriptions will be restored with
Managing and transferring Subscriptions
Introduction
A subscription is a successful contract between an API publisher and an API consumer. A subscription is created when an API consumer uses a registered application to make a subscription request to a published plan and an API publisher either manually or automatically validates the subscription.
APIs with Keyless plans do not require the API consumer to create an application or submit a subscription request because no authorization is required to access the backend API.
This page includes the following sections:
Subscription requests
API consumers can subscribe to APIs with published plans during the application creation process, or after the application is created, through the APIM Console or Developer Portal.
client_id depends on how it was configured. To subscribe to OAuth2 or JWT plans, the application must have a client_id.
To subscribe to an API via the APIM Console:
-
Log in to your APIM Console
-
Select Applications from the left nav
-
Select Subscriptions from the inner left nav
-
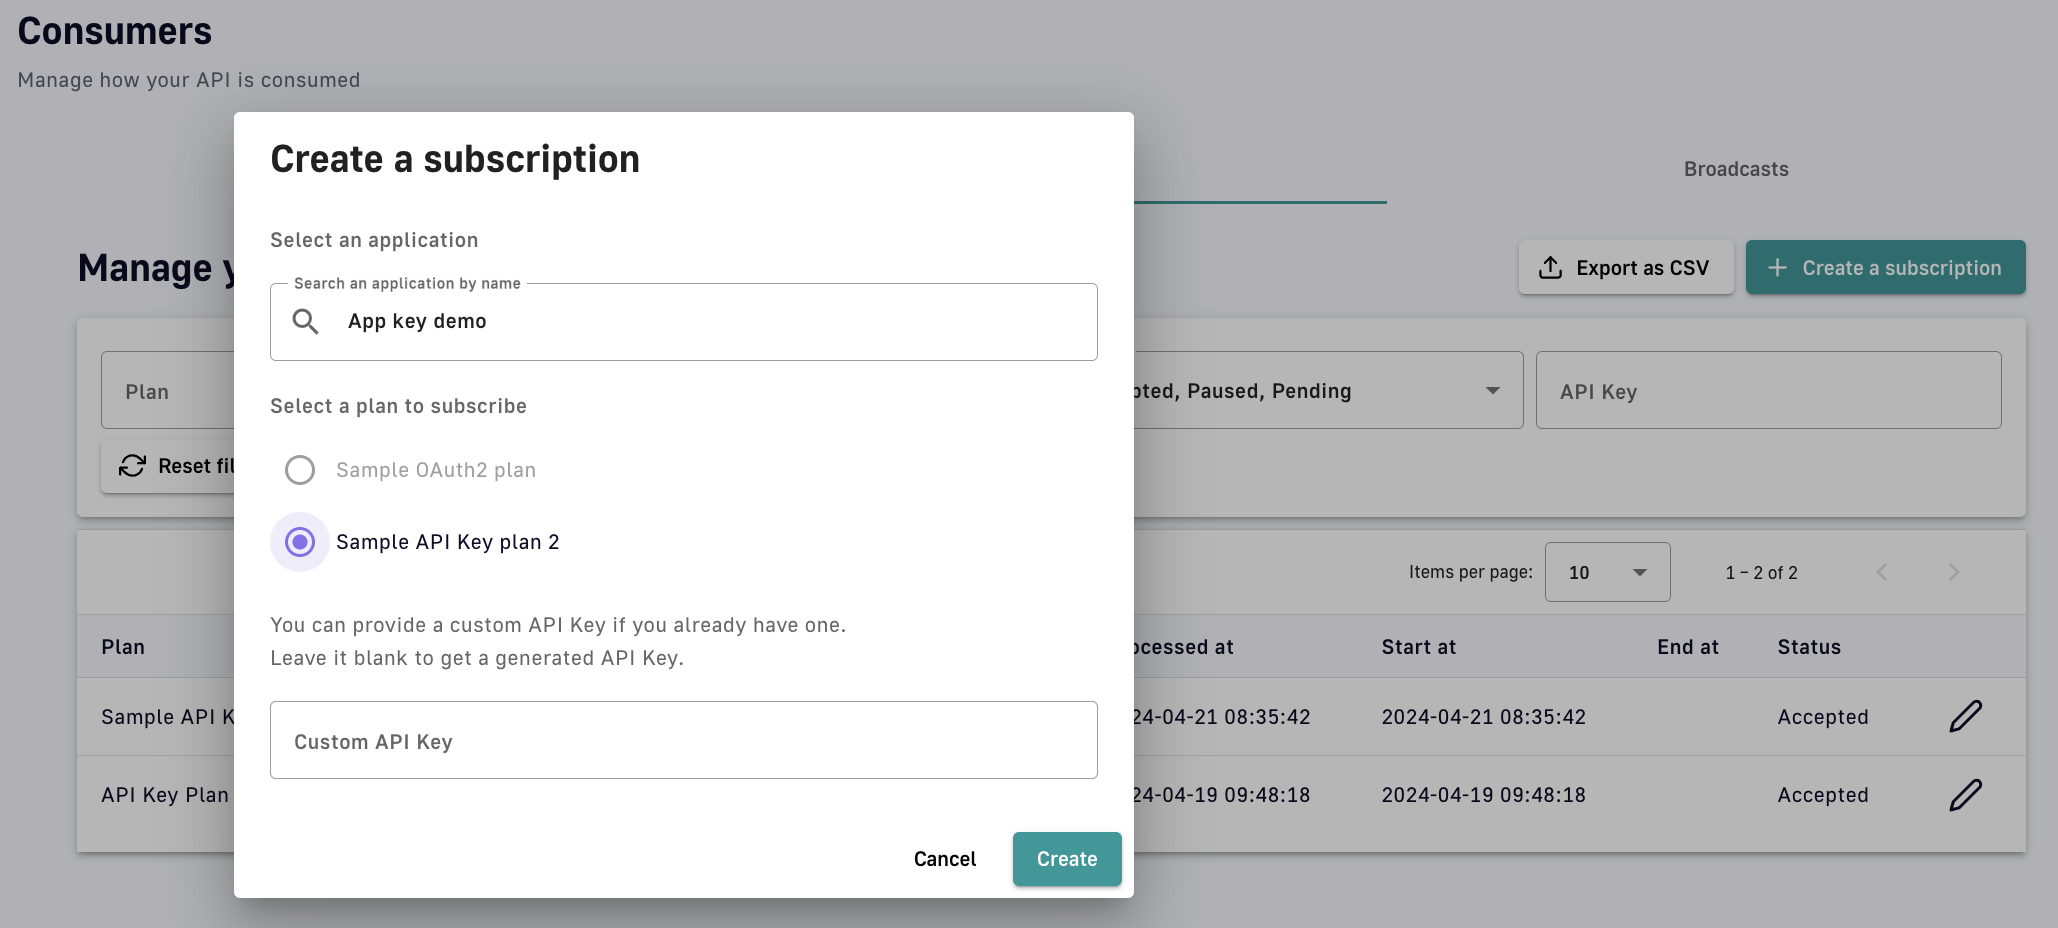
Click the + Create a subscription button
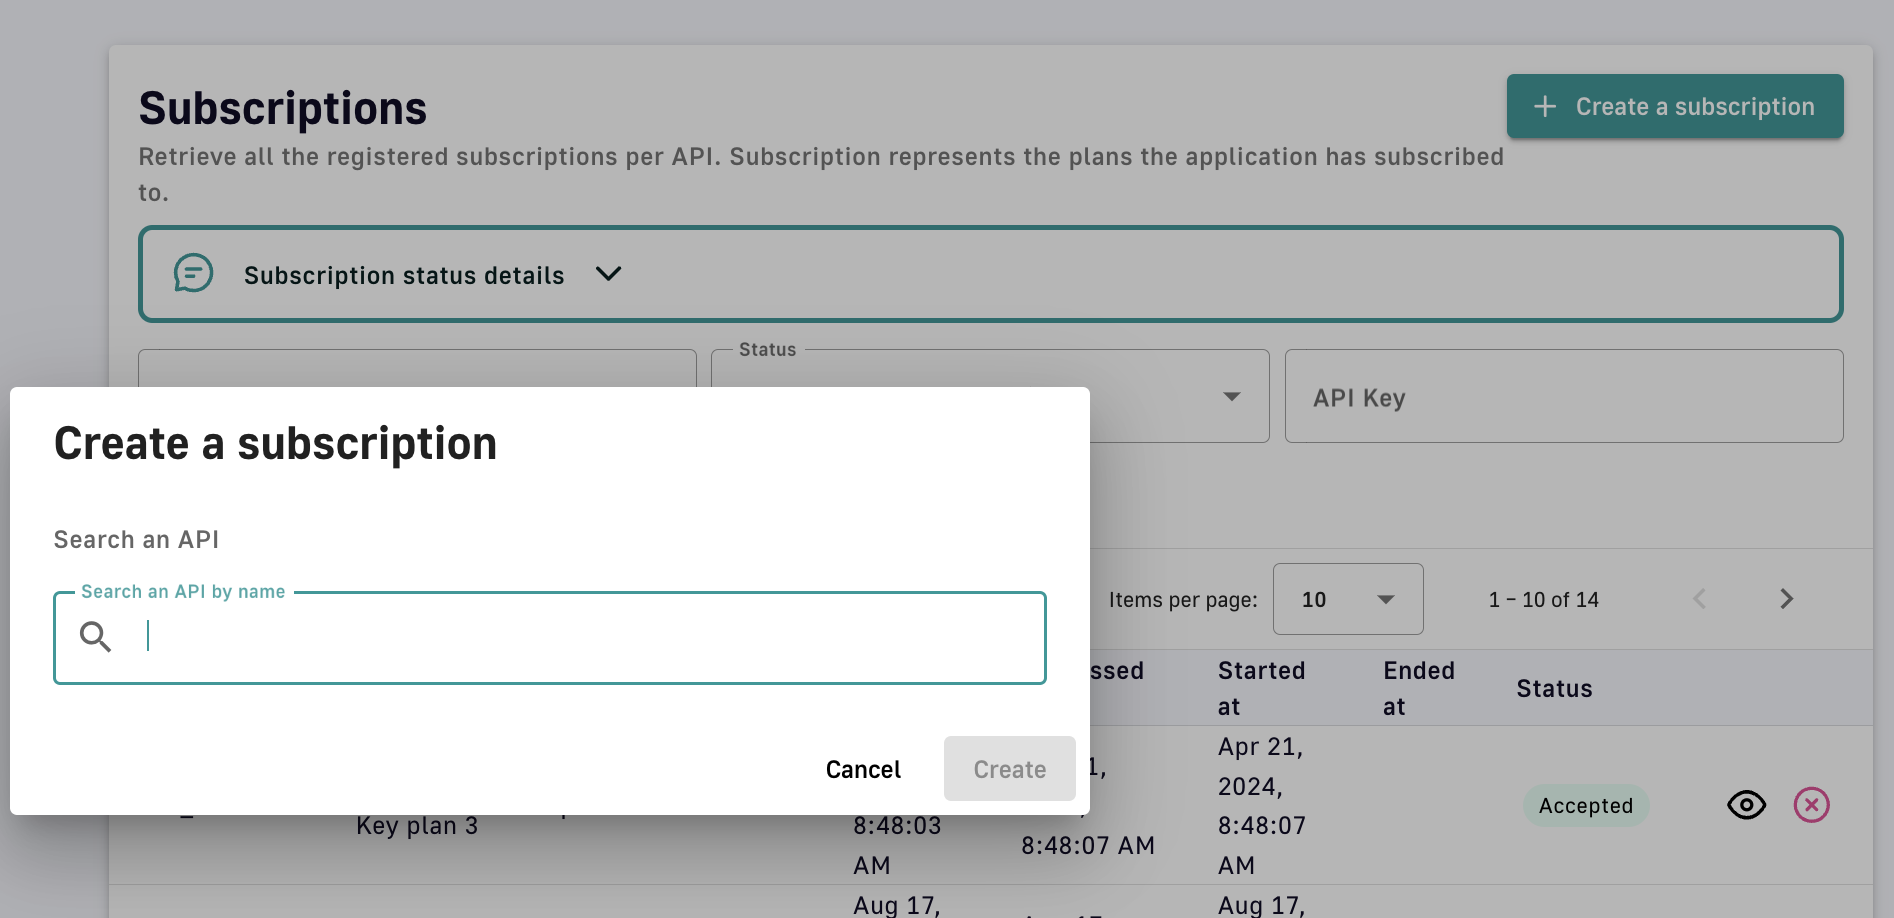
Create a subscription
-
Search for the API you want to subscribe to. To be searchable the API consumer must have access to the API, i.e., the API must be public or the API consumer must be a member of it.
-
Select the plan you would like to request a subscription to
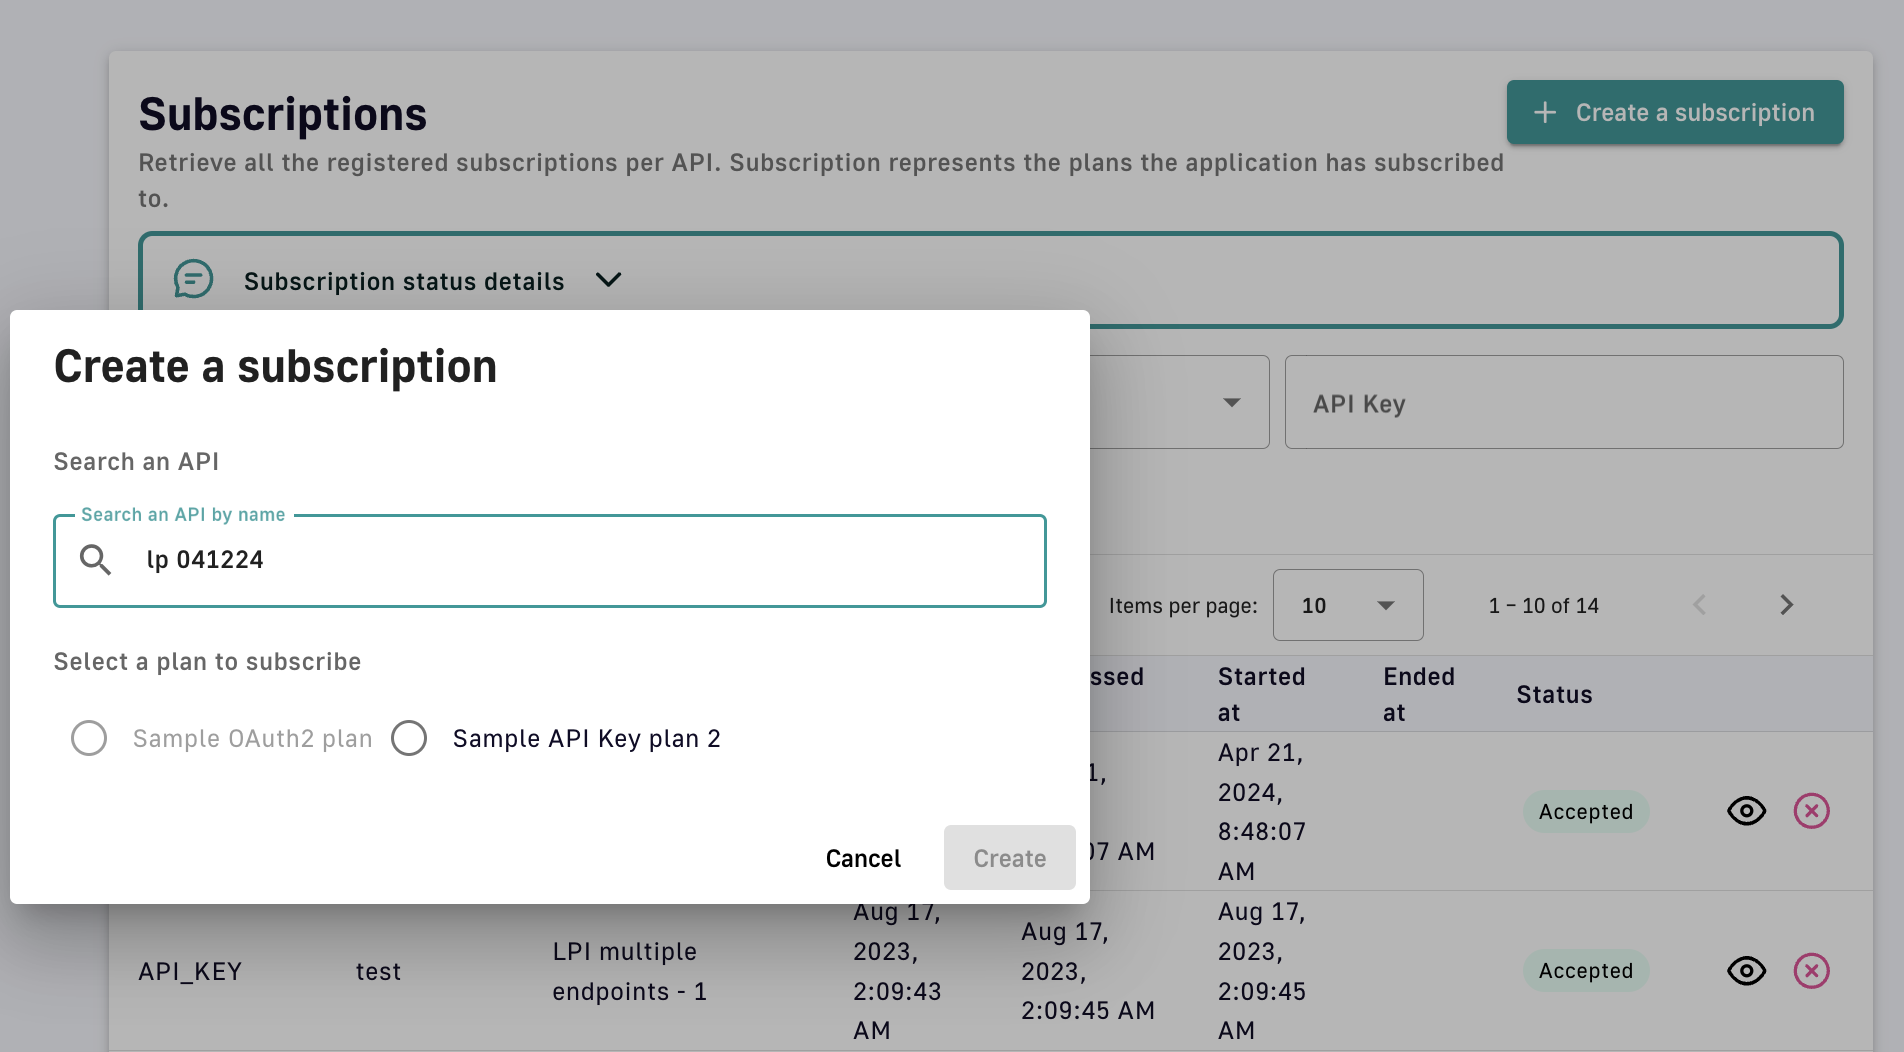
Select the subscription plan
-
Click Create to see the subscription details
Manage subscriptions
When creating a plan, you can enable subscription auto-validation to immediately approve subscription requests. If Auto validate subscription is disabled, the API publisher must approve all subscription requests.
To manage subscriptions in APIM Console:
- Log in to your APIM Console
- Select APIs from the left nav
- Select the API with subscriptions to manage
- Select Consumers from the inner left nav
- Click the Subscriptions header tab
- Select the request or subscription you want to manage
- Validate or reject the subscription
-
If validating, fill out the Validate your subscription form, then click Validate
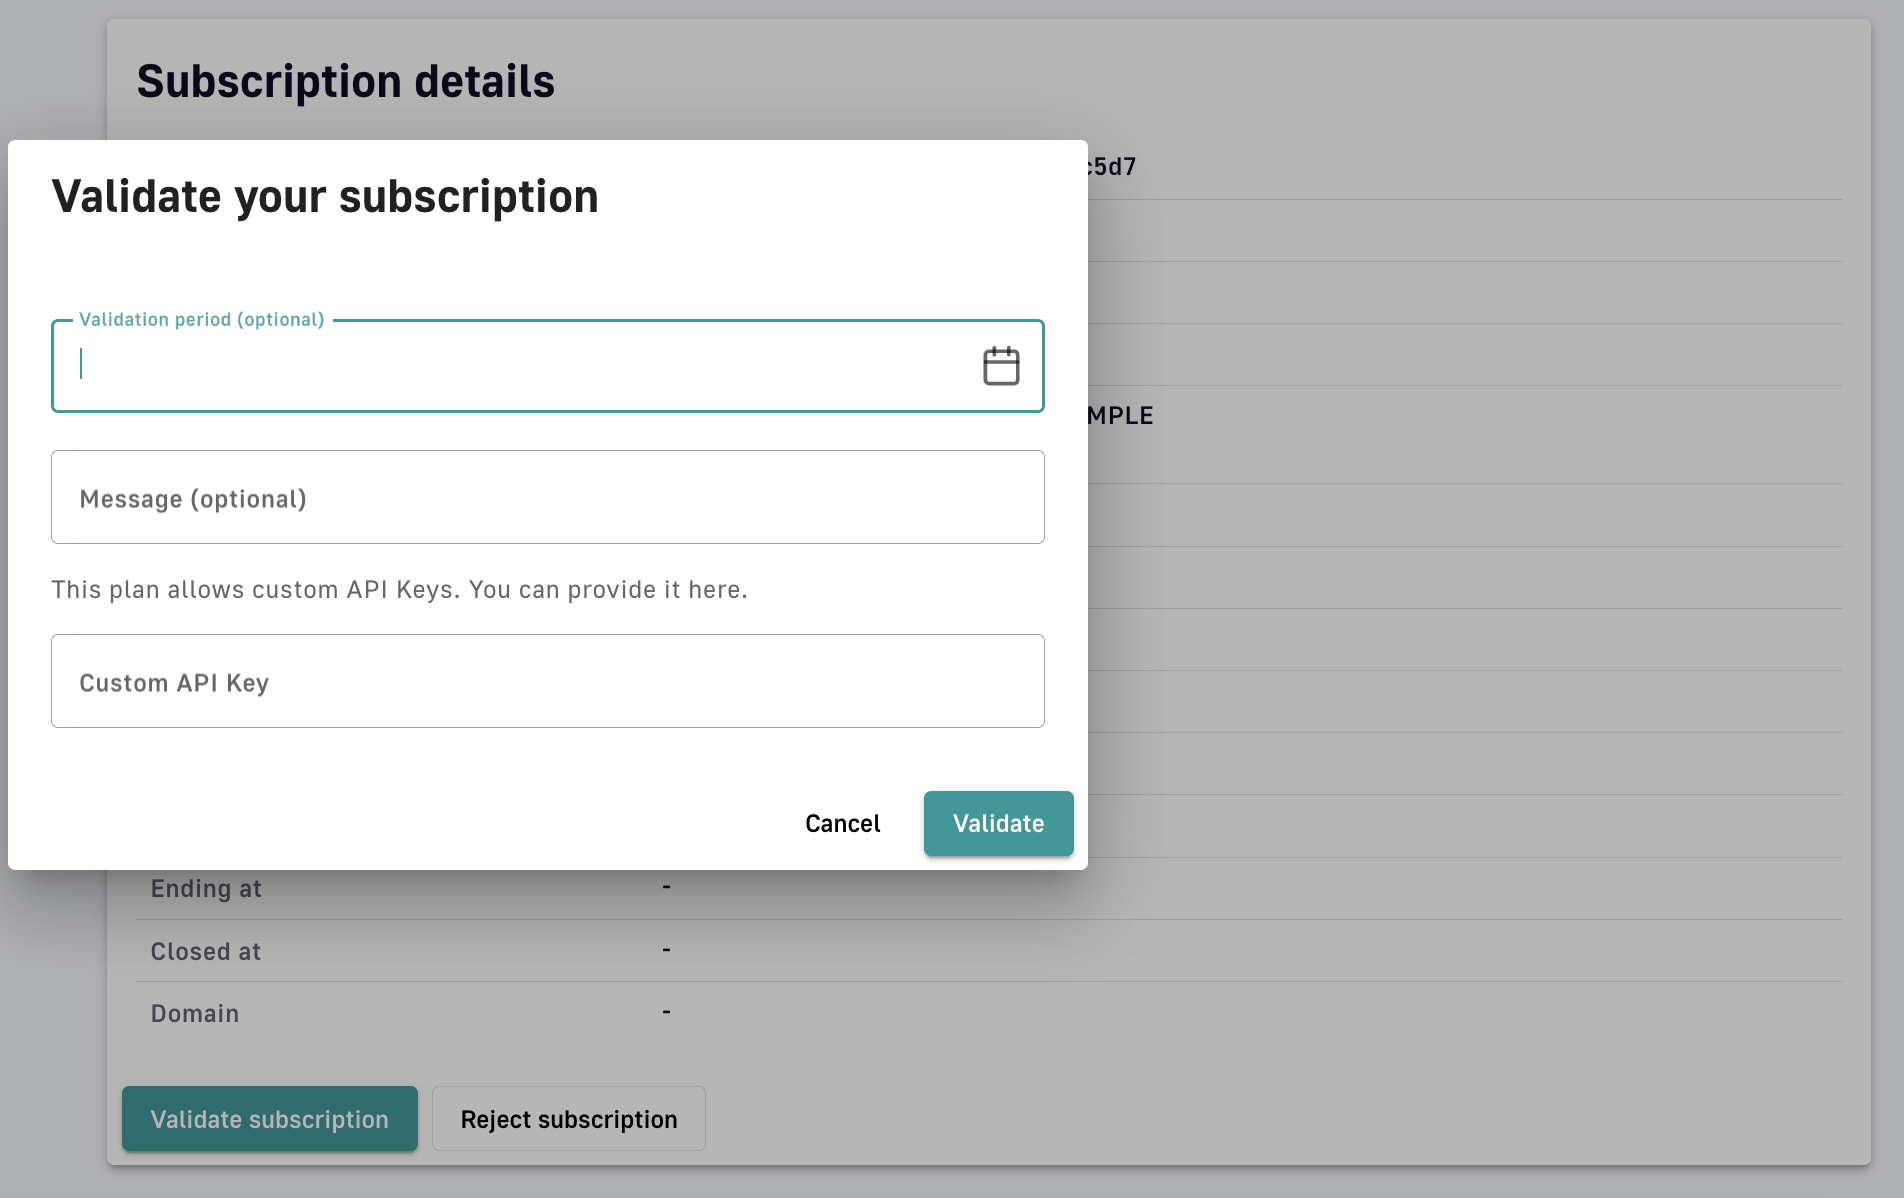
Validate the subscription
-
API Key plans
Subscriptions to API Key plans include additional security management settings:
-
Renew: Generate a new API key or provide a custom API key. The existing API key will be automatically invalidated after two hours.

Renew an API key
-
Revoke: Immediately invalidate an existing API key. This option is reversible.

Revoke an API key
-
Expire: Set a date/time to automatically invalidate an existing API key
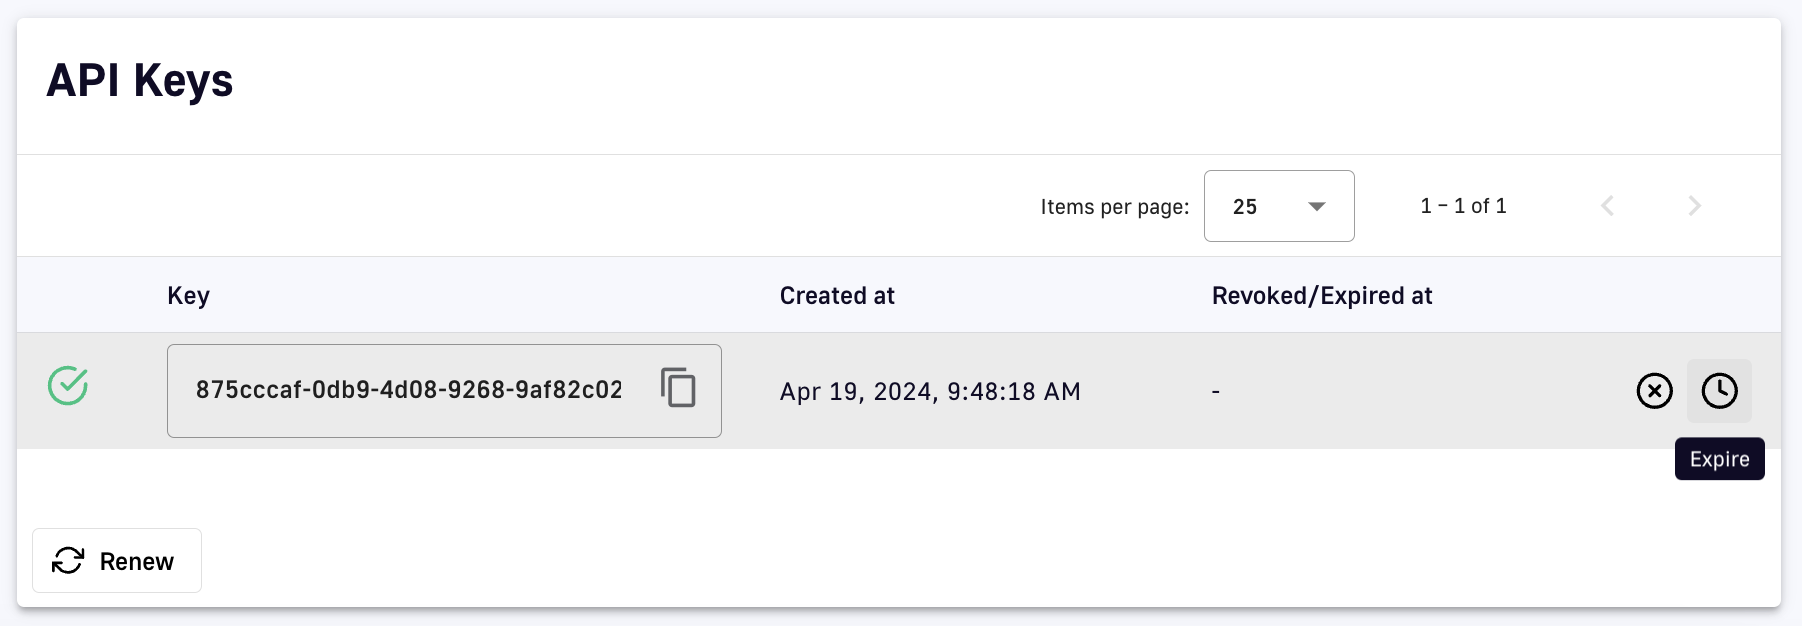
Expire an API key
Transfer subscriptions
API publishers can transfer active subscriptions to a new plan with the same security type:
-
Log in to your APIM Console
-
Select APIs from the left nav
-
Select the API with the subscription to transfer
-
Select Consumers from the inner left nav
-
Click the Subscriptions header tab
-
Click the pencil icon of the subscription you want to transfer
-
At the bottom of the Subscription details section, click Transfer
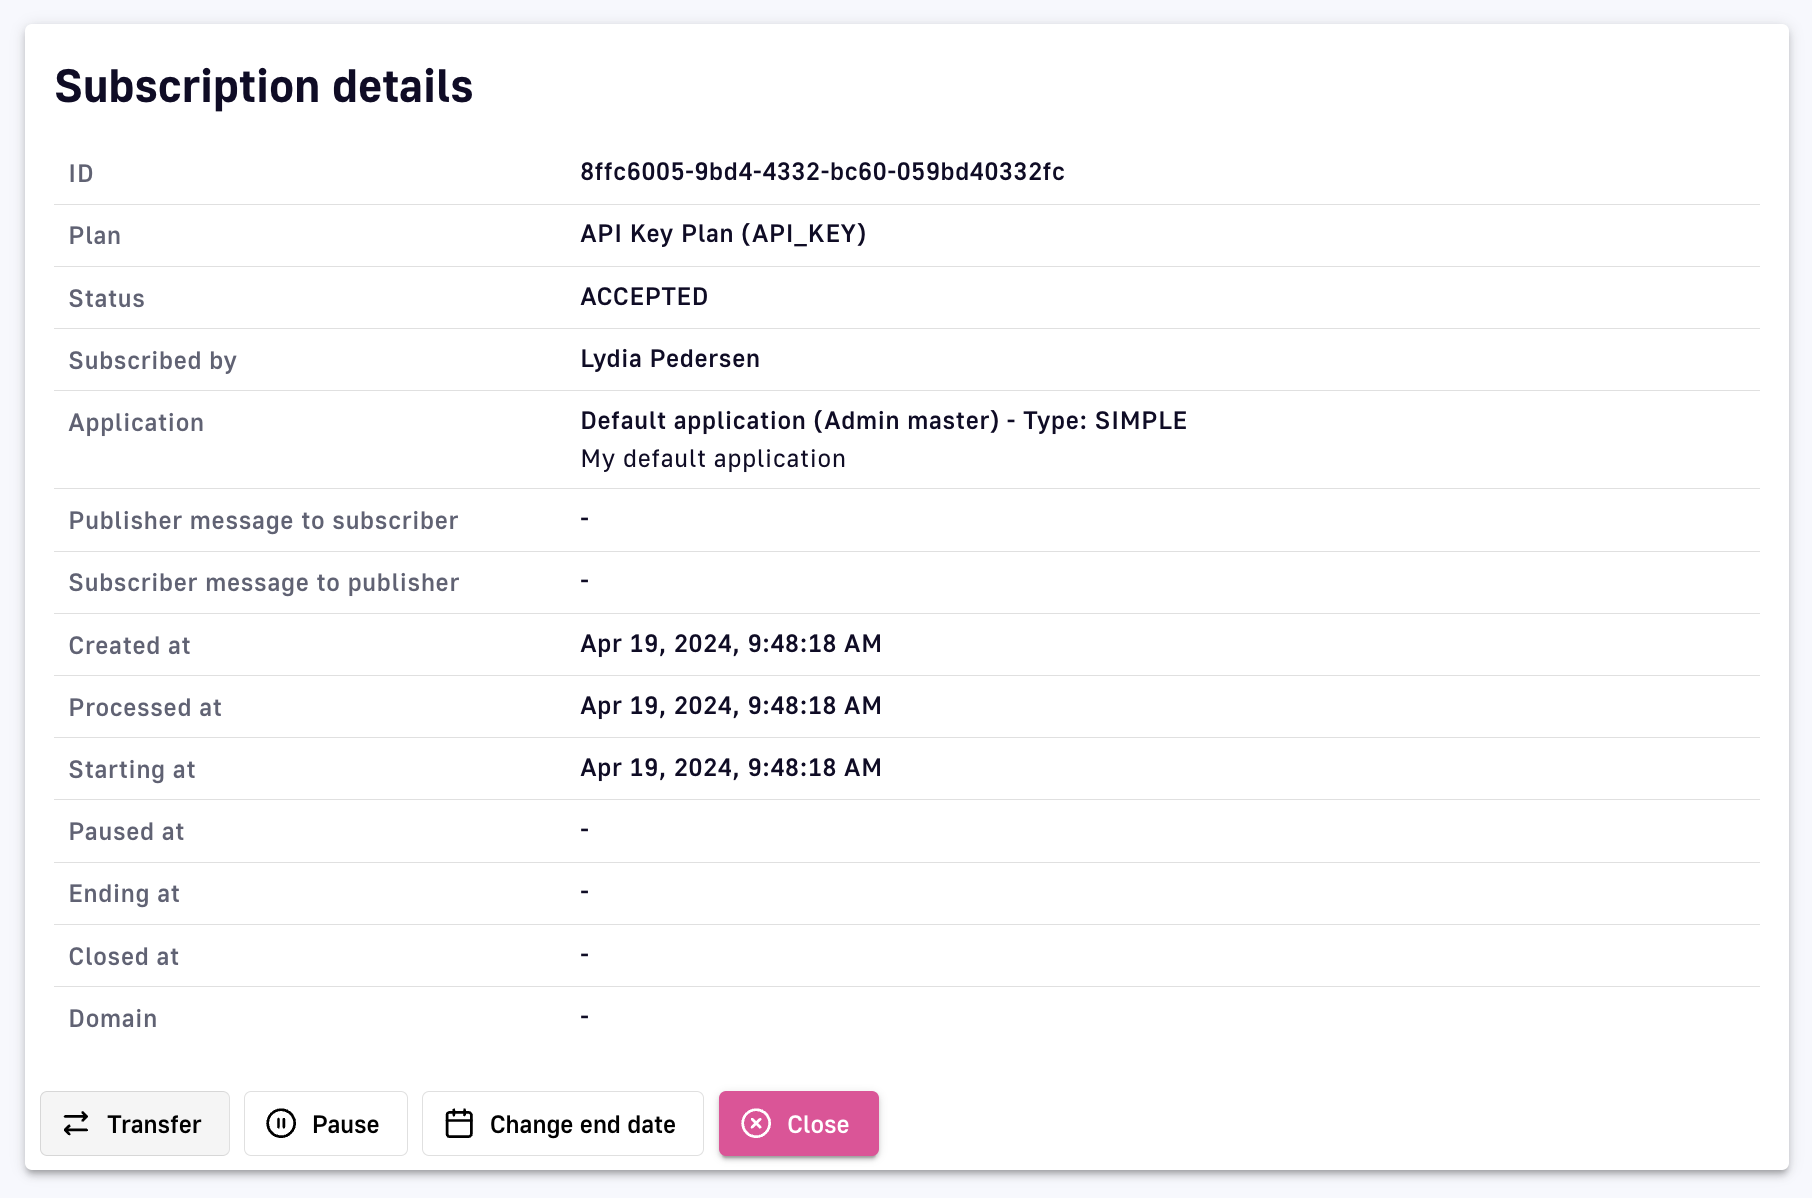
Transfer a subscription
-
Select the plan to transfer the subscription to, then click Transfer
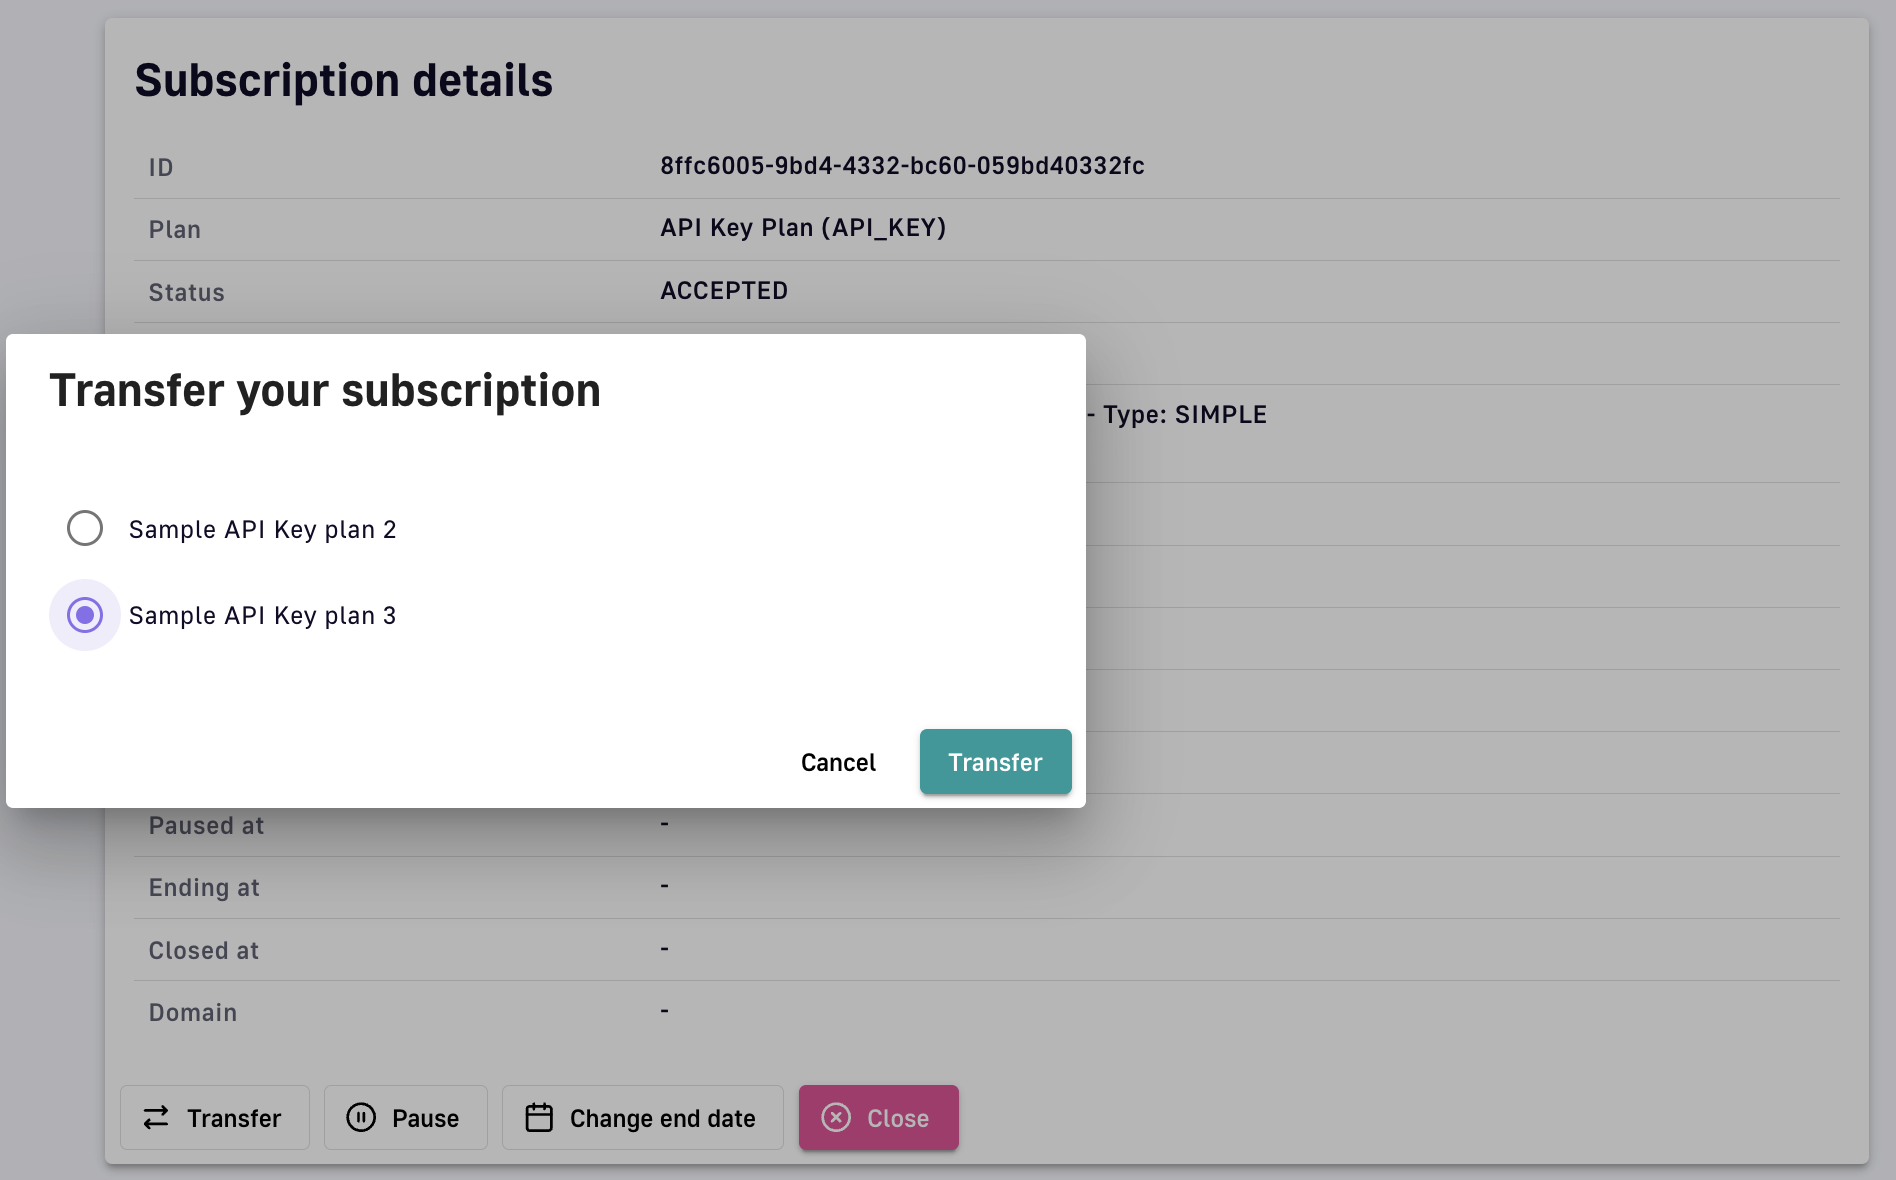
Specify and confirm subscription transfer
API Measurement, Tracking, and Analytics
DSAPI offers several options for measuring, tracking, and analyzing APIs to easily maintain visibility into performance and consumption.
Dashboards
Overview
The DSAPI Dashboard is an area in the UI where you can create custom dashboards reflecting API performance, status, lifecycle stage, etc. The Dashboard is comprised of 3 modules: Overview, APIs health-check, and My tasks.
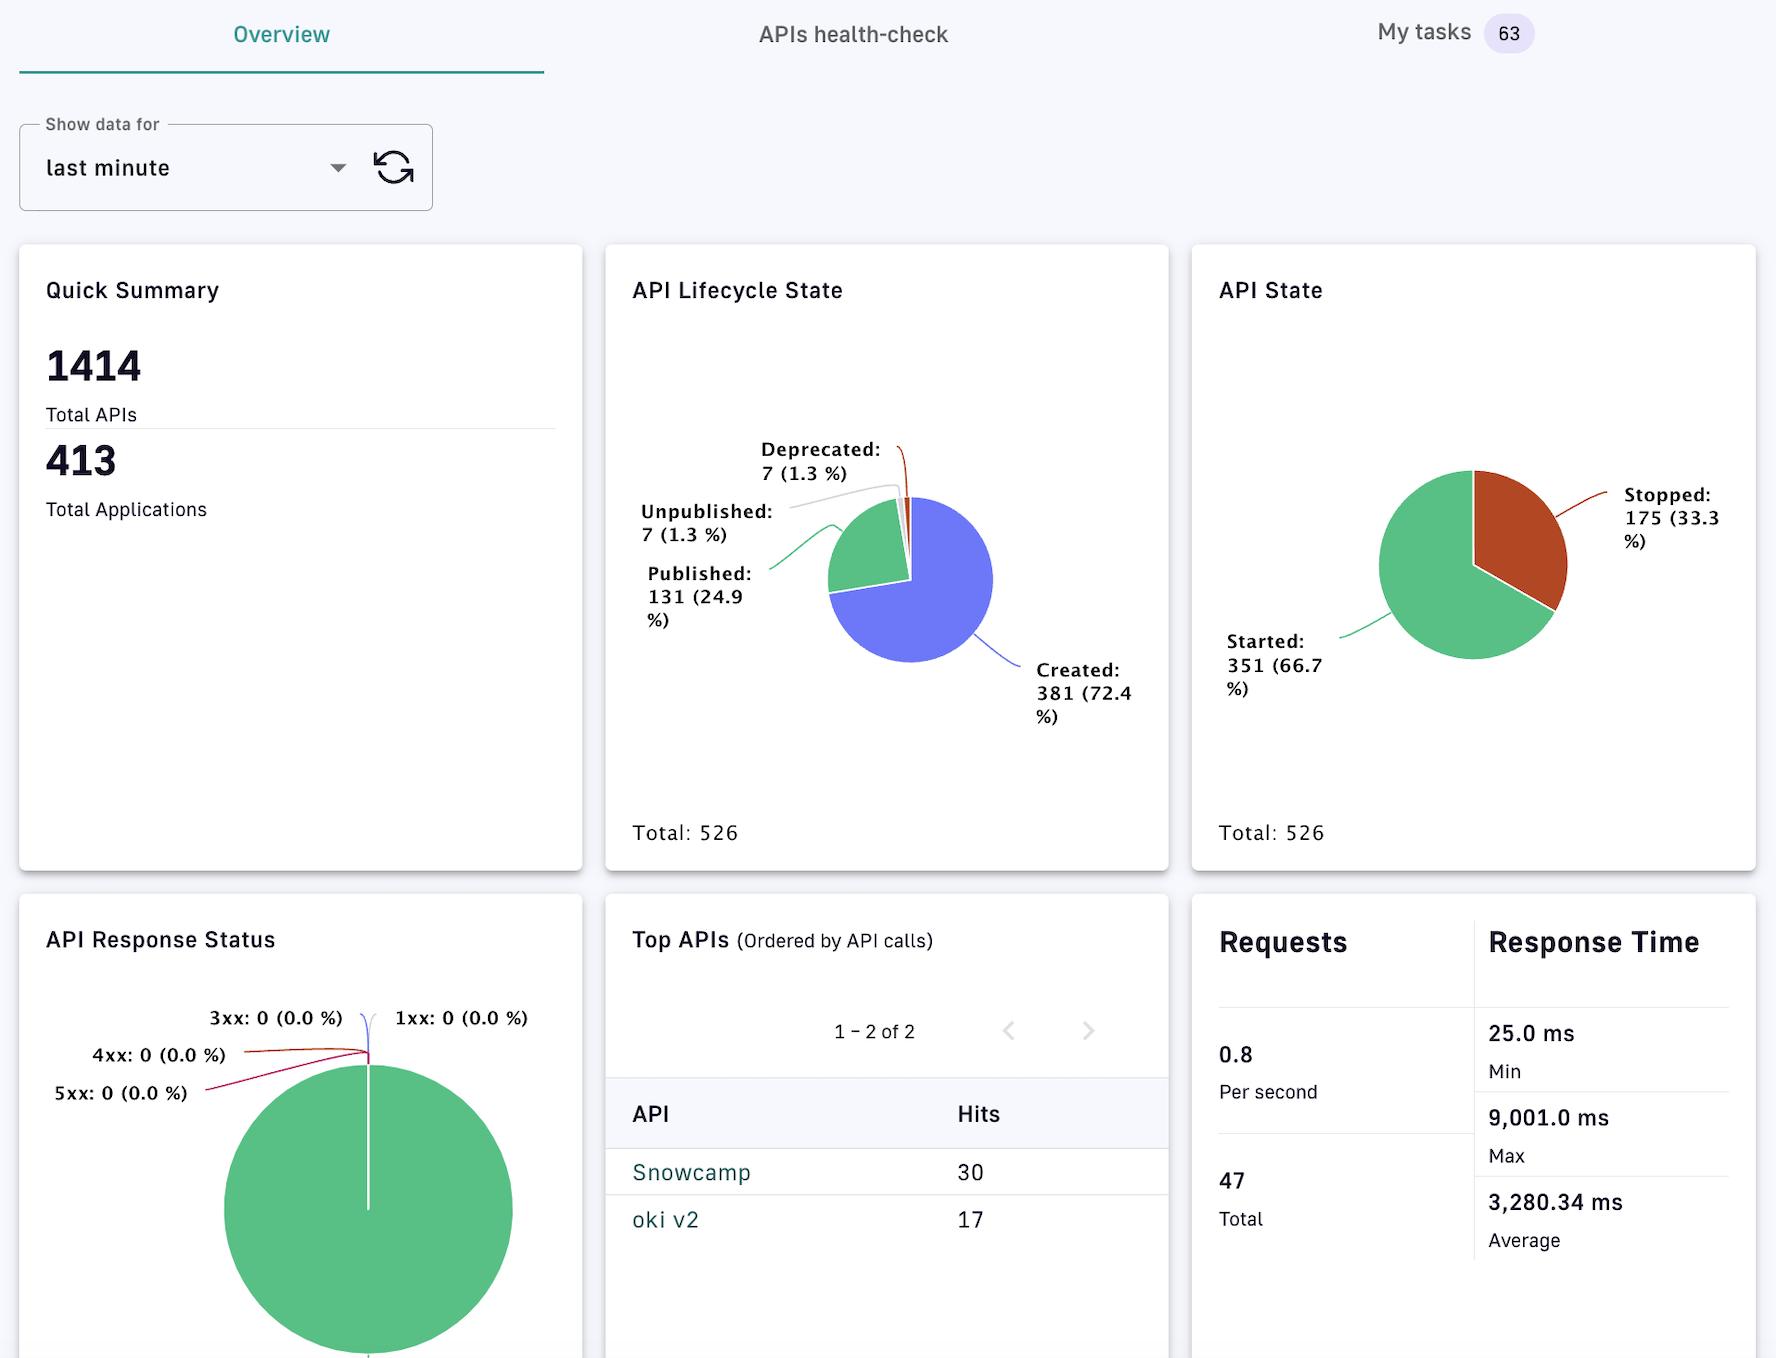
Dashboard overview
- Overview: Shows a summary of API metrics for the selected time interval via configurable charts and information, followed by a paginated list of API events
- APIs health-check: Shows API status and availability data based on filter criteria and the selected time interval
- My tasks: Starting with the most recent, shows the list of tasks to be validated
Create a dashboard
You can configure your DSAPI Dashboard by creating dashboard charts for three different categories: Platform, API, and Applications. To create a chart:
-
Log in to your APIM Console
-
Click on Settings in the left nav
-
Click on Analytics in the inner left nav
-
Choose to ADD A NEW PLATFORM DASHBOARD, ADD A NEW API DASHBOARD, or ADD A NEW APPLICATION DASHBOARD
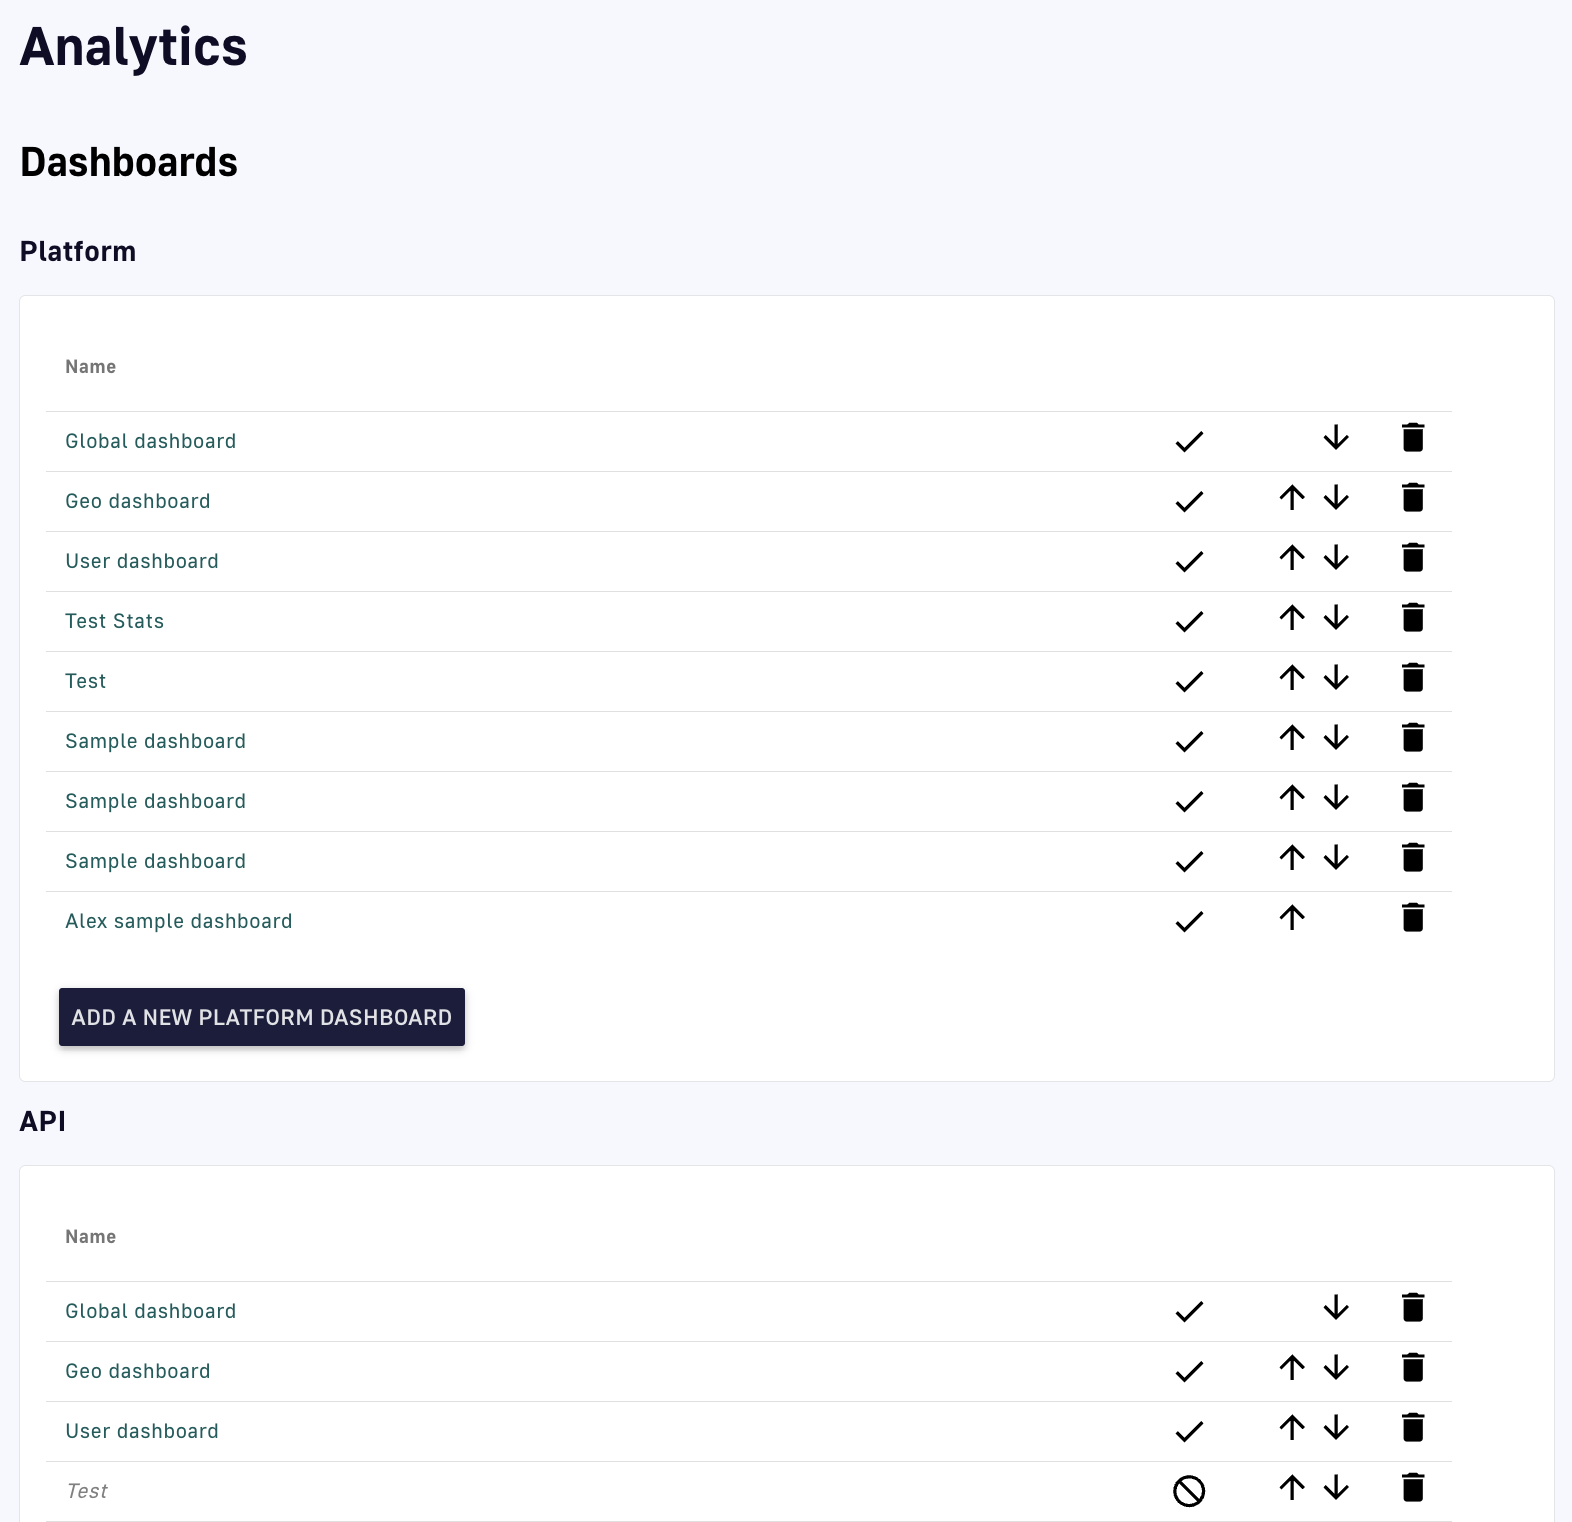
Add a dashboard to a category
-
Define your Dashboard name and Query filter (optional), then click SAVE

Add a dashboard
-
Click the plus icon at the bottom of the screen to add a widget
-
Click the pencil icon to configure the widget:

Configure your widget
- Give your widget a Name and (optionally) a Subtitle
- Select a Widget type from the drop-down menu, e.g., table
- Select a Field from the drop-down menu, e.g., API, or use a custom field
- Choose the information to display for your selected field
- Clice SAVE
-
(Optional) Click ENABLE PREVIEW to preview your new dashboard and widget
View your dashboard
To view your new dashboard and chart:
-
Log in to your APIM Console
-
Click on Analytics in the left nav
-
Under the Dashboard header, select your dashboard from the Select a dashboard drop-down menu
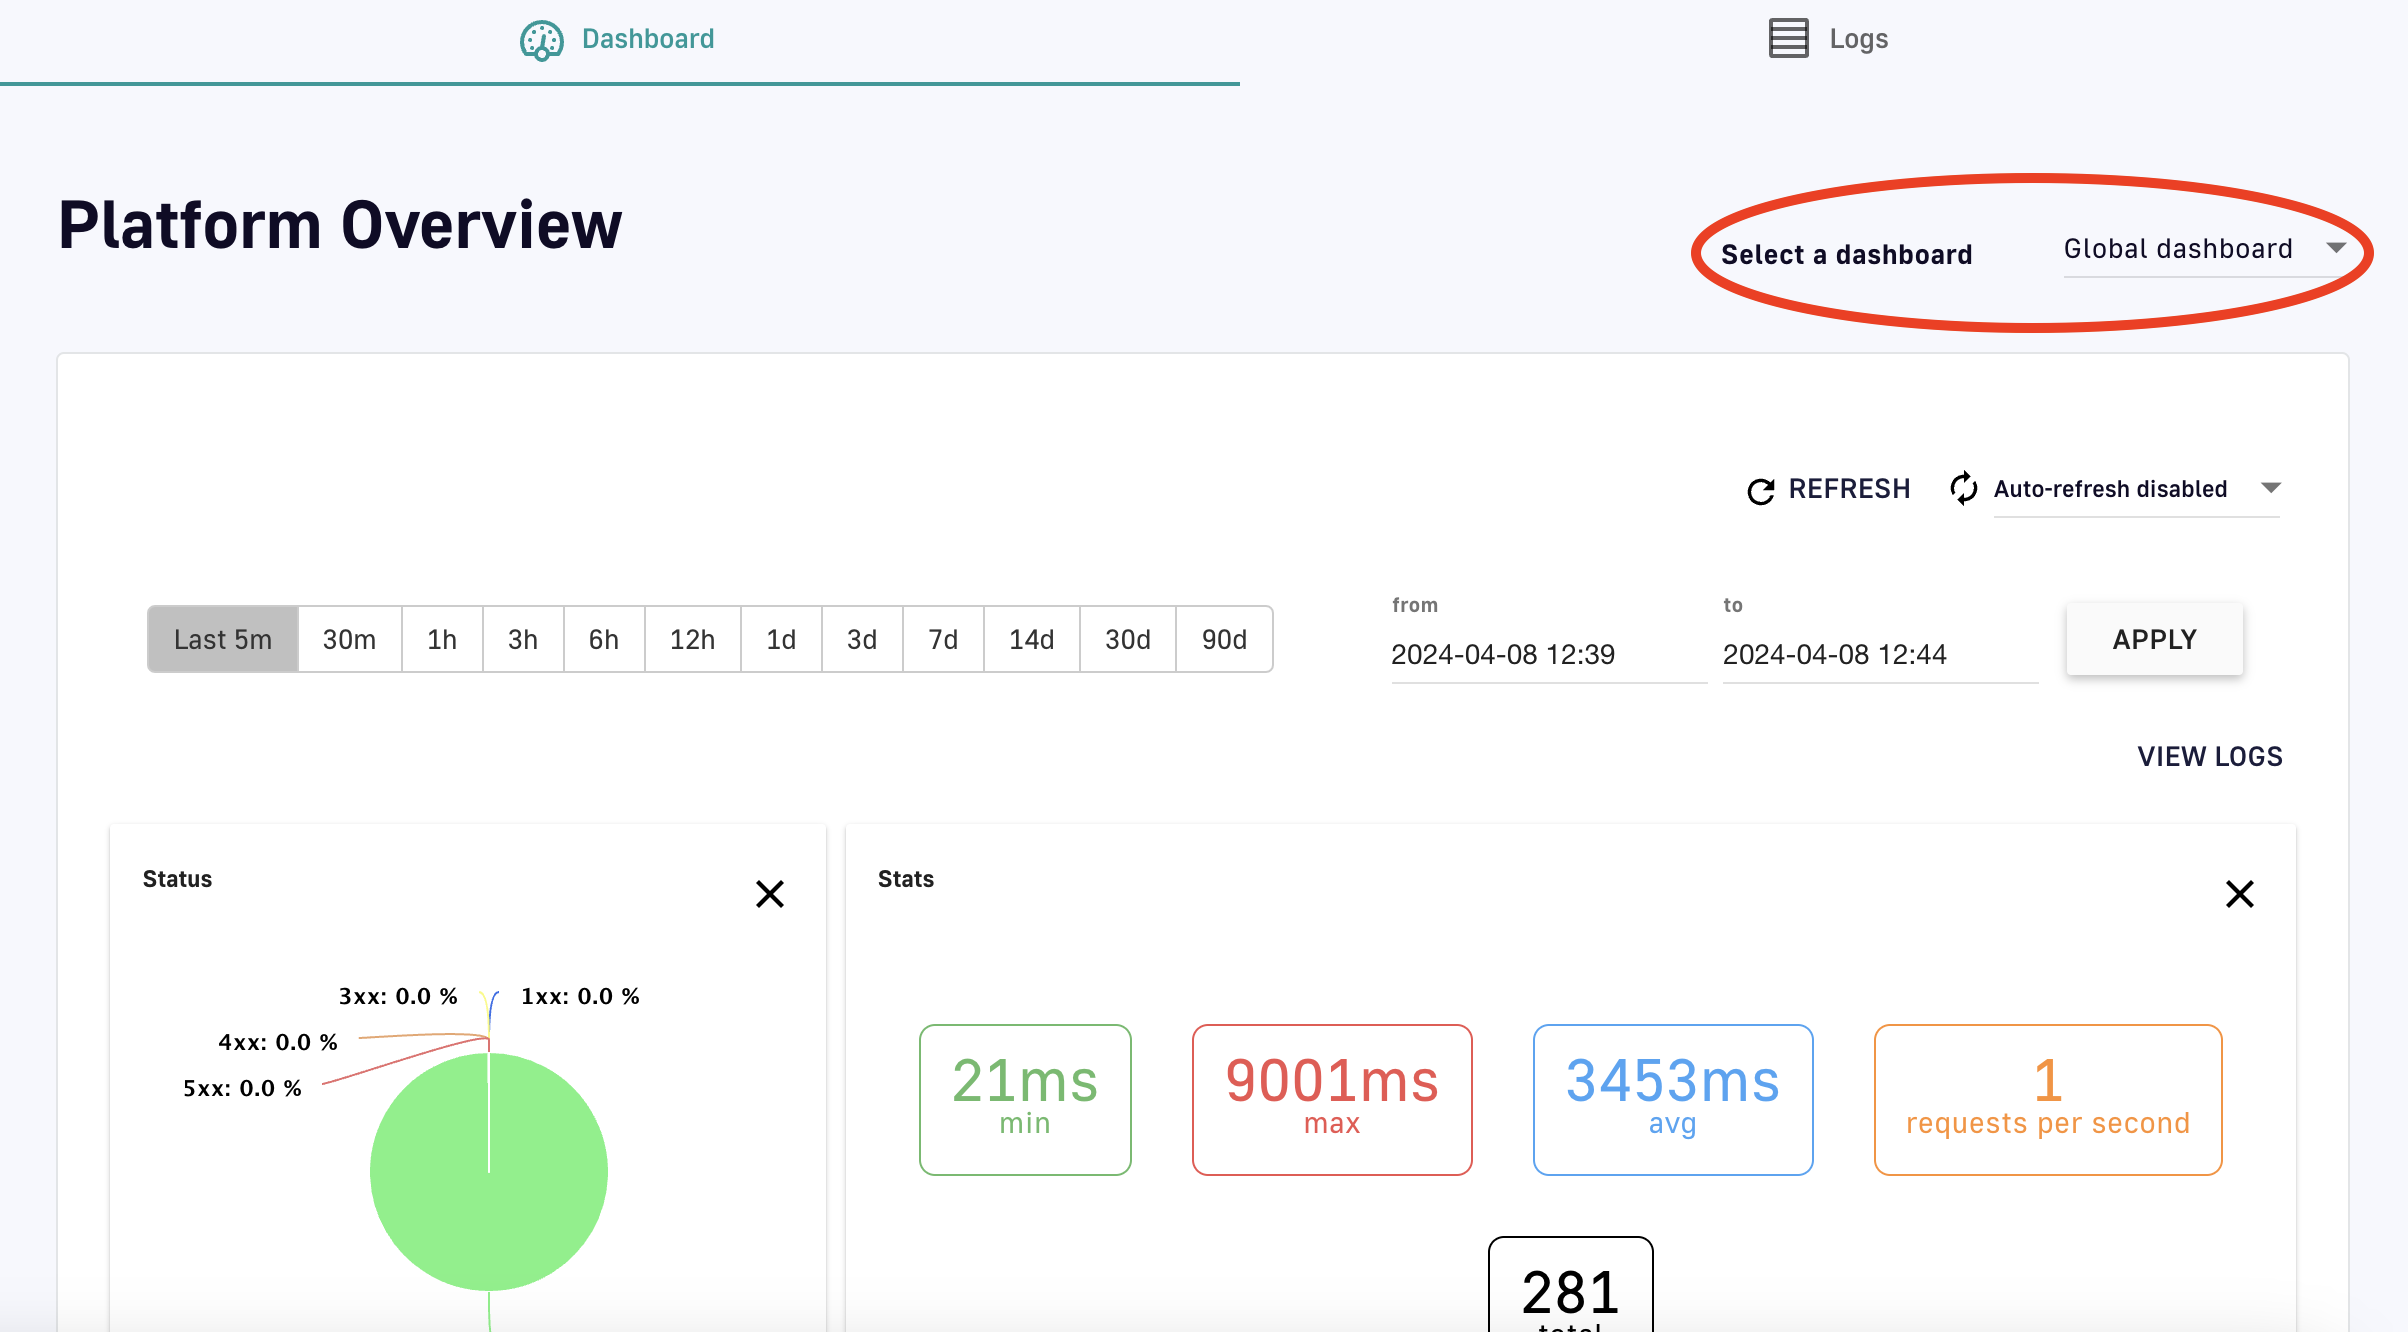
View your dashboard
Edit an existing dashboard
To modify existing dashboards:
- Log in to your APIM Console
- Click on Settings in the left nav
- Click on Analytics in the inner left nav
- Click on the hyperlink of an existing dashboard
- Use the pencil icons to edit widget settings, or the plus icon to add a new widget
- Click SAVE
API Quality
The API Quality feature is only available to v2 APIs
Overview
The DSAPI API Quality feature enables API governance by allowing you to create and automatically assign customizable scores based on certain variables determined to impact API quality. If API Quality is enabled, APIs that you create in DSAPI will automatically be assigned an API quality score.
Configure API Quality
API Quality is configured at the Portal Settings level. To access these settings:
-
Log in to your API Management Console.
-
Select Settings from the left nav.
-
Select API Quality from the inner left nav
-
Configure pre-built quality characteristics that DSAPI automatically enforces:
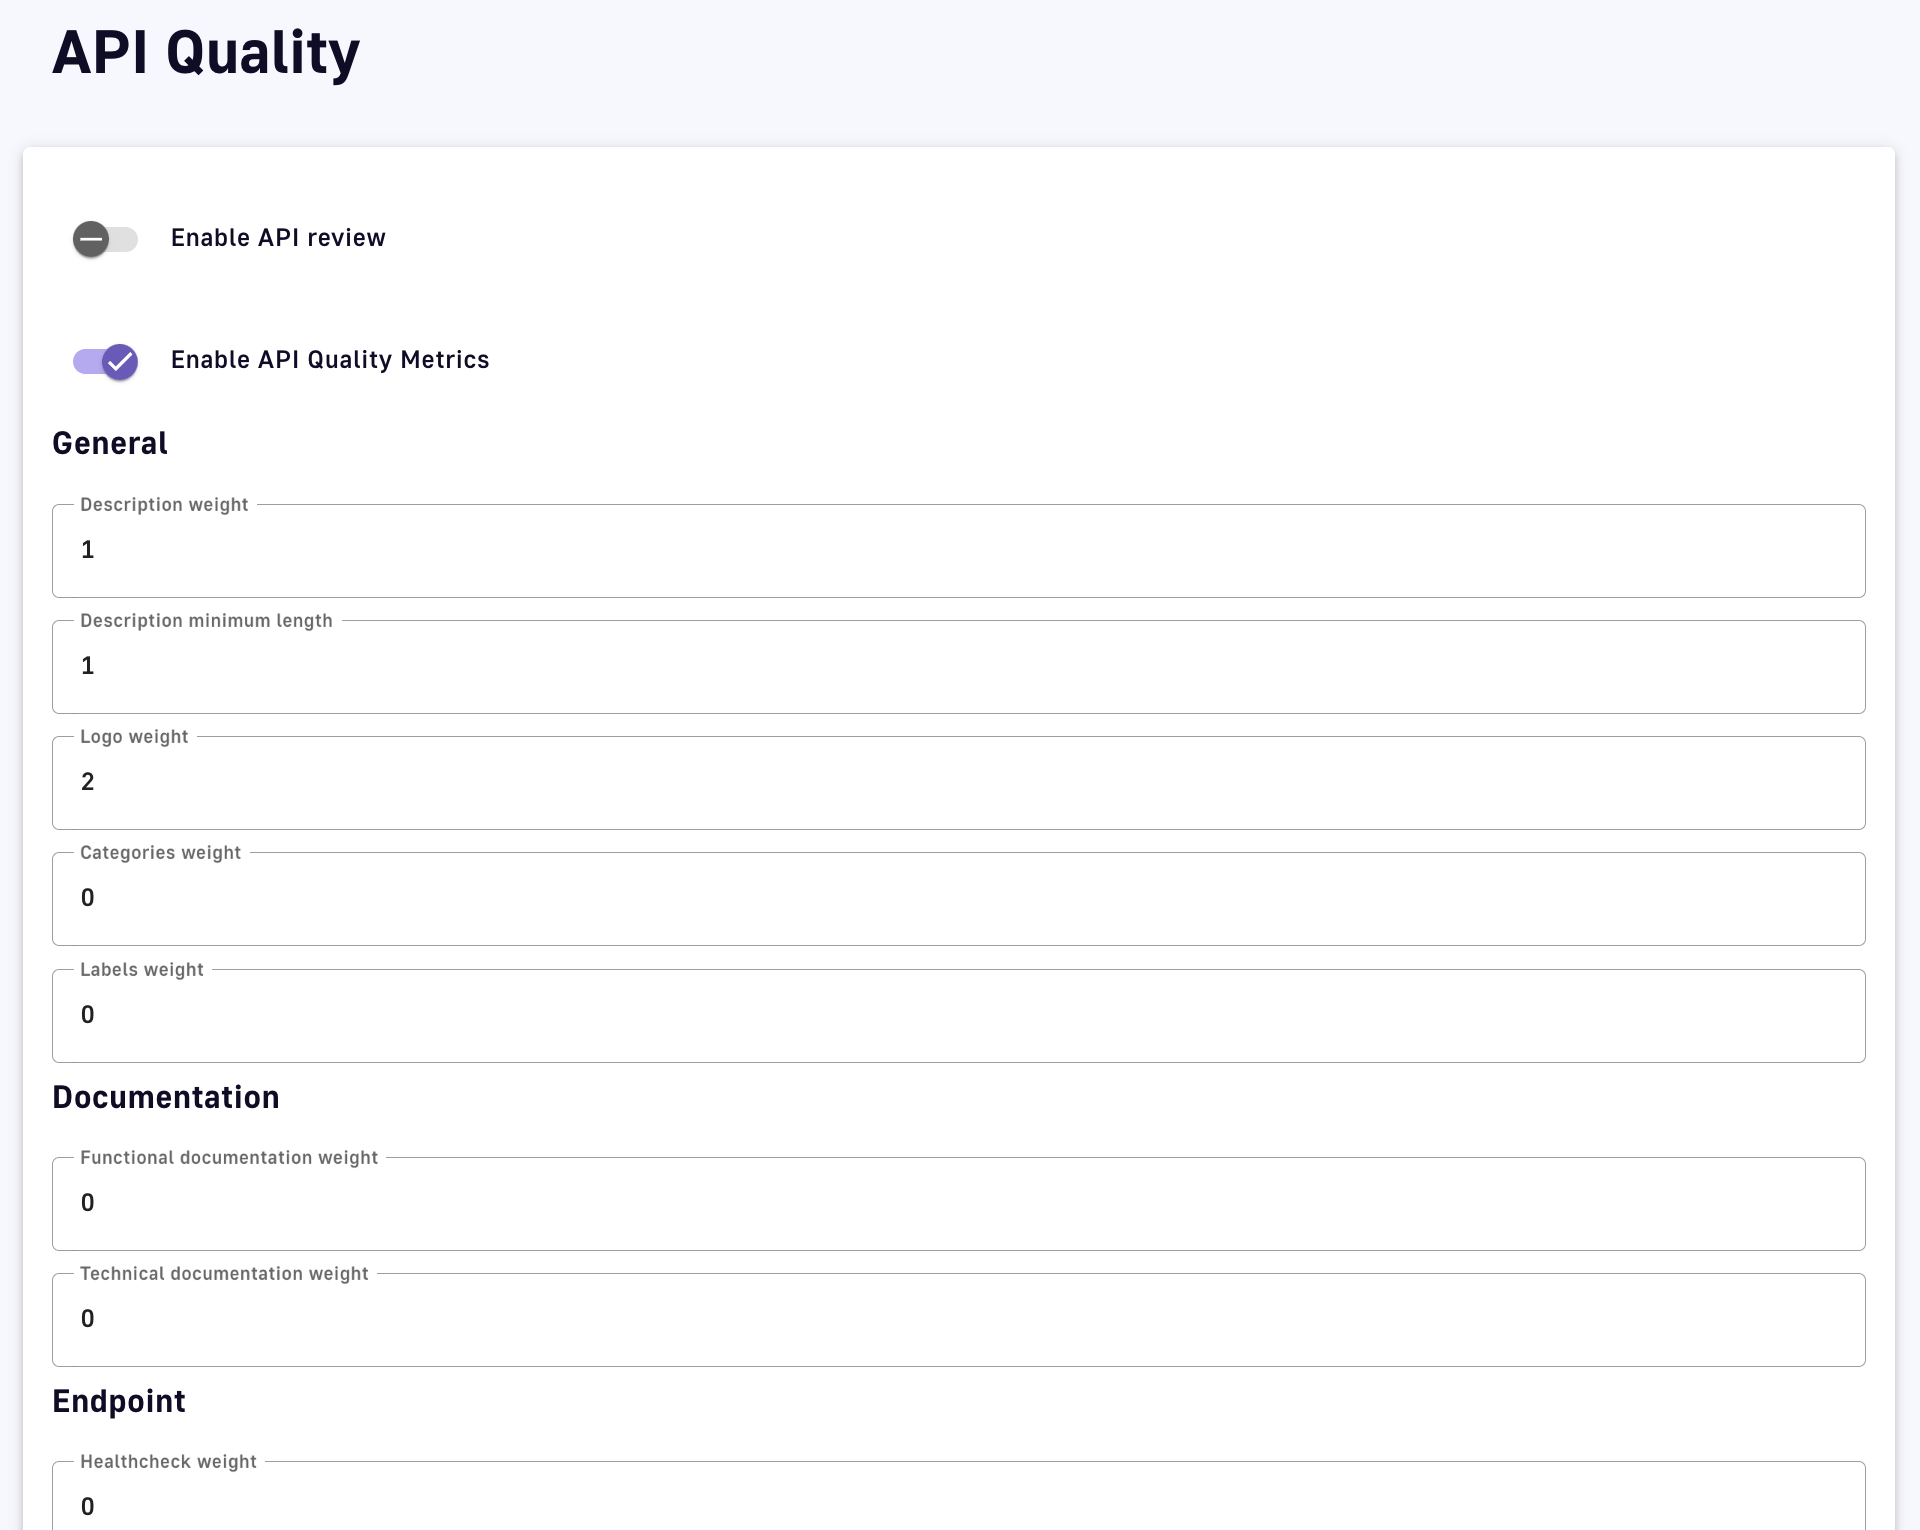
API Quality settings
- Enable API review: Toggle ON to build API Quality review into your workflow and not allow an API to be published without review
- Enable API Quality Metrics: Toggle ON to enable quality to be measured and viewable within an APIs details
- Description: Description weight assigns a weight to the overall description, while Description minimum length, Logo weight, Categories weight, and Labels weight assign weights to description characteristics
- Documentation: Specify Functional documentation weight and Technical documentation weight
- Endpoint: Specify Healthcheck weight
-
Click + Add new quality rule to configure a custom rule that will be enforced manually:
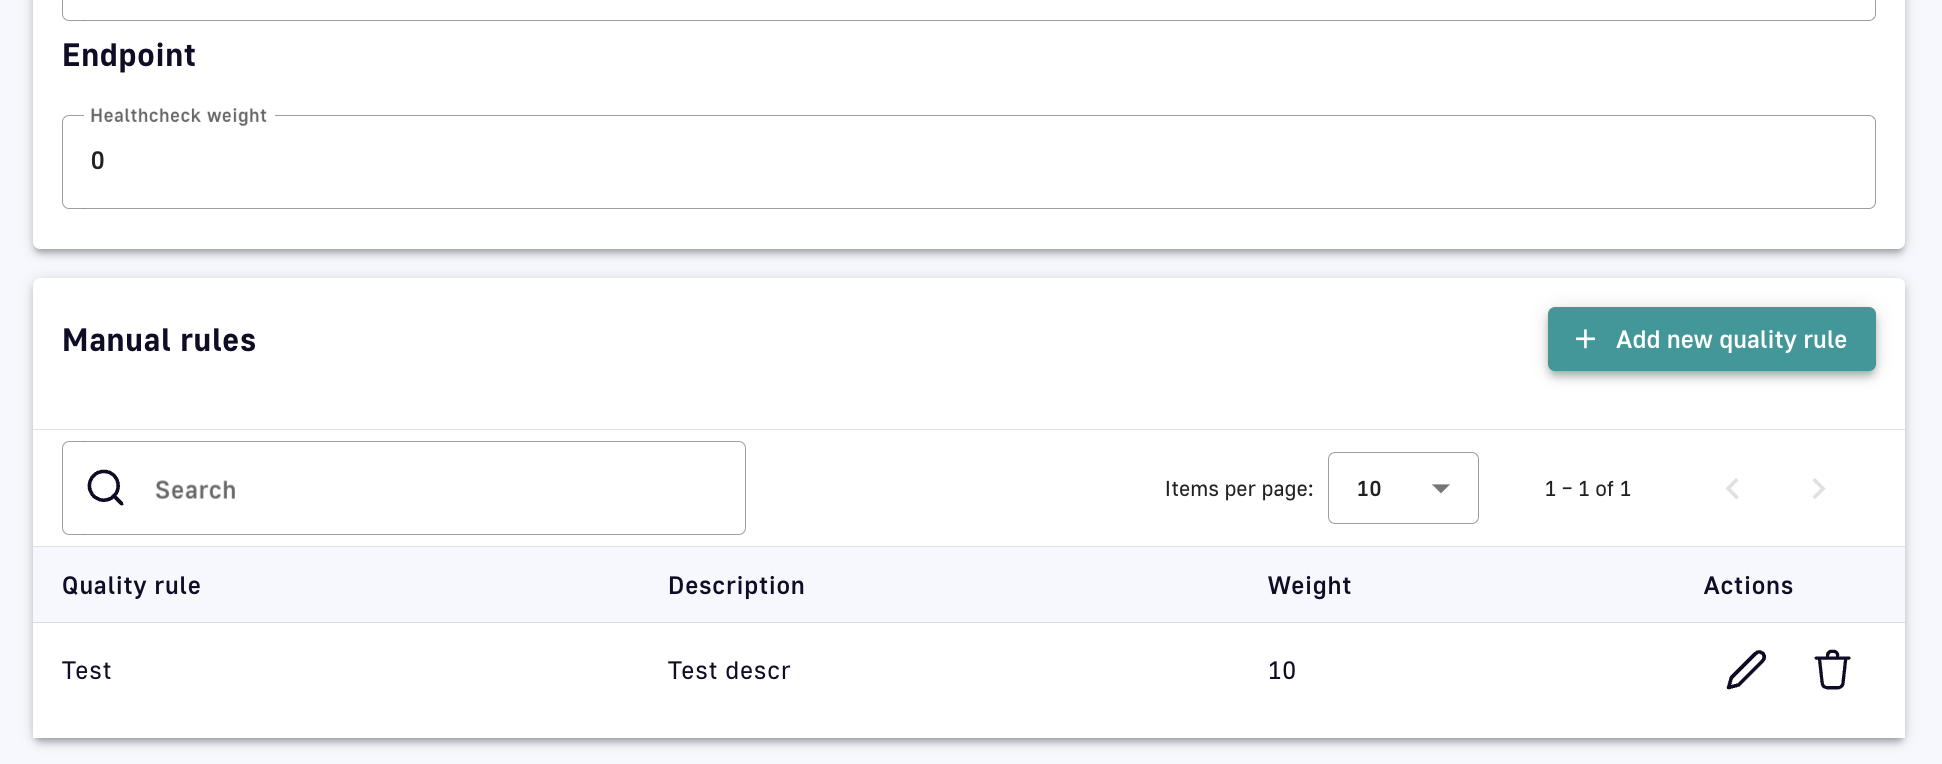
Create a manual custom rule
- Specify the rule name, description, and weight
- Click Create
API Quality view and review
To view an API Quality score:
-
Log in to the API Management Console
-
Select APIs from the left nav
-
Select your API
-
From the inner left nav, select Info under General
-
Scroll to the Quality section to view the API Quality score and rules that are impacting it
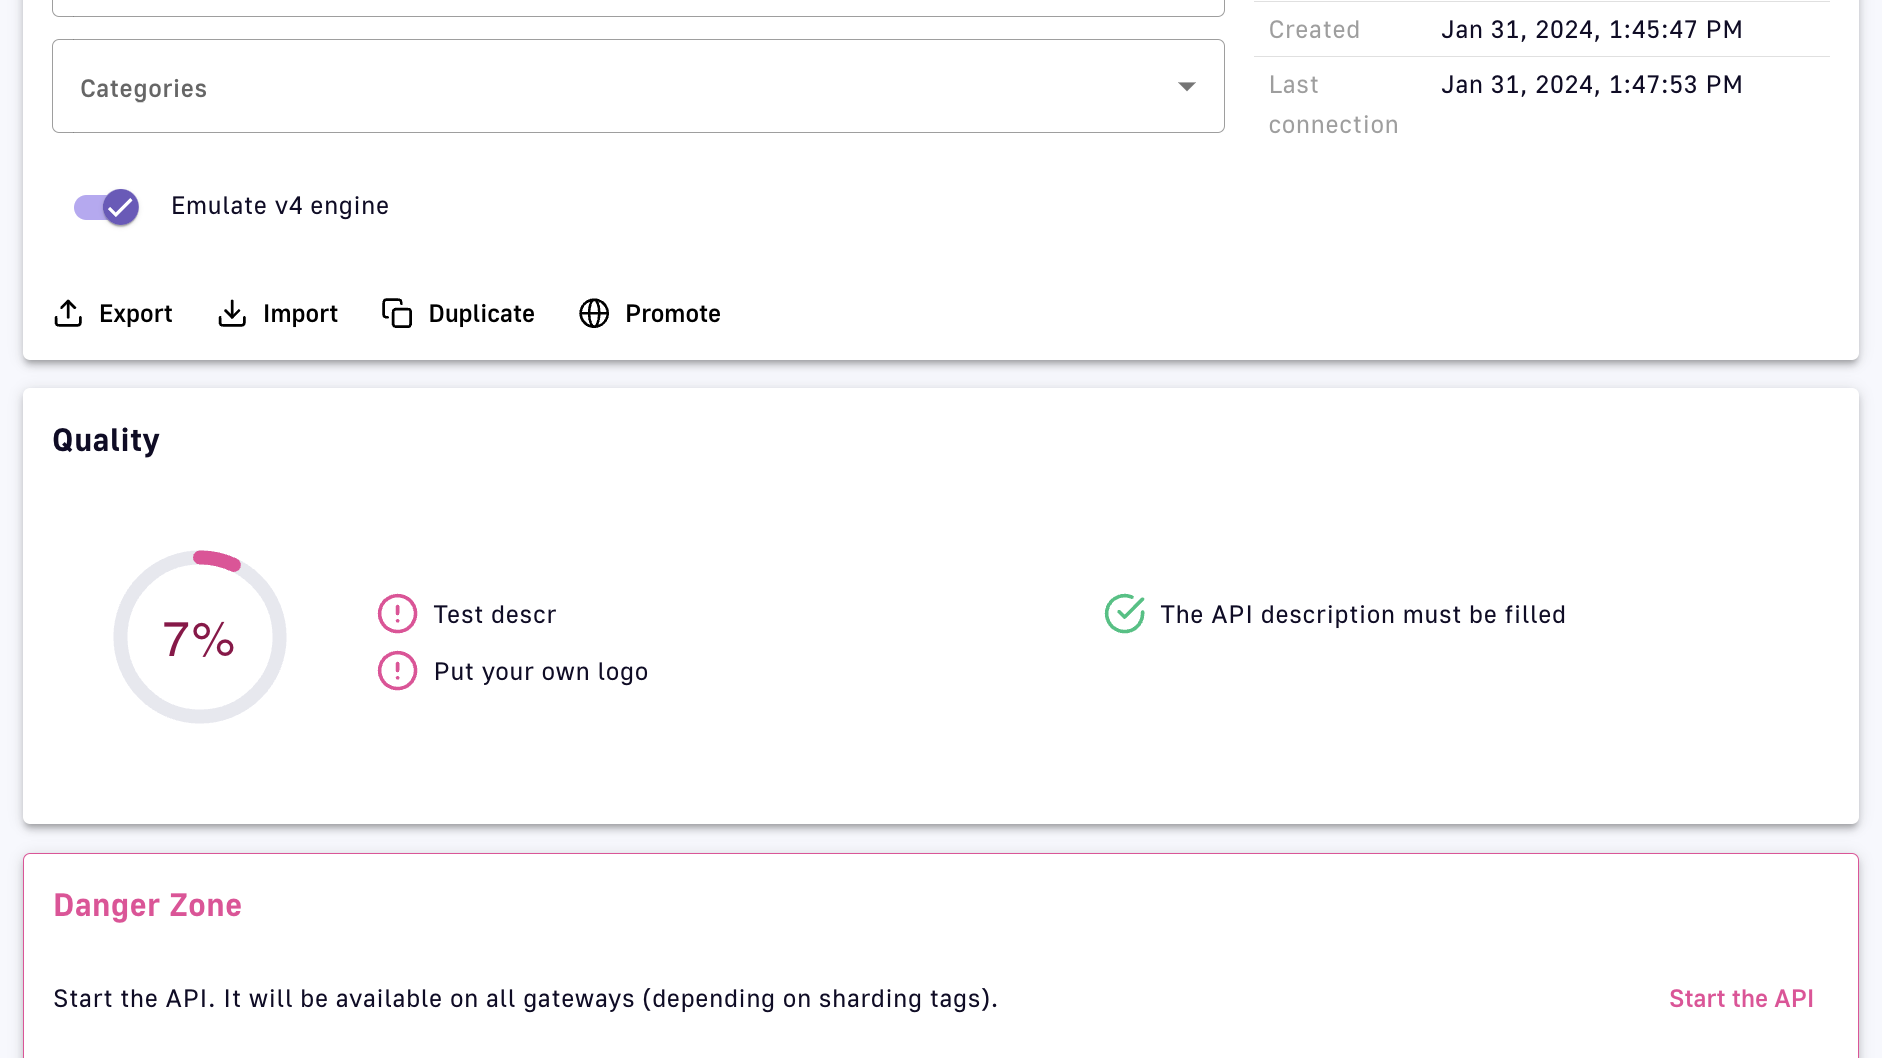
View the API Quality score
DSAPI Expression Language
Overview
DSAPI Expression Language (EL) is used to query and manipulate object graphs and dynamically configure various aspects and policies of an API. It allows you to reference values from the current API transaction to use expressions to create dynamic filters, routing rules, and policies that respond to specific conditions or parameters.
EL is an extended version of the Spring Expression Language (SpEL) that augments standard SpEL capabilities by providing additional object properties inside the expression language context. As an extension of SpEL, all capabilities detailed in the SpEL documentation are available in EL. However, DSAPI has implemented customizations that are detailed below.
Object properties
Custom properties and attributes have special meanings in the DSAPI ecosystem:
- Custom Properties: Defined at the API level and read-only during the Gateway's execution of an API transaction. You can learn more about how to set an API's custom properties here.
- Attributes: Scoped to the current API transaction and can be manipulated during the execution phase through the
assign-attributespolicy. Attributes are used to attach additional information to a request or message via a variable that is dropped after the API transaction is completed.
The following sections define the scope and usage of EL:
Basic usage
The information below summarizes:
- Object properties added to the EL context
- How attributes are accessed for v4 and v2 APIs
- Commonly used operators and functions
Expressions
Expressions in DSAPI are enclosed in curly braces {} and begin with the # symbol. Both dot notation and bracket notation are supported for accessing the properties of an object.
Example: {#context.attributes['user'].email}
Dot notation vs bracket notation
Please note that dot notation will not work with special characters:
{#request.headers.my-header} <- This will result in an error
Bracket notation should be used for property names that include a space or a hyphen, or start with a number:
{#request.headers['my-header']}
Lists
Expressions can be used to assign lists, e.g., {({'admin', 'writer'})}
- The outer enclosing brackets start and end the EL expression
- The parentheses indicates an object is being instantiated
- The list comprises the inner brackets and enclosed values, e.g.,
{'admin', 'writer'}
EL allows you to reference certain values injected into the EL context as object properties. The available object properties will be further detailed in later sections. EL adds the following root-level object properties:
{#api.properties}: Contains custom properties defined by the API publisher for that Gateway API.{#dictionaries}: Contains custom dictionaries defined by the API publisher for that Gateway API.{#endpoints}: Contains information about the Gateway API's respective endpoints.{#request}: Contains information about the current API request.{#response}: Contains information about the current API response.{#message}: Contains information about the current API message.{#node}: Contains information about the node hosting the instance of the Gateway handling the API transaction.
The attributes object property contains attributes that are automatically created by the APIM Gateway during an API transaction or added during the execution phase through the Assign Attributes policy. However, attributes fall into one of two categories based on API type:
{#context.attributes}: Contains attributes associated with v2 APIs or v4 Proxy APIs. A v4 Proxy API is created using the Proxy upstream protocol method.{#message.attributes}: Contains attributes associated with v4 Message APIs. These APIs are created using the Introspect messages from event-driven backend method.
See the v4 API creation wizard for more details.
EL supports various operators, such as arithmetic, logical, comparison, and ternary operators. Examples of commonly used operators in DSAPI include:
- Arithmetic operators:
+, -, *, / - Logical operators:
&& (logical and), || (logical or), ! (logical not) - Comparison operators:
==, !=, <, <=, >, >= - Ternary operators:
condition ? expression1 : expression2
EL provides a variety of built-in functions to manipulate and transform data in expressions. Examples of commonly used functions in DSAPI include:
- String functions:
length(), substring(), replace() #jsonPath: Evaluates ajsonPathon a specified object. This function invokesJsonPathUtils.evaluate(…), which delegates to the Jayway JsonPath library. The best way to learn jsonPath syntax is by using the online evaluator.#xpath: To evaluate anxpathon some provided object. For more information regarding XML and XPath, see XML Support - Dealing with XML Payloads in the SpEL documentation.
jsonPath example
As an example of how jsonPath can be used with EL, suppose you have a JSON payload in the request body that contains the following data:
{
  "store": {
    "book": [
      {
        "category": "fiction",
        "author": "Herman Melville",
        "title": "Moby Dick",
        "isbn": "0-553-21311-3",
        "price": 8.99
      },
      {
        "category": "fiction",
        "author": "J. R. R. Tolkien",
        "title": "The Lord of the Rings",
        "isbn": "0-395-19395-8",
        "price": 22.99
      }
    ]
  }
}
To extract the value of the price property for the book with title "The Lord of the Rings," you can use the following expression:
{#jsonPath(#request.content, "$.store.book[?(@.title=='The Lord of the Rings')].price")}
APIs
Using EL, you can access information about an API transaction through several root-level objects that are injected into the EL context: custom properties, dictionaries, and endpoints.
{#api.properties} root-level object property.
Examples
- Get the value of the property
my-propertydefined in an API's custom properties using{#api.properties['my-property']} - Get the value of the property
my-secretdefined and encrypted in an API's custom properties using{#api.properties['my-secret']}to pass a secured property to your backend
Encrypted custom properties
When accessing an encrypted custom property, DSAPI's Gateway will automatically manage the decryption and provide a plain text value.
Dictionaries work similarly to custom properties, but you need to specify the dictionary ID as well as the dictionary property name. Dictionary properties are simply key-value pairs that can be accessed from the {#dictionaries} root-level object property.
Example
Get the value of the dictionary property dict-key defined in dictionary my-dictionary-id using {#dictionaries['my-dictionary-id']['dict-key']}.
When you define endpoints for your API, you need to give them a name that is a unique identifier across all endpoints of the API. This identifier can be used to get an endpoint reference (i.e., a URI) from the {#endpoints} root-level object property.
Example
When you create an API, a default endpoint is created that corresponds to the value you set for the backend property. This endpoint can be retrieved with EL by using the following syntax: {#endpoints['default']}.
Request
EL can be used to access request properties and attributes as described below.
Request object properties
The object properties you can access from the {#request} root-level object property and use for API requests are listed below.
| Object Property | Description | Type | Example |
|---|---|---|---|
| content | Body content | string | - |
| contextPath | Context path | string | /v2/ |
| headers | Headers | key / value | X-Custom → myvalue |
| host | The host of the request. This is preferable to using the Host header of the request because HTTP2 requests do not provide this header. | string | DSAPI.example.com |
| id | Identifier | string | 12345678-90ab-cdef-1234-567890ab |
| localAddress | Local address | string | 0:0:0:0:0:0:0:1 |
| method | HTTP method | string | GET |
| params | Query parameters | key / value | order → 100 |
| path | Path | string | /v2/store/MyStore |
| pathInfo | Path info | string | /store/MyStore |
| pathInfos | Path info parts | array of strings | [,store,MyStore] |
| pathParams | Path parameters | key / value | storeId → MyStore (see Warning for details) |
| pathParamsRaw | Path parameters | string | /something/:id/** |
| paths | Path parts | array of strings | [,v2,store,MyStore] |
| remoteAddress | Remote address | string | 0:0:0:0:0:0:0:1 |
| scheme | The scheme of the request (either http or https) | string | http |
| host | string | ||
| ssl | SSL session information | SSL object | - |
| timestamp | Timestamp | long | 1602781000267 |
| transactionId | Transaction identifier | string | cd123456-7890-abcd-ef12-34567890 |
| uri | URI | string | /v2/store/MyStore?order=100 |
| version | HTTP version | string | HTTP_1_1 |
- Get the value of the
Content-Typeheader for an incoming HTTP request using{#request.headers['content-type']} - Get the second part of the request path using
{#request.paths[1]}
Request context attributes
When APIM Gateway handles an incoming API request, some object properties are automatically created or added during the execution phase through the Assign Attributes policy. These object properties are known as attributes. Attributes can be accessed from the {#context.attributes} root-level object property.
Some policies (e.g., the OAuth2 policy) register other attributes in the request context. For more information, refer to the documentation for individual policies.
Request context attributes and examples are listed below.
| Object Property | Description | Type | Nullable |
|---|---|---|---|
| api | Called API | string | - |
| api-key | The API key used (for an API Key plan) | string | X (for no API Key plan) |
| application | The authenticated application making incoming HTTP requests | string | X (for Keyless plan) |
| context-path | Context path | string | - |
| plan | Plan used to manage incoming HTTP requests | string | - |
| resolved-path | The path defined in policies | string | - |
| user-id | The user identifier of an incoming HTTP request: * The subscription ID for an API Key plan * The remote IP for a Keyless plan | string | - |
- Get the value of the
user-idattribute for an incoming HTTP request using{#context.attributes['user-id']} - Get the value of the
planattribute for an incoming HTTP request using{#context.attributes['plan']}
SSL object properties
The object properties you can access in the ssl session object from the {#request.ssl} root-level object property are listed below.
| Object Property | Description | Type | Example |
|---|---|---|---|
| clientHost | Host name of the client | string | client.domain.com |
| clientPort | Port number of the client | long | 443 |
| client | Client information | Principal object | - |
| server | Server information | Principal object | - |
{#request.ssl.clientHost}
Principal objects
The client and server objects are of type Principal. A Principal object represents the currently authenticated user who is making the request to the API and provides access to various user attributes such as username, email address, roles, and permissions.
The Principal object is typically used with security policies such as OAuth2, JWT, or basic authentication to enforce access control and authorization rules on incoming requests. For example, a policy can check if the current user has a specific role or permission before allowing them to access a protected resource.
If the Principal object is not defined, client and server object values are empty. Otherwise, there are domain name attributes you can access from the {#request.ssl.client} and {#request.ssl.server} Prinicipal objects as shown in the table below:
Limitation on arrays
All attributes of the Principalobject are flattened to be accessed directly with dot or bracket notation. While some of these attributes can be arrays, EL will only return the first item in the array. To retrieve all values of an attribute, use the attributes object property shown in the table and examples below.
| Object Property | Description | Type | Example |
|---|---|---|---|
| attributes | Retrieves all the Prinicipal object's domain name attributes | key / value | "ou" → ["Test team", "Dev team"] |
| businessCategory | Business category | string | - |
| c | Country code | string | FR |
| cn | Common name | string | - |
| countryOfCitizenship | RFC 3039 CountryOfCitizenship | string | - |
| countryOfResidence | RFC 3039 CountryOfResidence | string | - |
| dateOfBirth | RFC 3039 RFC 3039 DateOfBirth | string | 19830719000000Z |
| dc | Domain component | string | - |
| defined | Returns true if the Principal object is defined and contains values. Returns false otherwise. | boolean | - |
| description | Description | string | - |
| dmdName | RFC 2256 directory management domain | string | - |
| dn | Fully qualified domain name | string | - |
| dnQualifier | Domain name qualifier | string | - |
| e | Email address in Verisign certificates | string | - |
| emailAddress | Email address (RSA PKCS#9 extension) | string | - |
| gender | RFC 3039 Gender | string | "M", "F", "m" or "f" |
| generation | Naming attributes of type X520name | string | - |
| givenname | Naming attributes of type X520name | string | - |
| initials | Naming attributes of type X520name | string | - |
| l | Locality name | string | - |
| name | Name | string | - |
| nameAtBirth | ISIS-MTT NameAtBirth | string | - |
| o | Organization | string | - |
| organizationIdentifier | Organization identifier | string | - |
| ou | Organization unit name | string | - |
| placeOfBirth | RFC 3039 PlaceOfBirth | string | - |
| postalAddress | RFC 3039 PostalAddress | string | - |
| postalCode | Postal code | string | - |
| pseudonym | RFC 3039 Pseudonym | string | - |
| role | Role | string | - |
| serialnumber | Device serial number name | string | - |
| st | State or province name | string | - |
| street | Street | string | - |
| surname | Naming attributes of type X520name | string | - |
| t | Title | string | - |
| telephoneNumber | Telephone number | string | - |
| uid | LDAP User id | string | - |
| uniqueIdentifier | Naming attributes of type X520name | string | - |
| unstructuredAddress | Unstructured address (from PKCS#9) | string | - |
Standard Object Properties
- Get the client DN from the SSL session:
{#request.ssl.client.dn} - Get the server organization from the SSL session:
{#request.ssl.server.o}
Arrays and boolean logic
- Get all the organization units of the server from the SSL session:
{#request.ssl.server.attributes['ou'][0]}{#request.ssl.server.attributes['OU'][1]}{#request.ssl.server.attributes['Ou'][2]}
- Get a custom attribute of the client from the SSL session:
{#request.ssl.client.attributes['1.2.3.4'][0]} - Determine if the SSL attributes of the client are set:
{#request.ssl.client.defined}
Response
The object properties you can access for API responses from the {#response} root-level object property are listed below.
| Object Property | Description | Type | Example |
|---|---|---|---|
| content | Body content | string | - |
| headers | Headers | key / value | X-Custom → myvalue |
| status | Status of the HTTP response | int | 200 |
{#response.status}
Message
The object properties you can access for API messages from the {#message} root-level object property are listed below. A message (either sent or received) may also contain attributes that can be retrieved via {#message.attributes[key]}.
The EL used for a message does not change based on phase. EL is executed on the message itself, so whether the message is sent in the subscribe or publish phase is irrelevant.
| Object Property | Description | Type | Example |
|---|---|---|---|
| attributeNames | The names of the attributes | list / array | - |
| attributes | Attributes attached to the message | key / value | - |
| content | Content of the message | string | - |
| contentLength | Size of the content | integer | - |
| error | Flag regarding the error state of the message | boolean | - |
| headers | Headers attached to the message | key / value | - |
| id | ID of the message | string | - |
| metadata | Metadata attached to the message | key / value | - |
- Get the value of the
Content-Typeheader for a message using{#message.headers['content-type']} - Get the size of a message using
{#message.contentLength}
Nodes
A node is a component that represents an instance of the DSAPI Gateway. Each node runs a copy of the Gateway that is responsible for handling incoming requests, executing policies, and forwarding requests to the appropriate upstream services. The object properties you can access for nodes from the {#node} root-level object property are listed below.
| Object Property | Description | Type | Example |
|---|---|---|---|
| id | Node ID | string | 975de338-90ff-41ab-9de3-3890ff41ab62 |
| shardingTags | Node sharding tag | array of string | [internal,external] |
| tenant | Node tenant | string | Europe |
| version | Node version | string | 3.14.0 |
| zone | Zone the node is grouped in | string | europe-west-2 |
{#node.version}
Mixin
In previous examples, we showed various ways to manipulate objects available in the EL context. You can also mix root-level object property usage to provide an increasingly dynamic configuration.
For example, to retrieve the value of an HTTP header where the name is based on an API custom property named my-property, use {#request.headers[#api.properties['my-property']]}.
Policies
You can use the EL to update some aspects of policy configuration. The policy specifies if it supports EL or not by including a Condition section in the Policy Studio configuration.
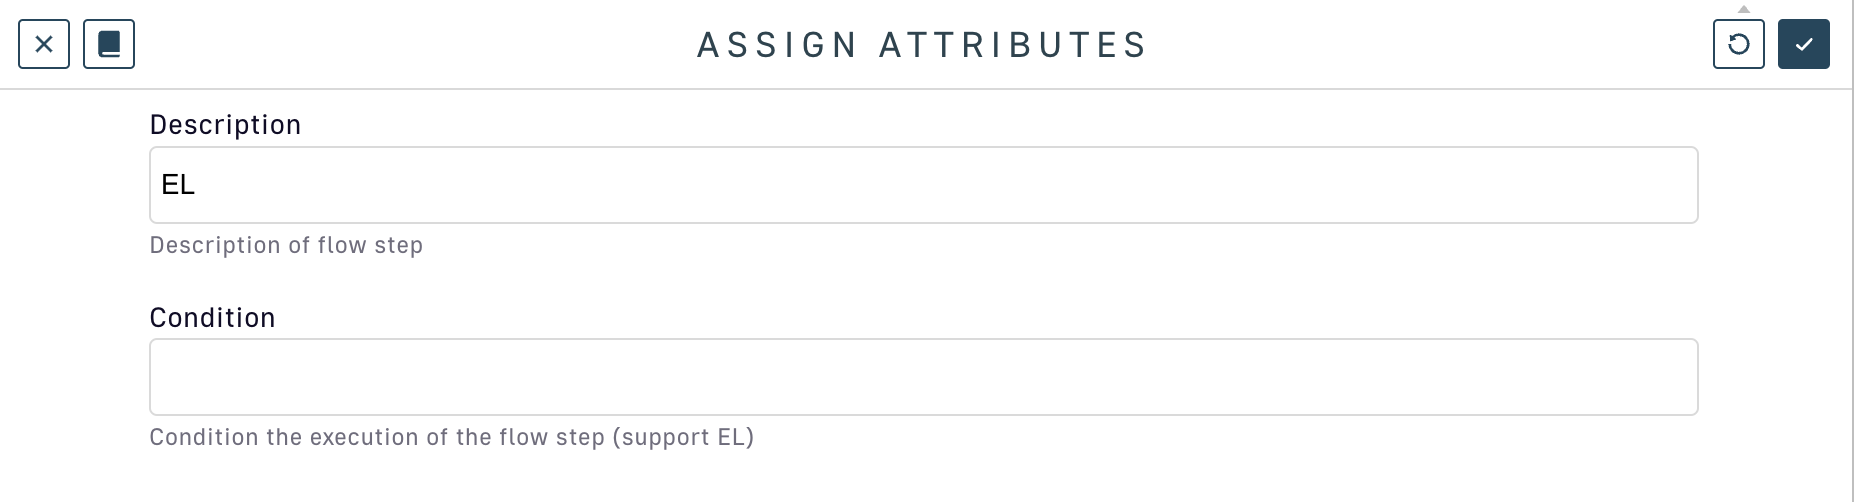
Assign attributes policy supports EL conditions
Conditions
You can use the EL to set a condition of execution (see 'conditional policies and flows conditions') and it is possible to use logical operators such as && or ||, as shown in the example below:
{#request.headers['my-header'] != null && #request.headers['my-header'][0] =="my-value"}
Alternate equality check
You can use the equals() method instead of ==. When you use .equals(), it is recommended to put the string first to prevent an error. For example, if #request.headers['my-header'] is null , then 'my-value'.equals(#request.headers['my-header'])will prevent an error.
Debugging
In case of an error when using EL, an exception will be raised :
The template evaluation returns an error. Expression: {#context.error}
If debugging your expression is difficult, consider the following example for guidance:
Assume {#request.content.length() >= 10} is the conditional expression on a flow. When testing, you are expecting the condition to evaluate to false and stop the flow from executing, but the flow continues to function unexpectedly.