Administration Last updated 17-Dec-2024
DSAPI offers a robust set of platform and user administration capabilities. This section discusses DSAPI Organizations, Environments, user roles and permissions, and methods for requesting support..
Administering Organizations and Environments
Organizations
In DSAPI, an Organization represents a logical portion of a company that shares unique characteristics and/or serves a specific business purpose, e.g., a region or business unit.
Organizations are defined to maximize resources and capabilities. In the context of an APIM installation, an organization is the level at which shared Environment configurations are managed, such as users, roles, identity providers, and notification templates. A single Organization can include multiple Environments.
Configure your Organization
To access your Organization settings:
- Log in to your DSAPI APIM Console
- Select Organization from the left nav
- Select Settings under Console
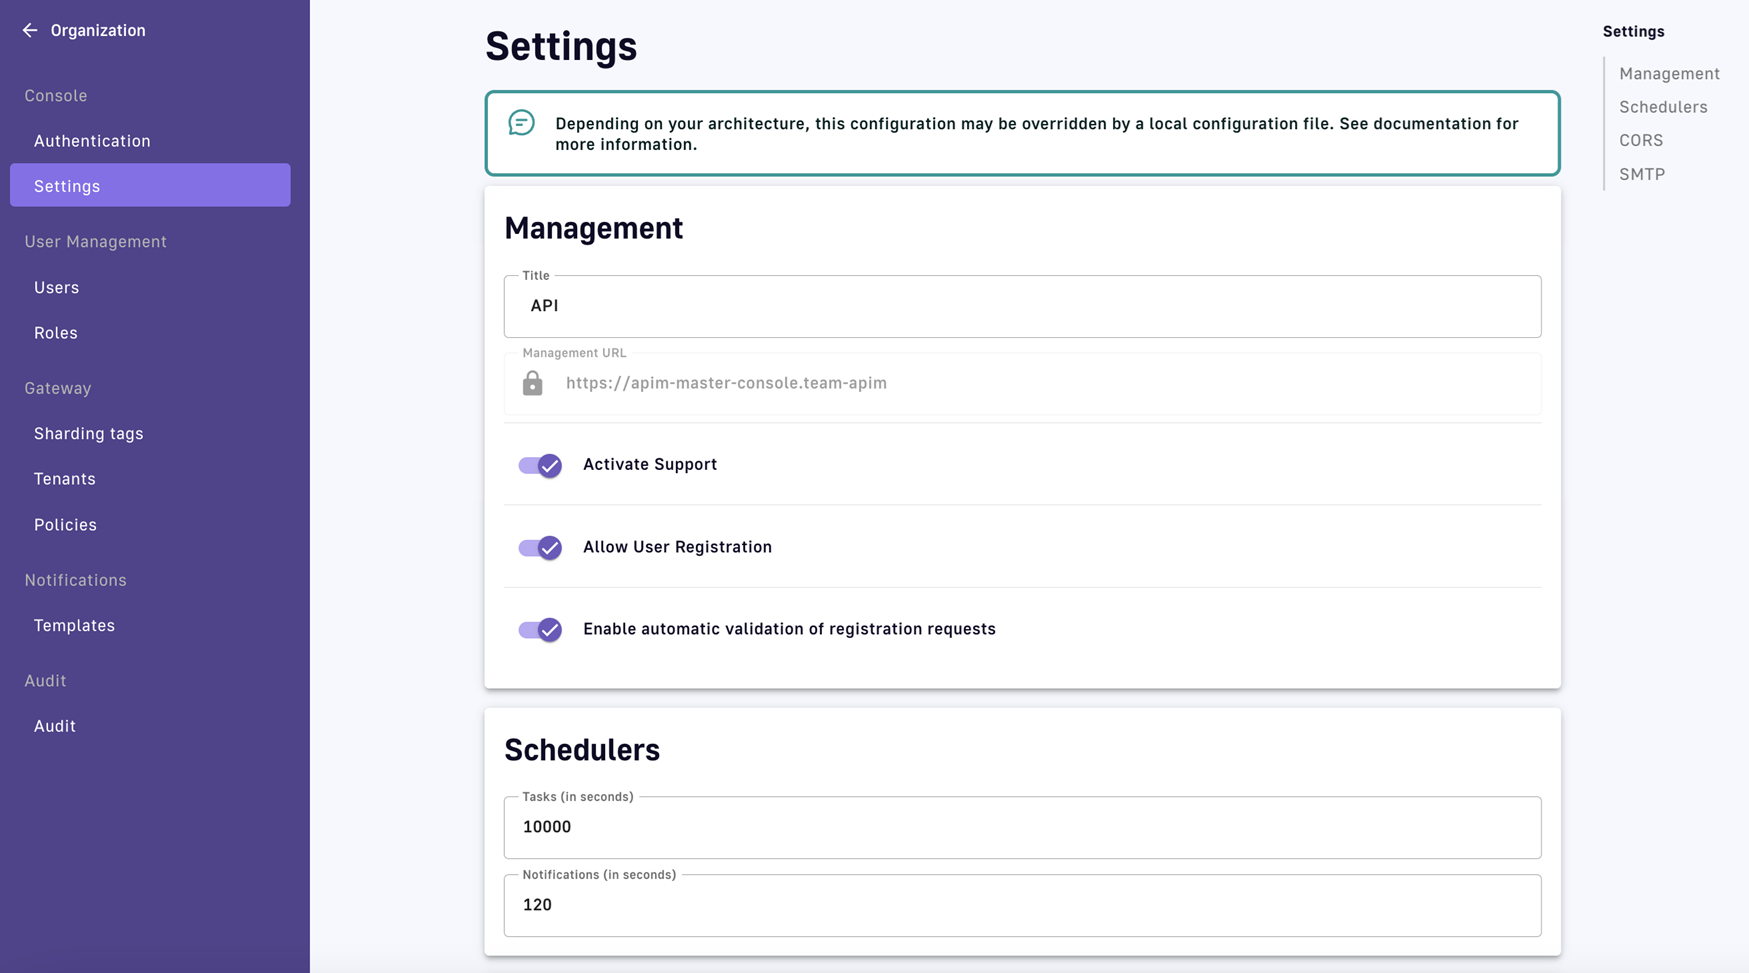
Organization settings
View or define the settings for your Organization, described below:
Management settings include:
- The title of your Organization
- The URL of your Management Console
- The option to enable support, user registration, and/or automatic validation of registration requests
Schedulers settings include:
- Tasks: How often (in seconds) DSAPI will check for new tasks
- Notifications: How often (in seconds) DSAPI will check for new notifications
Examples:
- Task: An API approver is alerted to accept or reject a request to access the API
- Notification: An API owner sends a message to an API's subscribers via the Messages feature
When a new task or notification is detected, a small indicator appears in the user's icon, on the top right of the screen.
Organization-wide CORS settings include:
- Allow-origin: Specifies a URI that may access the resource. Scheme, domain and port are part of the same-origin definition.
- Access-Control-Allow-Methods: Used in response to a preflight request to specify the method(s) allowed when accessing the resource.
- Allow-Headers: Used in response to a preflight request to indicate which HTTP headers can be used when making the request.
- Exposed-Headers: Used in response to a preflight request to indicate which HTTP headers can be exposed when making the request.
- Max age: How long the response from a preflight request can be cached by clients.
Organization-wide emailing settings include:
- Whether or not emailing is enabled
- Host
- Port
- Username
- Password
- Protocol
- Subject line content
- “From” email address
- Mail properties:
- Whether or not to enable authentication
- Whether or not to enable Start TLS
- SSL Trust
To learn more about notifications, refer to the Notifications documentation.
Platform access
As a part of Organization administration, DSAPI offers multiple ways to manage and control access to the DSAPI platform via identity provider configuration and login/registration settings. See the Authentication documentation for details.
Environments
In DSAPI, an Environment acts as the workspace within which users can manage their APIs, applications, and subscriptions. Each Environment manages its own categories, groups, documentation pages, and quality rules. Examples include:
- Technical Environments such as DEV / TEST / PRODUCTION
- Functional Environments such as PRIVATE APIS / PUBLIC APIS / PARTNERSHIP
Configuring sign-in access
This article focuses on how to configure SSO and authentication methods for accessing the DSAPI platform using DSAPI Access Management, Google, Github, Azure AD, and Keycloak
Introduction
DSAPI API Management (APIM) natively support several types of authentication methods to allow users to securely access APIM. For more information about configuring each authentication method using the `DSAPI.yaml` file or the DSAPI API Management Console, see the following articles:
Authentication Providers
Overview
The following sections describe how to configure:
In-memory users
This example shows a basic in-memory implementation, providing a simple and convenient way to declare advanced users of APIM, such as administrator users. To do this, you could configure the DSAPI.yaml file as follows:
# Authentication and identity sources
    # Users can have following roles (authorities):
    #  USER: Can access portal and be a member of an API
    #  API_PUBLISHER: Can create and manage APIs
    #  API_CONSUMER: Can create and manage Applications
    #  ADMIN: Can manage global system
    security:
      # When using an authentication providers, use trustAll mode for TLS connections
      # trustAll: false
      providers:  # authentication providers
        - type: memory
          # allow search results to display the user email. Be careful, It may be contrary to the user privacy.
    #      allow-email-in-search-results: true
          # password encoding/hashing algorithm. One of:
          # - bcrypt : passwords are hashed with bcrypt (supports only $2a$ algorithm)
          # - none : passwords are not hashed/encrypted
          # default value is bcrypt
          password-encoding-algo: bcrypt
          users:
            - user:
              username: user
              #firstname:
              #lastname:
              # Passwords are encoded using BCrypt
              # Password value: password
              password: $2a$10$9kjw/SH9gucCId3Lnt6EmuFreUAcXSZgpvAYuW2ISv7hSOhHRH1AO
              roles: ORGANIZATION:USER,ENVIRONMENT:USER
              # Useful to receive notifications
              #email:
            - user:
              username: admin
              #firstname:
              #lastname:
              # Password value: admin
              password: $2a$10$Ihk05VSds5rUSgMdsMVi9OKMIx2yUvMz7y9VP3rJmQeizZLrhLMyq
              roles: ORGANIZATION:ADMIN,ENVIRONMENT:ADMIN
              #email:
            - user:
              username: api1
              #firstname:
              #lastname:
              # Password value: api1
              password: $2a$10$iXdXO4wAYdhx2LOwijsp7.PsoAZQ05zEdHxbriIYCbtyo.y32LTji
              # You can declare multiple roles using comma separator
              roles: ORGANIZATION:USER,ENVIRONMENT:API_PUBLISHER
              #email:
            - user:
              username: application1
              #firstname:
              #lastname:
              # Password value: application1
              password: $2a$10$2gtKPYRB9zaVaPcn5RBx/.3T.7SeZoDGs9GKqbo9G64fKyXFR1He.
              roles: ORGANIZATION:USER,ENVIRONMENT:USER
              #email:
Generate a new password
If you use bcrypt to hash passwords, you can generate new passwords with the htpasswd command line, as shown in the following example (where new_password is your new password):
htpasswd -bnBC 10 "" new_password | tr -d ':\n'LDAP authentication
There are many ways to configure users via LDAP. To illustrate the basic concepts, here is an example configuration using the DSAPI.yaml file:
# ===================================================================
    # LDAP SECURITY PROPERTIES
    #
    # This sample file declared one ldap authentication source
    # ===================================================================
    security:
      type: basic
      providers:
        - type: ldap
          context:
            username: "uid=admin,ou=system"
            password: "secret"
            url: "ldap://localhost:389/dc=DSAPI,dc=io"
            base: "c=io,o=DSAPI"
          authentication:
            user:
              base: "ou=people"
              filter: "uid={0}"
            group:
              base: "o=authorization groups"
              filter: "member={0}"
              role:
                attribute: "cn"
                mapper: {
                  DSAPI-CONSUMERS: API_CONSUMER,
                  DSAPI-PUBLISHERS: API_PUBLISHER,
                  DSAPI-ADMINS: ADMIN,
                  DSAPI-USERS: USER
                }
          lookup:
            user:
              base: "ou=people"
              filter: "(&(objectClass=myObjectClass)(|(cn=*{0}*)(uid={0})))"
APIM data source authentication
APIM allows users to connect using an APIM data source. This is required if you want to add and register users via self-registration.
To activate this provider, all you need to do is declare it in the DSAPI.yaml file. All data source information is then retrieved from the Management Repository configuration.
security:
      providers:
        - type: DSAPI
Configuring DSAPI Access Management Authentication
Overview
In addition to API Management, DSAPI offers a full-fledged Access Management product. While DSAPI works seamlessly with other IAM and IdP providers, many teams prefer to use a single vendor for their APIM and AM needs. This section walks through how to use DSAPI Access Management as a preferred authentication method for your DSAPI platform users.
Configuration
You can configure DSAPI AM as your DSAPI APIM authentication provider via either the DSAPI.yaml file or by using the DSAPI APIM UI. Whichever you choose, the configuration is stored in the database. This means that APIM starts using your new configuration as soon as you select the Save button (if configuring in the APIM UI) or restart the APIM API (if configuring in the DSAPI.yaml configuration file). Please see the tabs below to lean more about each approach:
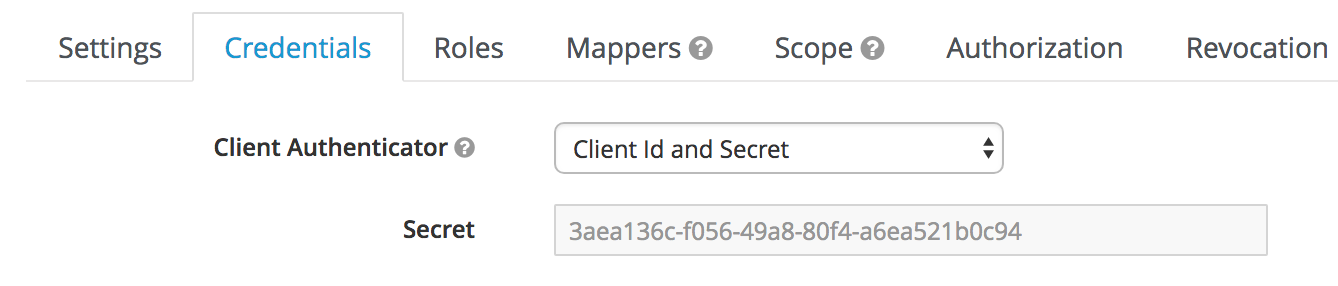
Before configuring the DSAPI.yaml file, you'll need to access the DSAPI AM client's credentials for authentication configuration. For example:

DSAPI AM client credentials
From here, you can configure the DSAPI.yaml file using those credentials:
security:
  providers:
    - type: DSAPIio_am
      clientId: xxxx-xxx-xxx-xxx
      clientSecret: xxxx-xxx-xxx-xxx
      serverURL: https://DSAPI.io/am
      domain: DSAPI
      color: "#3C3C3C"
      syncMappings: false
      scopes:
        - openid
        - email
      userMapping:
        id: sub
        email: email
        lastname: family_name
        firstname: given_name
        picture: picture
      groupMapping:
        - condition: "{#jsonPath(#profile, '$.identity_provider_id') == 'PARTNERS' && #jsonPath(#profile, '$.job_id') != 'API_MANAGER'}"
          groups:
            - Group 1
            - Group 2
      roleMapping:
        - condition: "{#jsonPath(#profile, '$.job_id') != 'API_MANAGER'}"
          roles:
            - "ORGANIZATION:USER"
            - "ENVIRONMENT:API_CONSUMER"           #applied to the DEFAULT environment
            - "ENVIRONMENT:DEFAULT:API_CONSUMER"         #applied to the DEFAULT environment
            - "ENVIRONMENT:<ENVIRONMENT_ID>:API_CONSUMER" #applied to environment whose id is <ENVIRONMENT_ID>
Before configuring authentication via the DSAPI APIM UI, you'll need to access the DSAPI AM client's credentials for authentication configuration. For example:
DSAPI AM client credentials
Next, log in to your DSAPI API Management Console and select Organization from the left hand nav. Then, select Authentication underneath Console. You will be brought to the Authentication page where you can:
- Enable or disable a log-in form for the API Management Console by toggling Show login form on Management Console ON or OFF
- Manage Identity Providers for logging in and registering DSAPI platform users
To add an identity provider, select + Add an identity provider. From here, you will have to select your IdP within the Provider type section. Choose DSAPI AM as your IdP. From here, you will need to enter in the following information:
- Define General settings
- Name
- Description
- Whether or not to allow portal authentication to use this provider
- Whether or not to require a public email for authentication
- Define Group and role mappings: this defines the level to which Platform administrators cam still override mappings. You have two options:
- Computed only during first user authentication
- Computed during each user authentication
- Define Configuration settings
- Client Id
- Client Secret
- Server URL
- Security domain
- Scopes
- Authentication button color
- User profile mapping: this will be used to define a user's DSAPI user profile based on the values provided by the Identity Provider upon registration:
- ID
- First name
- Last name
- Picture
When you are done, select Create. Then, go back to the IdP page, and toggle Activate Identity Provider ON for your new IdP.
Configuring authentication with Social Providers
Overview
The following sections describe how to configure:
GitHub authentication
DSAPI supports GitHub authentication. This section describes how to:
- Create a GitHub OAuth application
- Retrieve your OAuth2 credentials
- Configure the DSAPI APIM and GitHub connection
- Test your GitHub authentication flow
Create a GitHub OAuth application
A GitHub OAuth application is a type of OAuth 2.0 application that allows users to authenticate and authorize access to their GitHub account without sharing their login credentials with third-party services. You can also use this application to manage and control access to other tools and services that support GitHub as an IdP and authentication provider, such as DSAPI.
Before you can set up GitHub as an authentication provider for DSAPI APIM, you'll need to create a GitHub OAuth application that you can link to DSAPI APIM. To do so, follow these steps:
- Log in to your GitHub account, go to Settings, then Developer Settings
- Select OAuth Apps
- Select Register an application
- Enter in your DSAPI details in the Register a new OAuth application section. Please note that the Authorization callback URL must match the domain hosting DSAPI APIM. When you're done, select Register application.
.png)
Register an application in GitHub
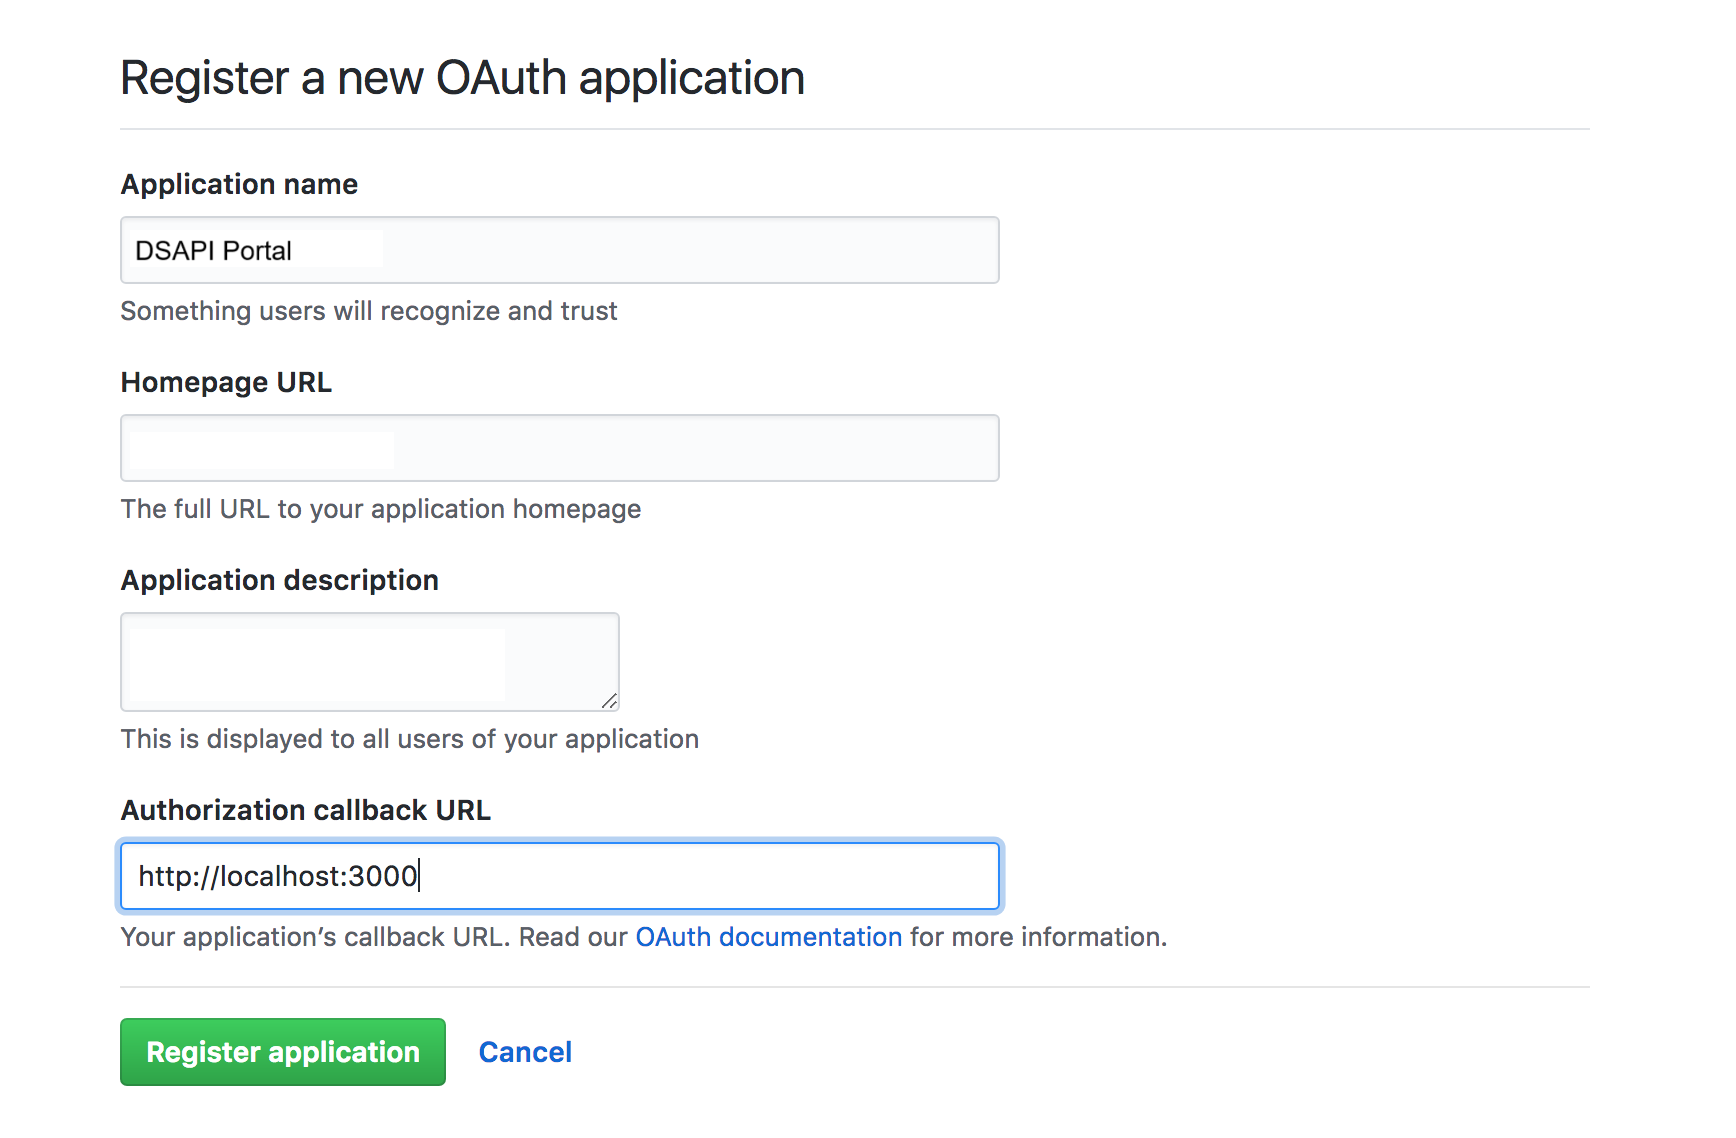
Register DSAPI details in GitHub
Retrieve your OAuth2 credentials
After you've registered DSAPI, you'll need to retrieve the GitHub OAUth2 credentials that you'll need to give to DSAPI APIM. To do so, follow these steps:
- In your GitHub settings, select OAuth Apps
- Find your DSAPI OAuth app
From here, you should be able to see your Client ID and Client secret.
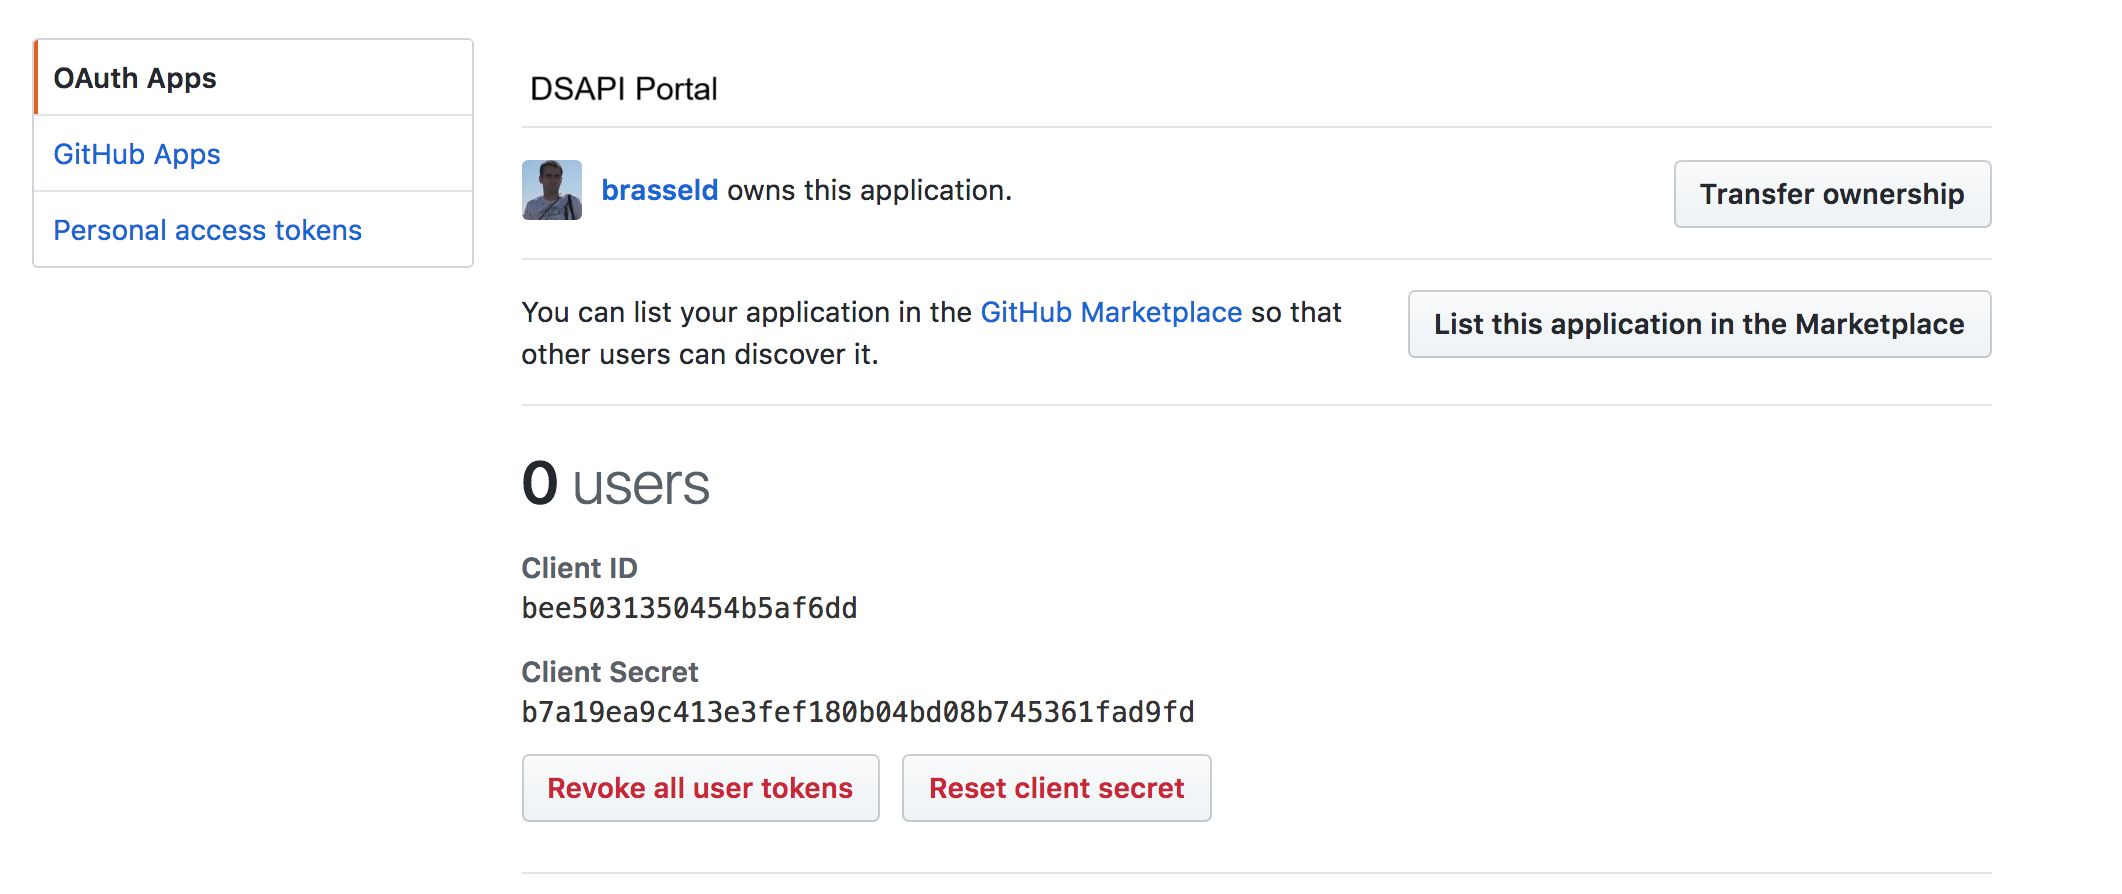
GitHub Oauth credentials
Configure GitHub authentication in DSAPI
Once you're done creating your GitHub OAuth application, you can configure your settings in DSAPI. You can do this either via the DSAPI APIM UI or the DSAPI.yaml file. Either way, the configuration is stored in the database. This means that APIM starts using your new configuration as soon as you select Save (if configuring in APIM Console) or restart the APIM API (if configuring in the configuration file). Please see the tabs below to see how to configure GitHub authentication via the APIM UI and the DSAPI.yaml file.
If you configure the provider in the configuration file and then change the values in APIM Console, all changes are overwritten by the values in the configuration file next time you restart APIM API.
Configuring GitHub authentication via the DSAPI.yaml file is easy. Simply update the following section of the DSAPI.yaml file with your GitHub OAuth2 app credentials that you retrieved above.
security:
  providers:
    - type: github
      clientId: xxxx-xxx-xxx-xxx
      clientSecret: xxxx-xxx-xxx-xxx
After this, you just need to restart the DSAPI APIM API, and you should be good to go.
To configure GitHub authentication using the APIM UI, follow these steps:
- Log-in to the DSAPI APIM UI, and select Organization from the left-hand nav.
- Under Console, select Authentication.
- Select + Add an identity provider.
- On the Create a new identity provider page, select Github as your Provider type. Then you will need to:
- Define General settings:
- Name
- Description
- Whether or not to allow portal authentication to use this provider
- Whether or not to require a public email for authentication
- Define Group and role mappings: this defines the level to which Platform administrators can still override mappings. You have two options:
- Computed only during first user authentication
- Computed during each user authentication
- Configuration
- Client Id
- Client Secret
- Define General settings:
When you are done, select Create. Then, go back to the IdP page, and toggle Activate Identity Provider ON for your new IdP.
Test your new GitHub authentication flow
You can easily test your GitHub configuration by logging out of the Management Console, clearing your cookies, and then logging back in. Once on the log in screen, you should see a Sign in with GitHub option.
Select this, and enter in your credentials. You should then be met with an Authorize DSAPI page. Here, select Authorize. You should then be brought to the DSAPI API Management Console.
Google authentication
DSAPI supports Google authentication. This section describes how to:
- Create a Google OAuth client
- Configure the DSAPI APIM and Google connection
- Test your Google authentication flow
Create a Google OAuth client
In order to connect Google and DSAPI APIM, you'll need to create a Google OAuth client ID. To do so, follow these steps:
- First, create a Google project with access to the Google+ API. Do this here
- Now, it's time to create a client. Access https://console.developers.google.com/, and access your project Credentials. Select Create.
- Select OAuth client ID from the Create credentials drop-down.
- Enter in your client details. These will be your DSAPI APIM details. The Authorized redirect URIs value must match the domain hosting your DSAPI APIM Portal.
- Select Create.
- Retrieve the new Client ID and Client secret.

Create a Google project with access to the Google + API
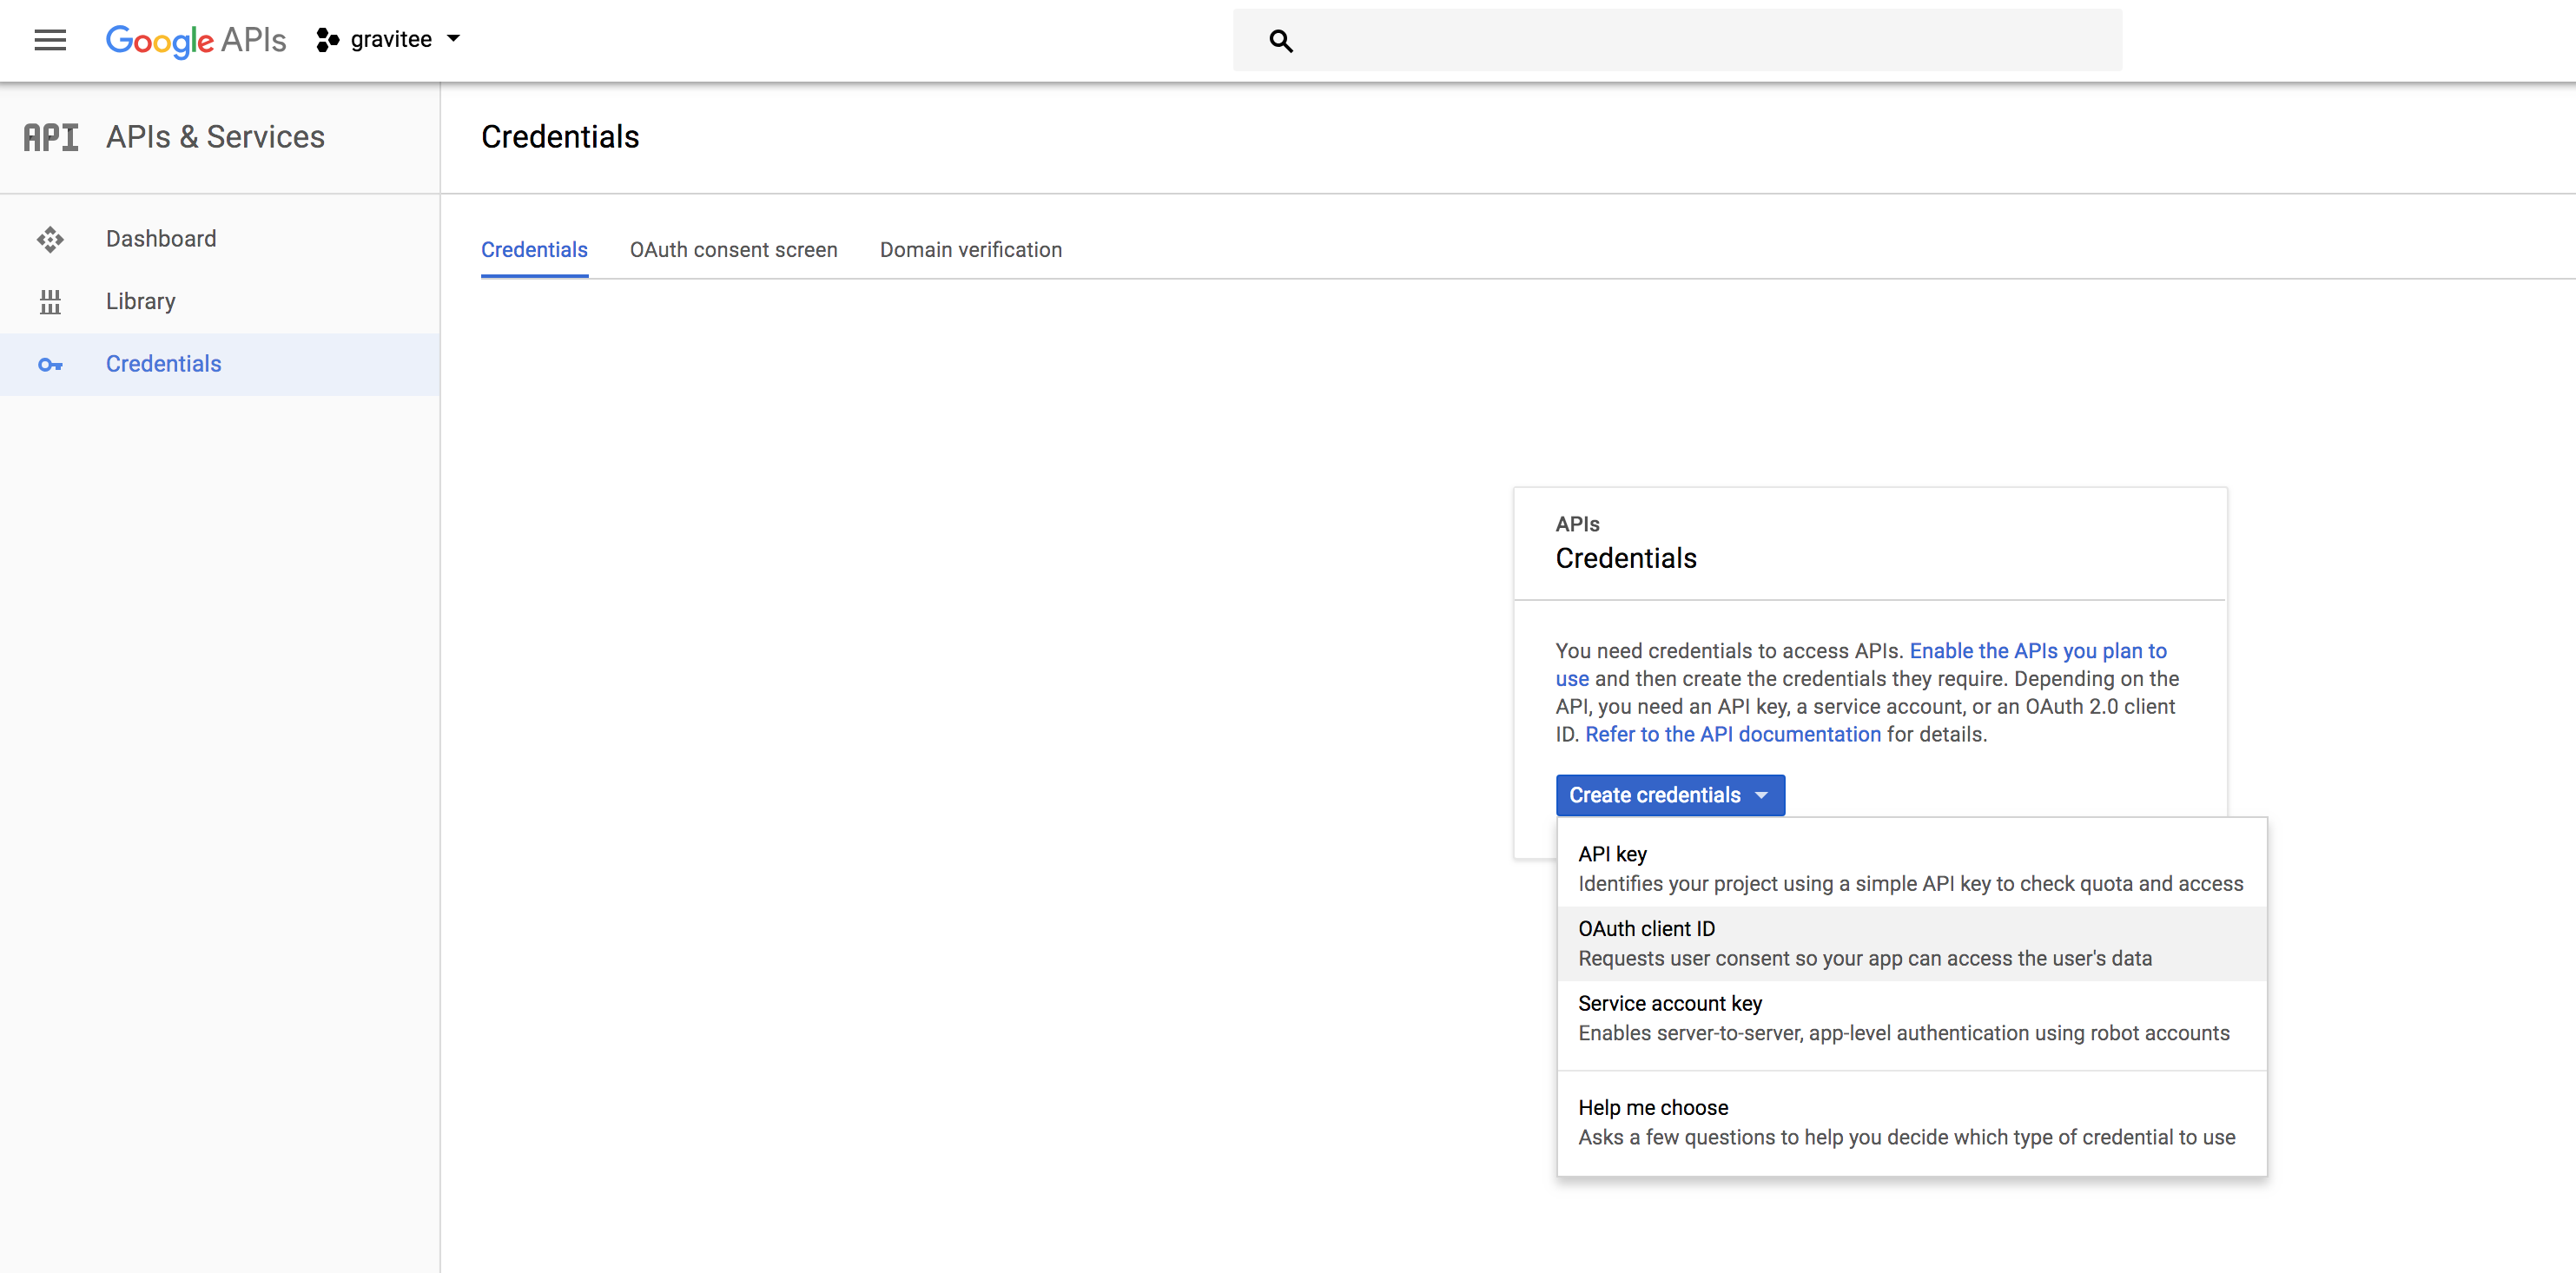
Create your OAuth client ID
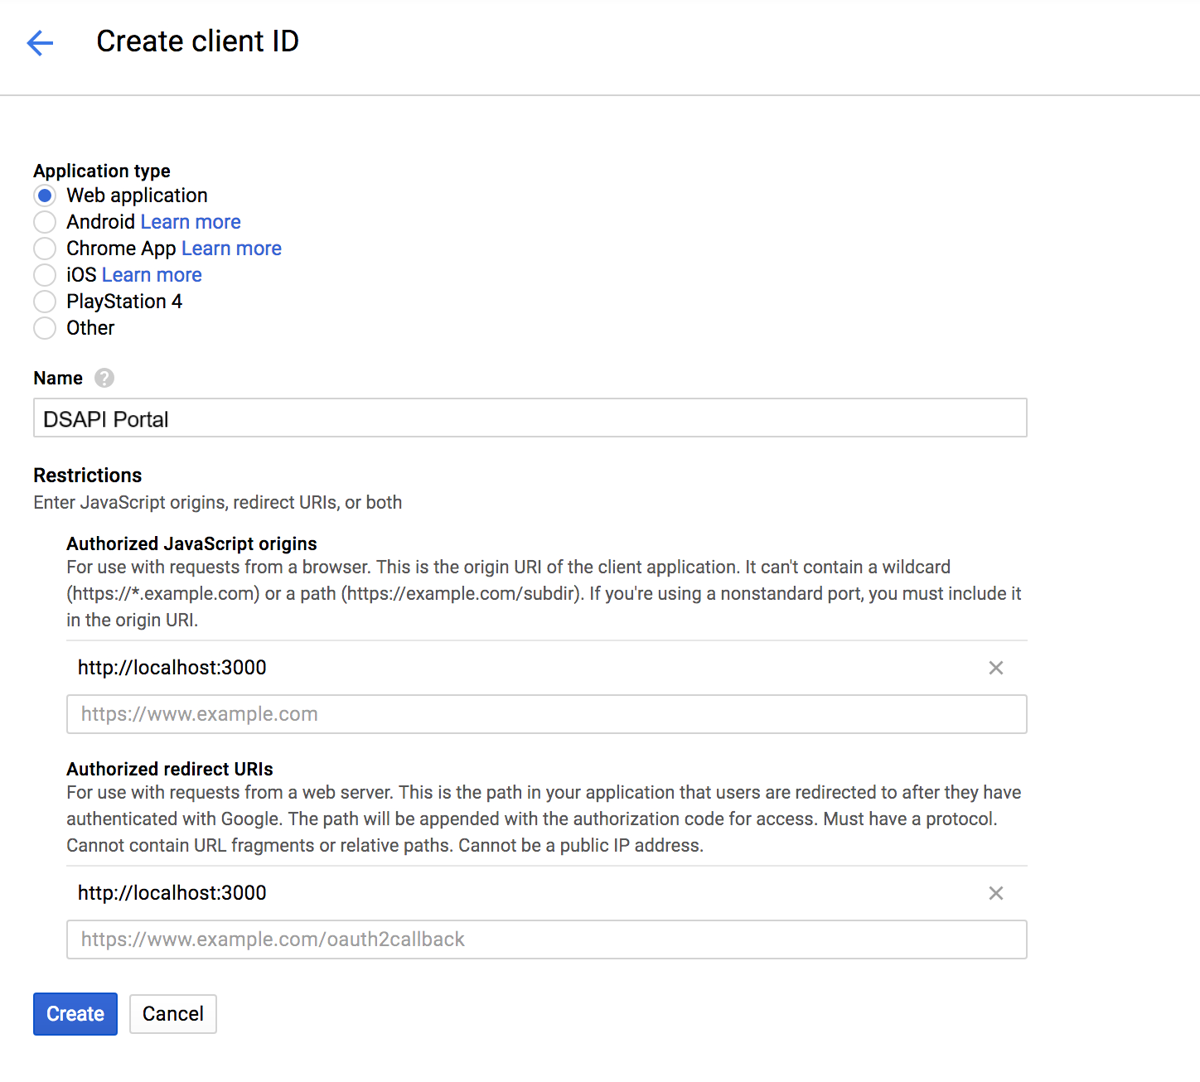
Enter in your DSAPI details when creating a Client ID
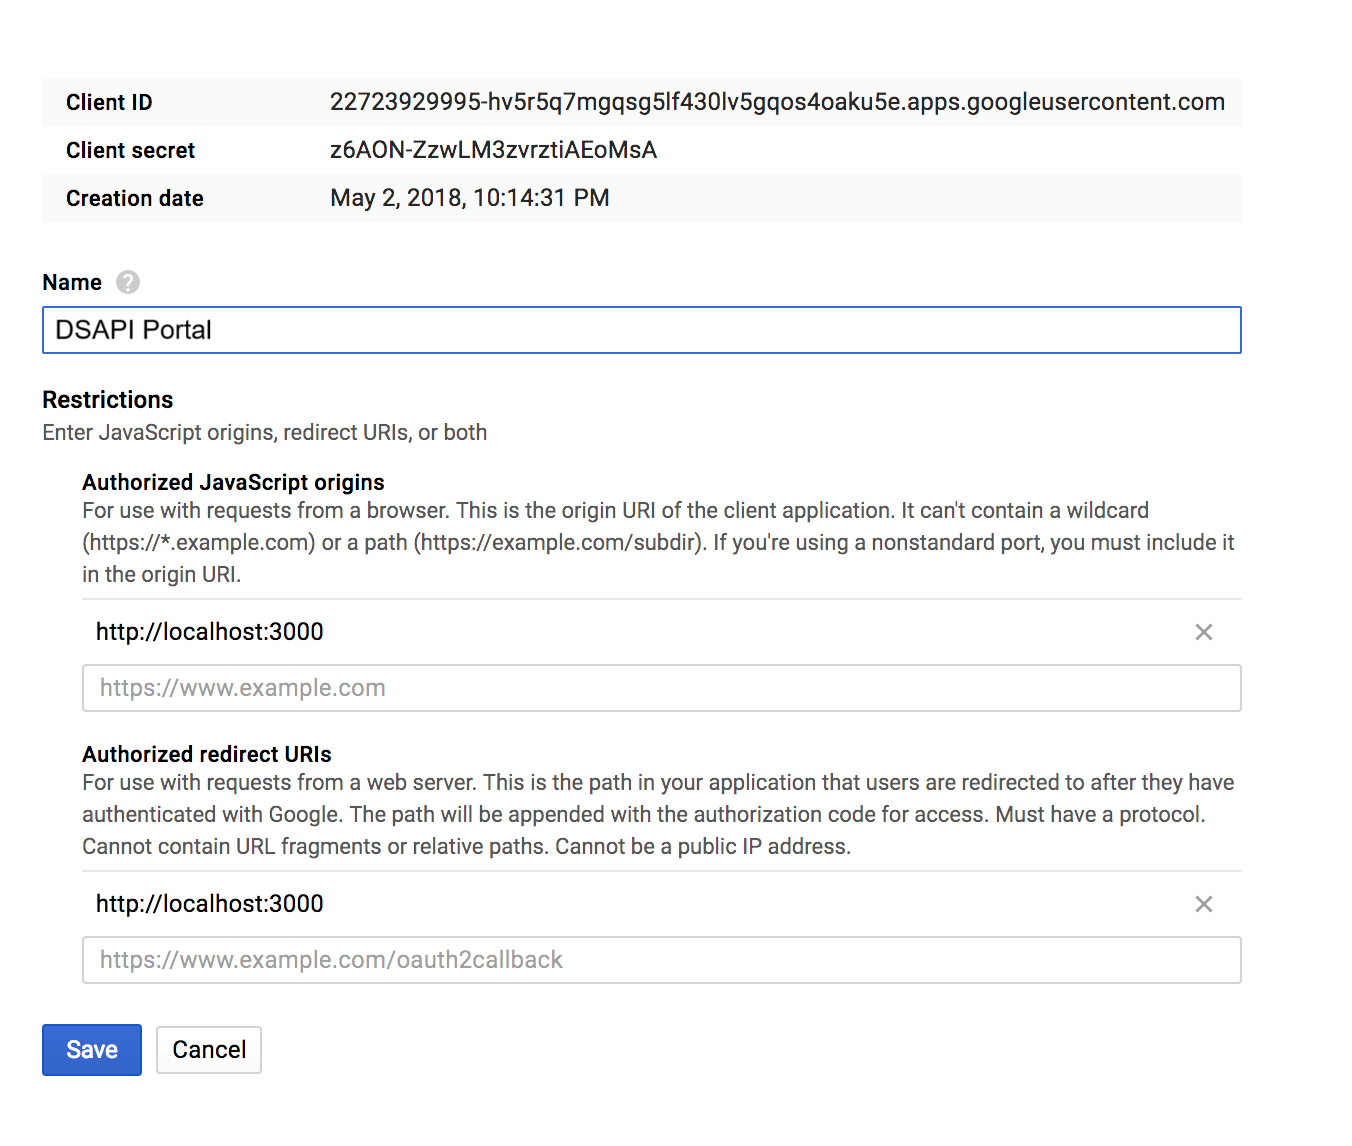
Google Client ID and Client secret.
Configure DSAPI APIM and Google connection
Once you're done creating your Google OAuth client, you can configure your settings in DSAPI. You can do this either via the DSAPI APIM UI or the DSAPI.yaml file. Either way, the configuration is stored in the database. This means that APIM starts using your new configuration as soon as you select Save (if configuring in APIM Console) or restart the APIM API (if configuring in the configuration file). Please see the tabs below to see how to configure Google authentication via the APIM UI and the DSAPI.yaml file.
If you configure the provider in the configuration file and then change the values in APIM Console, all changes are overwritten by the values in the configuration file next time you restart APIM API.
Configuring Google authentication via the DSAPI.yaml file is easy. Simply update the following section of the file with the Google client credentials.
security:
  providers:
    - type: google
      clientId: xxxx-xxx-xxx-xxx
      clientSecret: xxxx-xxx-xxx-xxx
Once you're done, just restart the APIM API.
To configure Google authentication using the APIM UI, follow these steps:
- Log-in to the DSAPI APIM UI, and select Organization from the left-hand nav.
- Under Console, select Authentication.
- Select + Add an identity provider.
- On the Create a new identity provider page, select Google as your Provider type. Then you will need to:
- Define General settings:
- Name
- Description
- Whether or not to allow portal authentication to use this provider
- Whether or not to require a public email for authentication
- Define Group and role mappings: this defines the level to which Platform administrators can still override mappings. You have two options:
- Computed only during first user authentication
- Computed during each user authentication
- Configuration
- Client Id
- Client Secret
- Define General settings:
When you are done, select Create. Then, go back to the IdP page, and toggle Activate Identity Provider ON for your new IdP.
Test your new Google authentication flow
You can easily test your Google configuration by logging out of the Management Console, clearing your cookies, and then logging back in. Once on the log in screen, you should see a Sign in with Google option.
Select this, and choose your Google account that you want to use for authentication. You should then be brought to the DSAPI API Management Console.
Configuring authentication with Custom OAuth2/OpenID Authorization Server
Overview
OpenID Connect is an authentication protocol built on top of the OAuth 2.0 framework that provides identity verification capabilities for web and mobile applications. It enables users to authenticate with an identity provider and obtain an identity token, which can be used to access protected resources on a web application.
DSAPI offers support for OpenID Connect authentication. This section includes set up instructions for:
OpenID Connect authentication
Ensure all prerequisites are satisfied before attempting to configure your OpenID Connect IdP in DSAPI.
Prerequisites
- Create your OpenID Connect client
- Retrieve the following information for your client:
- Client ID
- Client Secret
- Token endpoint
- Token introspection Endpoint (optional)
- Authorize Endpoint
- UserInfo Endpoint
- UserInfo Logout Endpoint (optional)
- (Optional) Decide:
- Scopes
- Authentication button color
- Decide proper user profile mappings:
- ID
- First name (optional)
- Last name (optional)
- Email (optional)
- Picture (optional)
Configuration
You can use either the dsapi.yaml file or the API Management Console to set up your OpenID Connect authentication. The tabs below contain general set up directions for OpenID Connect authentication:
To configure an OpenID Connect authentication provider using the DSAPI.yaml configuration file, you'll need to update to the file with your client information. You'll need to enter in this information where we have **(enter in client information)** called out in the code block. Depending on your client, this information will be different. To see a real-life example, check out the Configure Keycloak authentication section below.
security:
  providers:
    - type: (enter in client information)
      id: (enter in client information; not required if not present and the type will be used)
      clientId: (enter in client information)
      clientSecret: (enter in client information)
      tokenIntrospectionEndpoint: (enter in client information)
      tokenEndpoint: (enter in client information)
      authorizeEndpoint: (enter in client information)
      userInfoEndpoint: (enter in client information)
      userLogoutEndpoint: (enter in client information)
      color: "(enter in client information)"
      syncMappings: false
      scopes:
        - (enter in client information)
      userMapping:
        id: (enter in client information)
        email: (enter in client information)
        lastname: (enter in client information)
        firstname: (enter in client information)
        picture: (enter in client information)
      groupMapping:
        - condition: (enter in client information)
          groups:
            - (enter in client information) 1
            - (enter in client information) 2
      roleMapping:
        - condition: (enter in client information)
          roles:
            - (enter in client information)
            - (enter in client information)                  #applied to the DEFAULT environment
            - (enter in client information)          #applied to the DEFAULT environment
            - (enter in client information) #applied to environment whose id is <ENVIRONMENT_ID>
To configure OpenID Connect authentication using the APIM UI, follow these steps:
- Log-in to the DSAPI APIM UI, and select Organization from the left-hand nav.
- Under Console, select Authentication.
- Select + Add an identity provider.
- On the Create a new identity provider page, select OpenID Connect as your Provider type. Then you will need to:
- Define General settings:
- Name
- Description (optional)
- Whether or not to allow portal authentication to use this provider
- Whether or not to require a public email for authentication
- Define Group and role mappings: this defines the level to which Platform administrators can still override mappings. You have two options:
- Computed only during first user authentication
- Computed during each user authentication
- Define Configuration settings:
- Client Id
- Client Secret
- Token Endpoint
- Token Introspection Endpoint (optional)
- Authorize Endpoint
- UserInfo Endpoint
- UserInfo Logout Endpoint (optional)
- Scopes (optional)
- Authentication button color (optional)
- User profile mapping: this will be used to define a user's DSAPI user profile based on the values provided by the Identity Provider upon registration:
- ID
- First name (optional)
- Last name (optional)
- Email (optional)
- Picture (optional)
- Define General settings:
When you are done, select Create. Then, go back to the IdP page, and toggle Activate Identity Provider ON for your new IdP.
If you're using a custom PKI
When using custom a Public Key Infrastructure (PKI) for your OAuth2 authentication provider, you may have to specify the certificate authority chain of your provider in APIM. To do this, you can either:
- Export an environment variable for your current session. For example:
export JAVA_OPTS=" -Djavax.net.ssl.trustStore=/opt/DSAPIio-management-api/security/truststore.jks -Djavax.net.ssl.trustStorePassword=<MYPWD>" - Add an environment variable to your Docker Compose file to ensure that this configuration persists across settings. For example:
local_managementapi:
    extends:
      file: common.yml
      service: managementapi
    ports:
      - "8005:8083"
    volumes:
      - ./conf/ssl/truststore.jks:/opt/DSAPIio-management-api/security/truststore.jks:ro
      - ./logs/management-api:/home/DSAPI/logs
    links:
      - "local_mongodb:demo-mongodb"
      - "local_elasticsearch:demo-elasticsearch"
    environment:
      - JAVA_OPTS=-Djavax.net.ssl.trustStore=/opt/DSAPIio-management-api/security/truststore.jks -Djavax.net.ssl.trustStorePassword=<MYPWD>
      - DSAPI_management_mongodb_uri=mongodb://demo-mongodb:27017/DSAPI?serverSelectionTimeoutMS=5000&connectTimeoutMS=5000&socketTimeoutMS=5000
      - DSAPI_analytics_elasticsearch_endpoints_0=http://demo-elasticsearch:9200
Keycloak authentication
To better illustrate how the OpenID Connect configuration works (and to assist users who are using Keycloak as their authentication provider), this section describes how to set up Keycloak as an OpenID Connect authentication provider.
Create a Keycloak client
Before you can connect to the DSAPI portal using Keycloak, you need to create a new client. To do so, follow these steps:
- Log-in to Keycloak and create a new client.
- Enter in your client details for DSAPI. The
Valid Redirect URIsvalue must exactly match the domain which is hosting APIM Portal. - Once you're done and create the client, retrieve the client credentials that you will need to give to DSAPI.
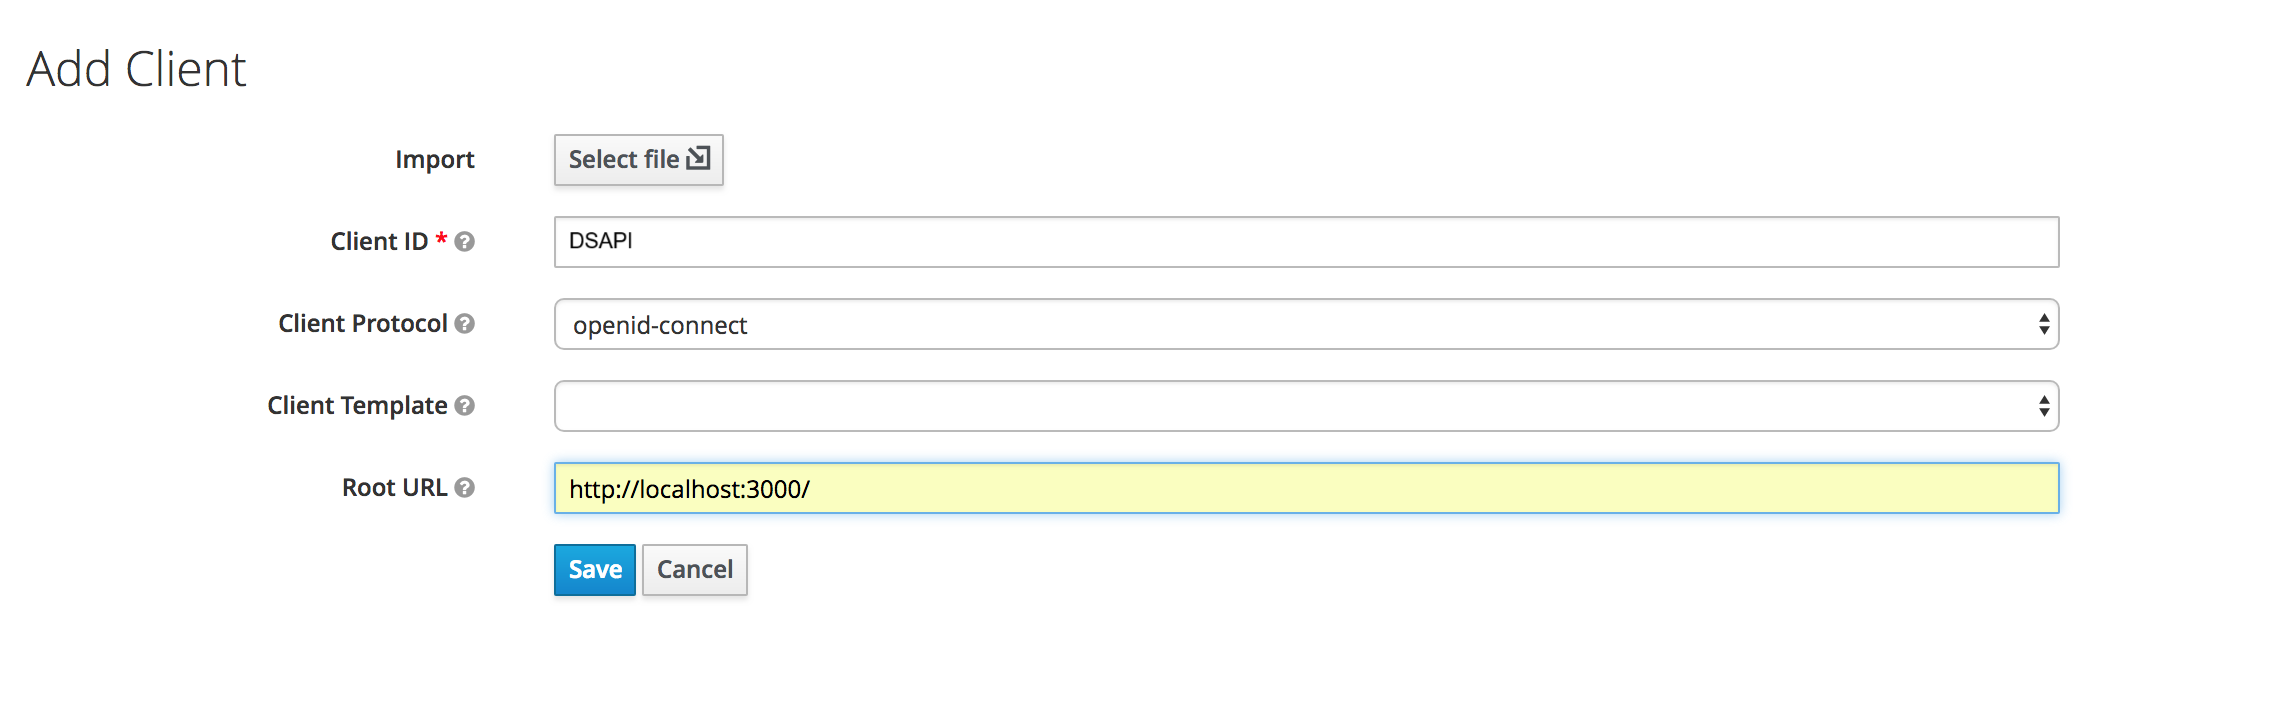
Add a DSAPI client in Keycloak
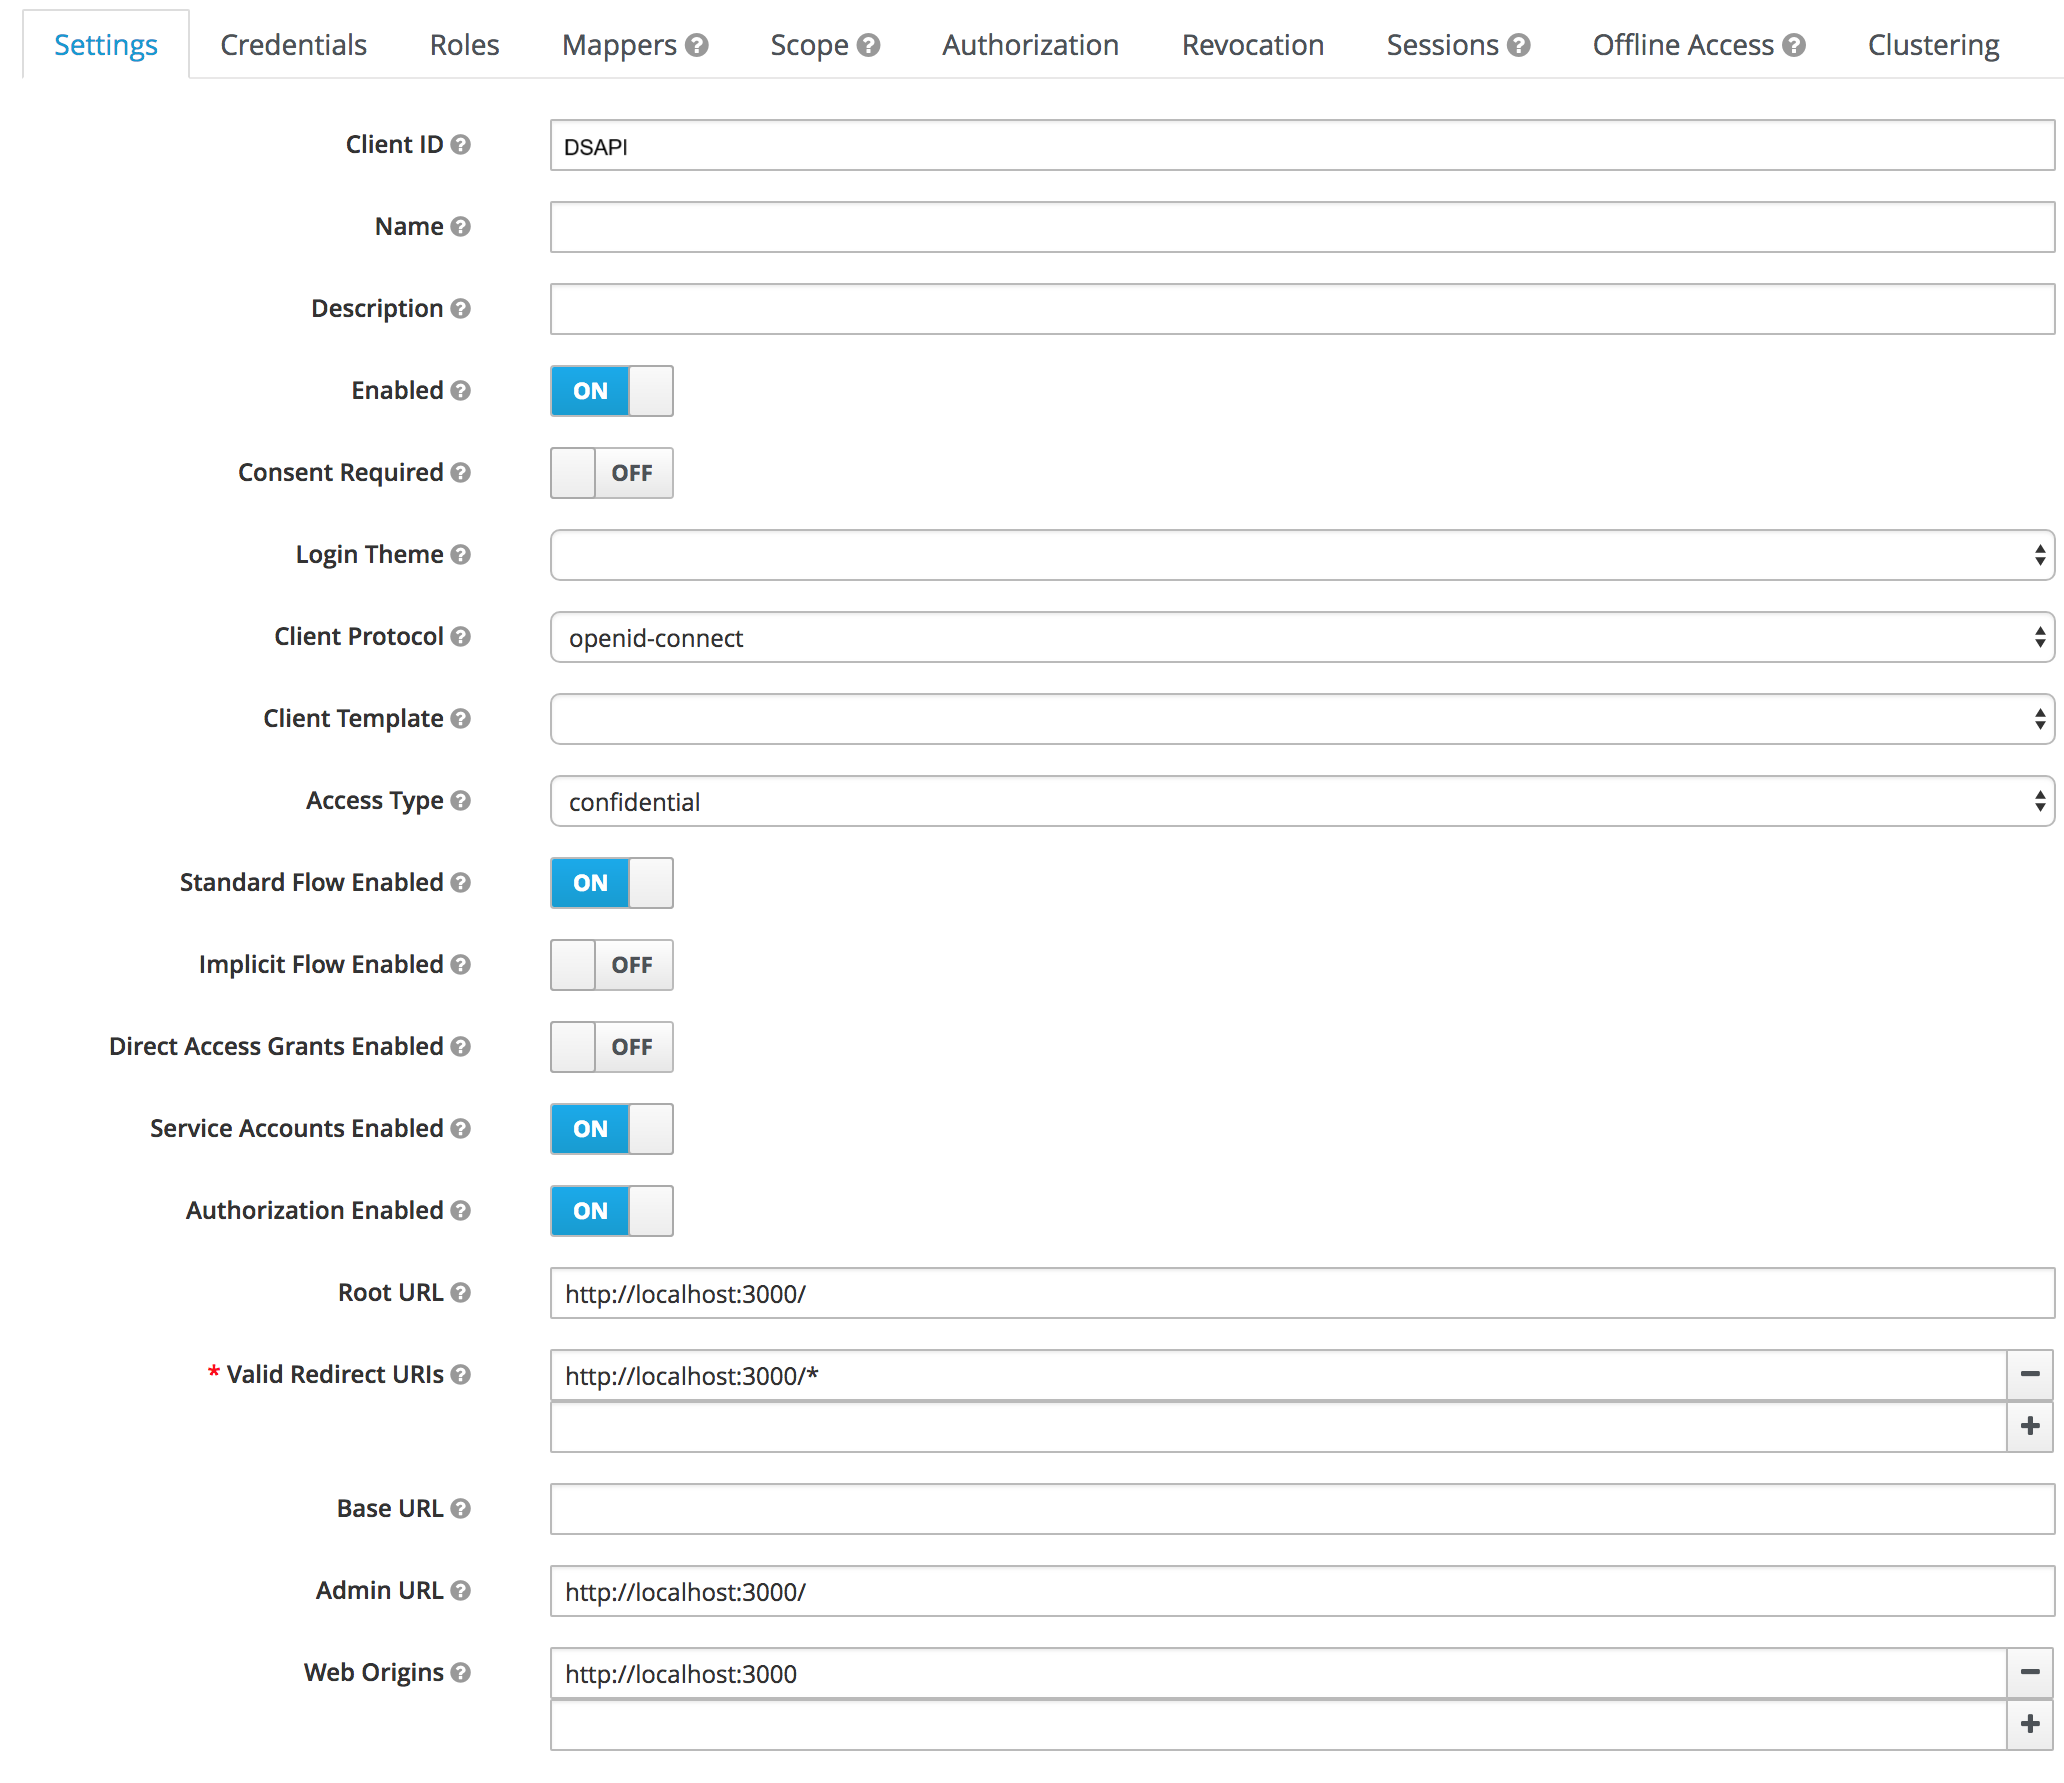
Enter DSAPI client details in Keycloak
Keycloak client credentials that will need to be given to DSAPI
Create and configure Keycloak Client scope
- In your realm, go to the Client scopes page.
- Set a special DSAPI-client-groups Scope that will contain users' roles.
- In the new client scope, set a mapper with Claim name "groups".
- In your realm, go to the Client page, and select your Client.
- Add the new configured scope in the Client Scopes tab.
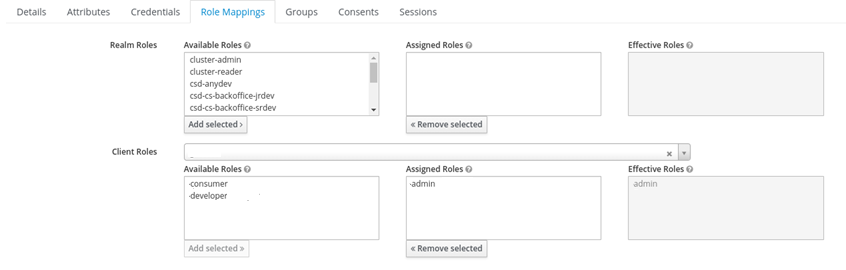
Create Keycloak Client roles
Optionally, you can configure Keycloak client roles. These roles can be defined later in DSAPI either via the DSAPI.yaml file or the DSAPI APIM UI. To configure Client roles in Keycloak, follow these steps:
- In your client, create roles by organization, as needed.
- To configure Keycloak users with appropriate roles, select Role Mappings and define roles as is appropriate.
DSAPI role mapping uses Spring Expression Language
DSAPI role mapping uses Spring Expression Language (SpEL) for writing conditions. The only available object in context is #profile set from userInfoEndpoint.
security:
  providers:
    - type: oidc
      ...
      roleMapping:
        - condition: "{(#jsonPath(#profile, '$.groups') matches 'DSAPI-admin' )}"
          roles:
            - "ORGANIZATION:ADMIN"
            - "ENVIRONMENT:ADMIN"
Configure Keycloak authentication in DSAPI
You can configure Keycloak settings in DSAPI either via the DSAPI APIM UI or the DSAPI.yaml file. Either way, the configuration is stored in the database, meaning that APIM starts using your new configuration as soon as you select Save (if configuring in APIM Console) or restart the APIM API (if configuring in the configuration file).
To configure Keycloak as an OpenID Connect authentication provider using the DSAPI.yaml configuration file, you'll need to update to the file with your Keycloak client information as shown below:
security:
  providers:
    - type: oidc
      id: keycloak # not required if not present, the type is used
      clientId: DSAPI
      clientSecret: 3aea136c-f056-49a8-80f4-a6ea521b0c94
      tokenIntrospectionEndpoint: http://localhost:8080/auth/realms/master/protocol/openid-connect/token/introspect
      tokenEndpoint: http://localhost:8080/auth/realms/master/protocol/openid-connect/token
      authorizeEndpoint: http://localhost:8080/auth/realms/master/protocol/openid-connect/auth
      userInfoEndpoint: http://localhost:8080/auth/realms/master/protocol/openid-connect/userinfo
      userLogoutEndpoint: http://localhost:8080/auth/realms/master/protocol/openid-connect/logout
      color: "#0076b4"
      syncMappings: false
      scopes:
        - openid
        - profile
      userMapping:
        id: sub
        email: email
        lastname: family_name
        firstname: given_name
        picture: picture
      groupMapping:
        - condition: "{#jsonPath(#profile, '$.identity_provider_id') == 'PARTNERS' && #jsonPath(#profile, '$.job_id') != 'API_MANAGER'}"
          groups:
            - Group 1
            - Group 2
      roleMapping:
        - condition: "{#jsonPath(#profile, '$.job_id') != 'API_MANAGER'}"
          roles:
            - "ORGANIZATION:USER"
            - "ENVIRONMENT:API_CONSUMER"                  #applied to the DEFAULT environment
            - "ENVIRONMENT:DEFAULT:API_CONSUMER"          #applied to the DEFAULT environment
            - "ENVIRONMENT:<ENVIRONMENT_ID>:API_CONSUMER" #applied to environment whose id is <ENVIRONMENT_ID>
To configure OpenID Connect authentication using the APIM UI, follow these steps:
- Log-in to the DSAPI APIM UI, and select Organization from the left-hand nav.
- Under Console, select Authentication.
- Select + Add an identity provider.
- On the Create a new identity provider page, select OpenID Connect as your Provider type. Then you will need to:
- Define General settings:
- Name
- Description (optional)
- Whether or not to allow portal authentication to use this provider
- Whether or not to require a public email for authentication
- Define Group and role mappings: this defines the level to which Platform administrators can still override mappings. You have two options:
- Computed only during first user authentication
- Computed during each user authentication
- Define Configuration settings:
- Client Id
- Client Secret
- Token Endpoint
- Token Introspection Endpoint (optional)
- Authorize Endpoint
- UserInfo Endpoint
- UserInfo Logout Endpoint (optional)
- Scopes (optional)
- Authentication button color (optional)
- User profile mapping: this will be used to define a user's DSAPI user profile based on the values provided by the Identity Provider upon registration:
- ID
- First name (optional)
- Last name (optional)
- Email (optional)
- Picture (optional)
- Define General settings:
When you are done, select Create. Then, go back to the IdP page, and toggle Activate Identity Provider ON for your new IdP.
Test your Keycloak authentication
You can easily test your Keycloak configuration by logging out of the Management Console, clearing your cookies, and logging back in. Once on the login screen, you should see a Sign in with Keycloak option. Upon entering in your Keycloak credentials, you should be successfully logged in.
- This example uses bcrypt to hash passwords.
- Define the password.
- Here, you can define information, passwords, roles, etc. for specific user types, such as user or admin.
- Define the roles.
Azure AD / Entra ID
Introduction
This article aims to provide information on how to setup APIM authentication in the APIM Console UI to be able to use Azure Entra ID (formerly known as Azure AD) as an IDP.
For now, these instructions only cover authentication, not for the roles mappings.
Prerequisites:
- Azure Entra ID subscription
- An Application Registered in Entra ID to represent DSAPI APIM console
- A running DSAPI APIM installations with access to Entra ID.
- A User who can access the domain in Entra ID.
Application Creation (example) in Entra ID (minimum setup):
First, you'll need to create an application in Entra ID. Here is an example of steps to create that application:
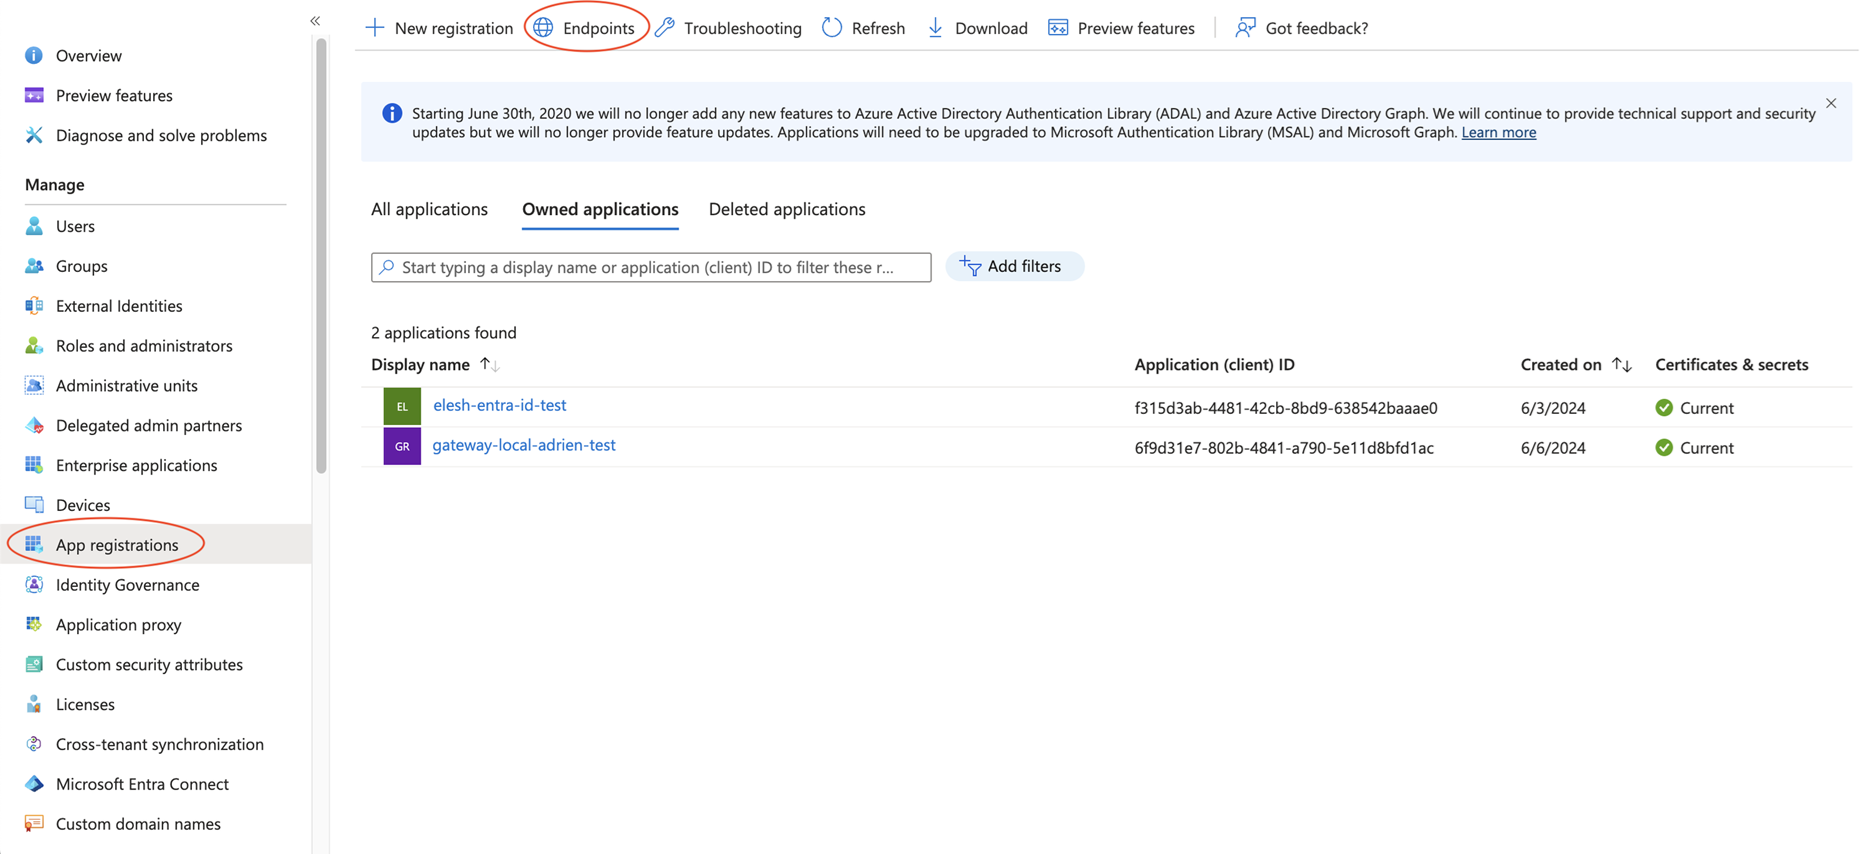
- In the Entra ID menu, click App registrations
- Click New Registration
- Pick a name for your application ex: "DSAPI-client-local"
- Select who can use or access the API:
- Pick what applies to your context (use the default "Accounts in this organizational directory only (<yourdomain> only - Single tenant) for example)
- Edit the Redirect URI to map with your API Management console URL
- ex: http://localhost:8084 for a local deployment of APIM
- Click Register
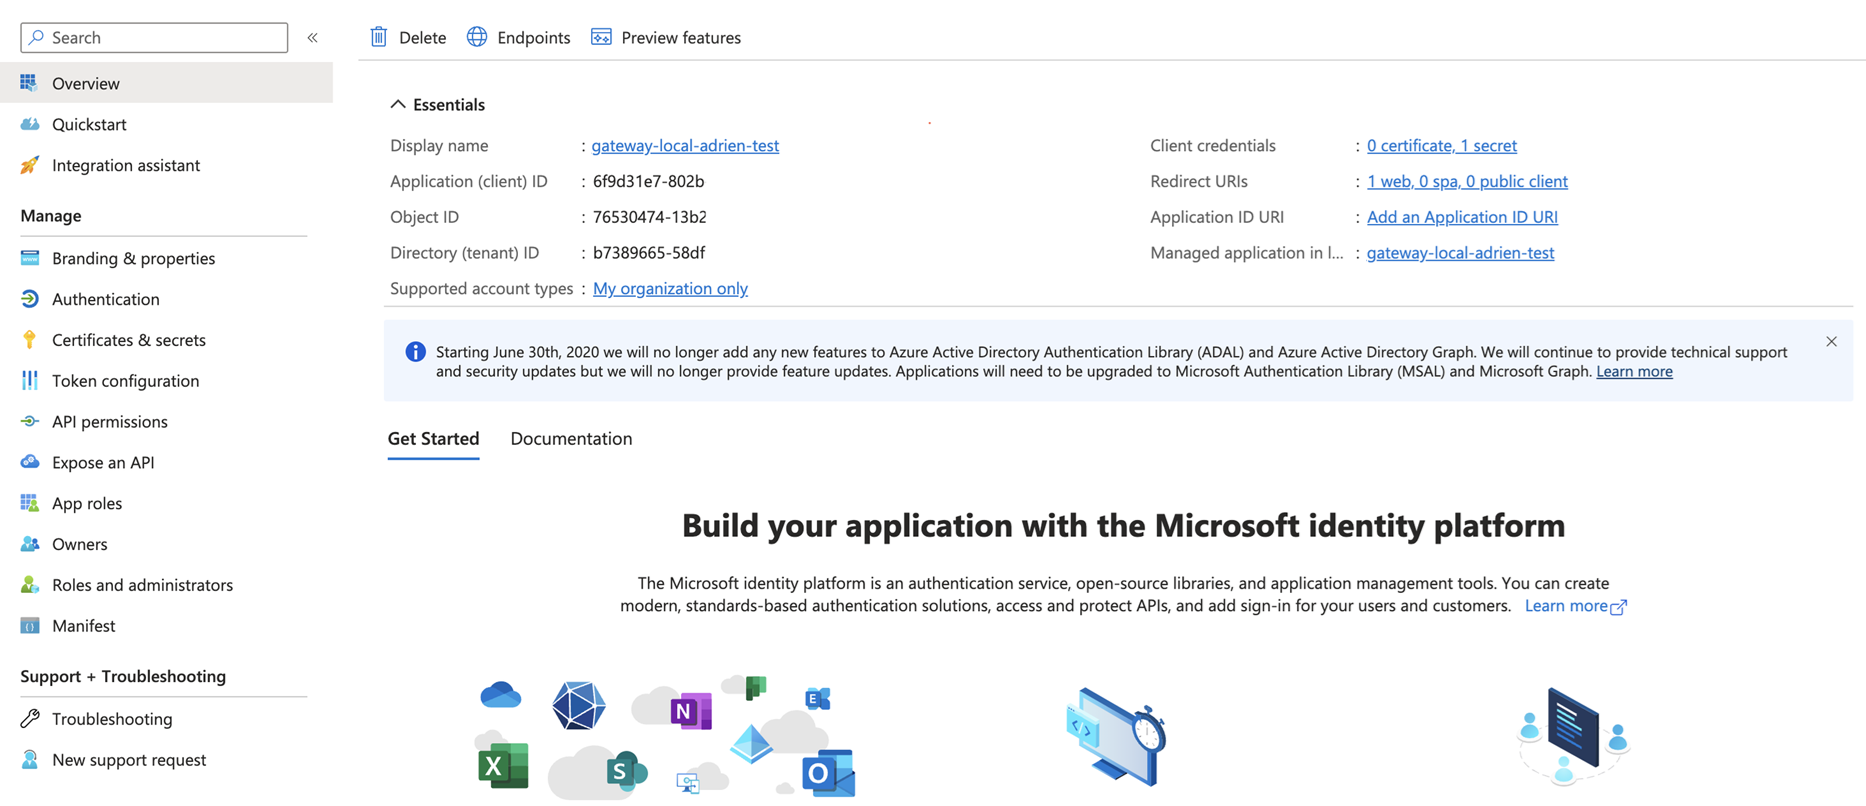
- Enter your application details by clicking on it
- Copy the Application (client) ID from the Overview page. This will be used to identify your application when configuring APIM Authentication (this looks like a UUID)
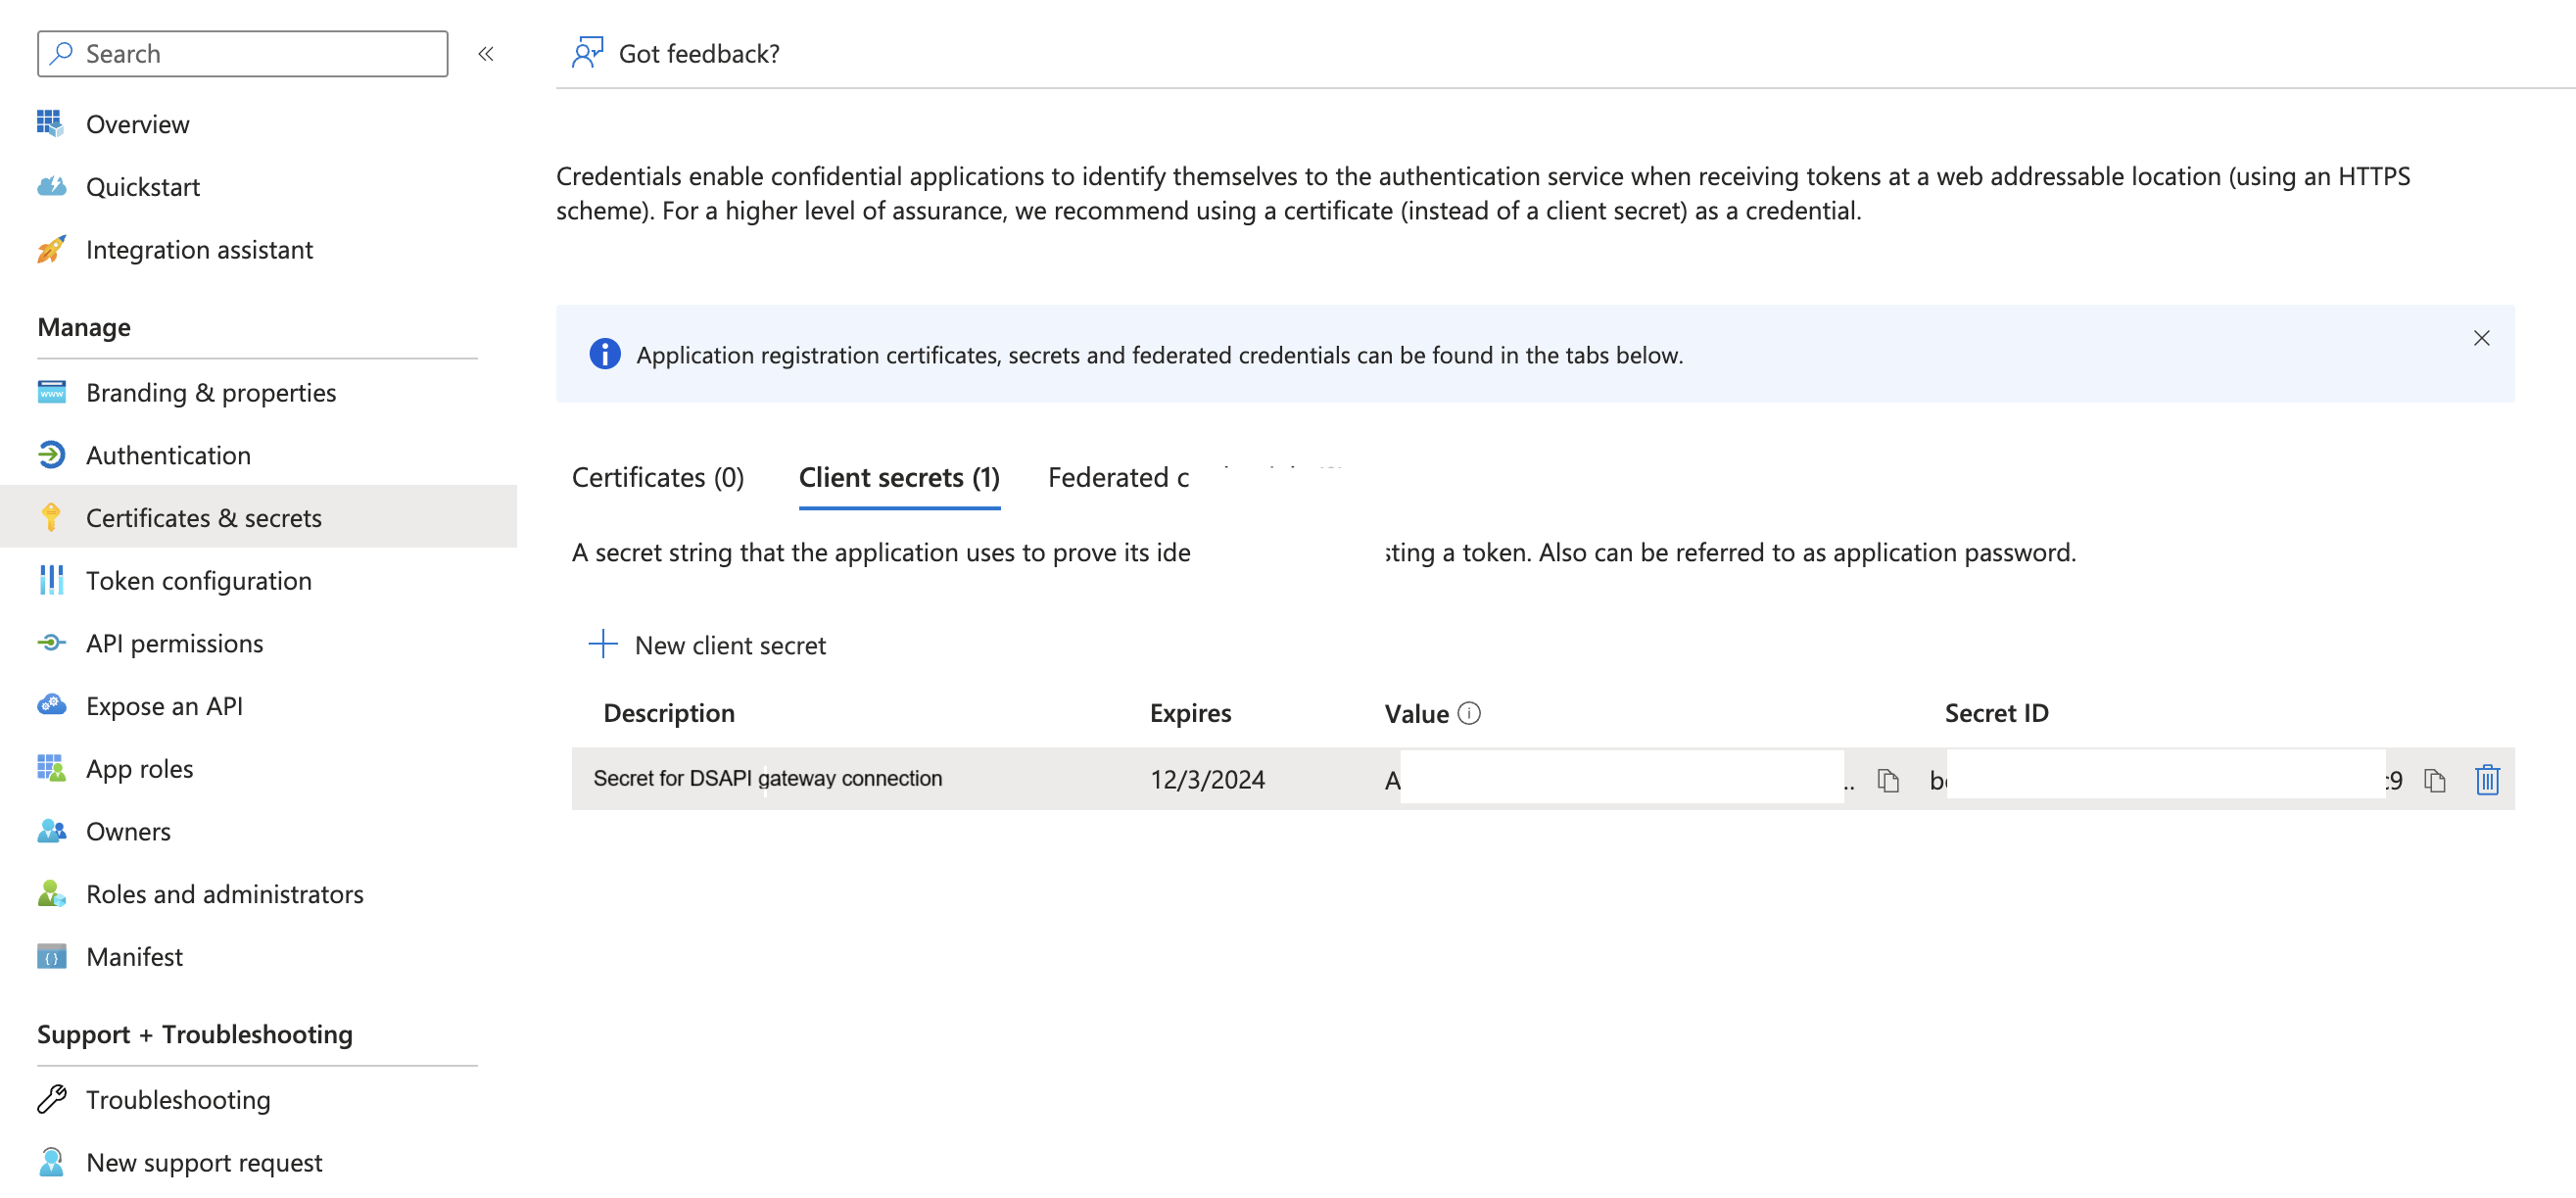
- Generate a client secret
- Click on the Certificate & Secrets
- Click on New client secret
- Enter a description
- Enter an expiration
- Click Add
- Copy the Value (not the Secret ID): This will be used to authenticate your DSAPI APIM application when checking token and authentication of users.
At this point, you are ready to configure the Authentication in DSAPI APIM Console.
Instructions using Azure v1 endpoints:
First, you'll need to retrieve your endpoint configuration within Azure Entra ID. To do so, follow these steps:
- Log in to your Azure Portal
- Enter the "Microsoft Entra ID" service
- Go to App Registrations
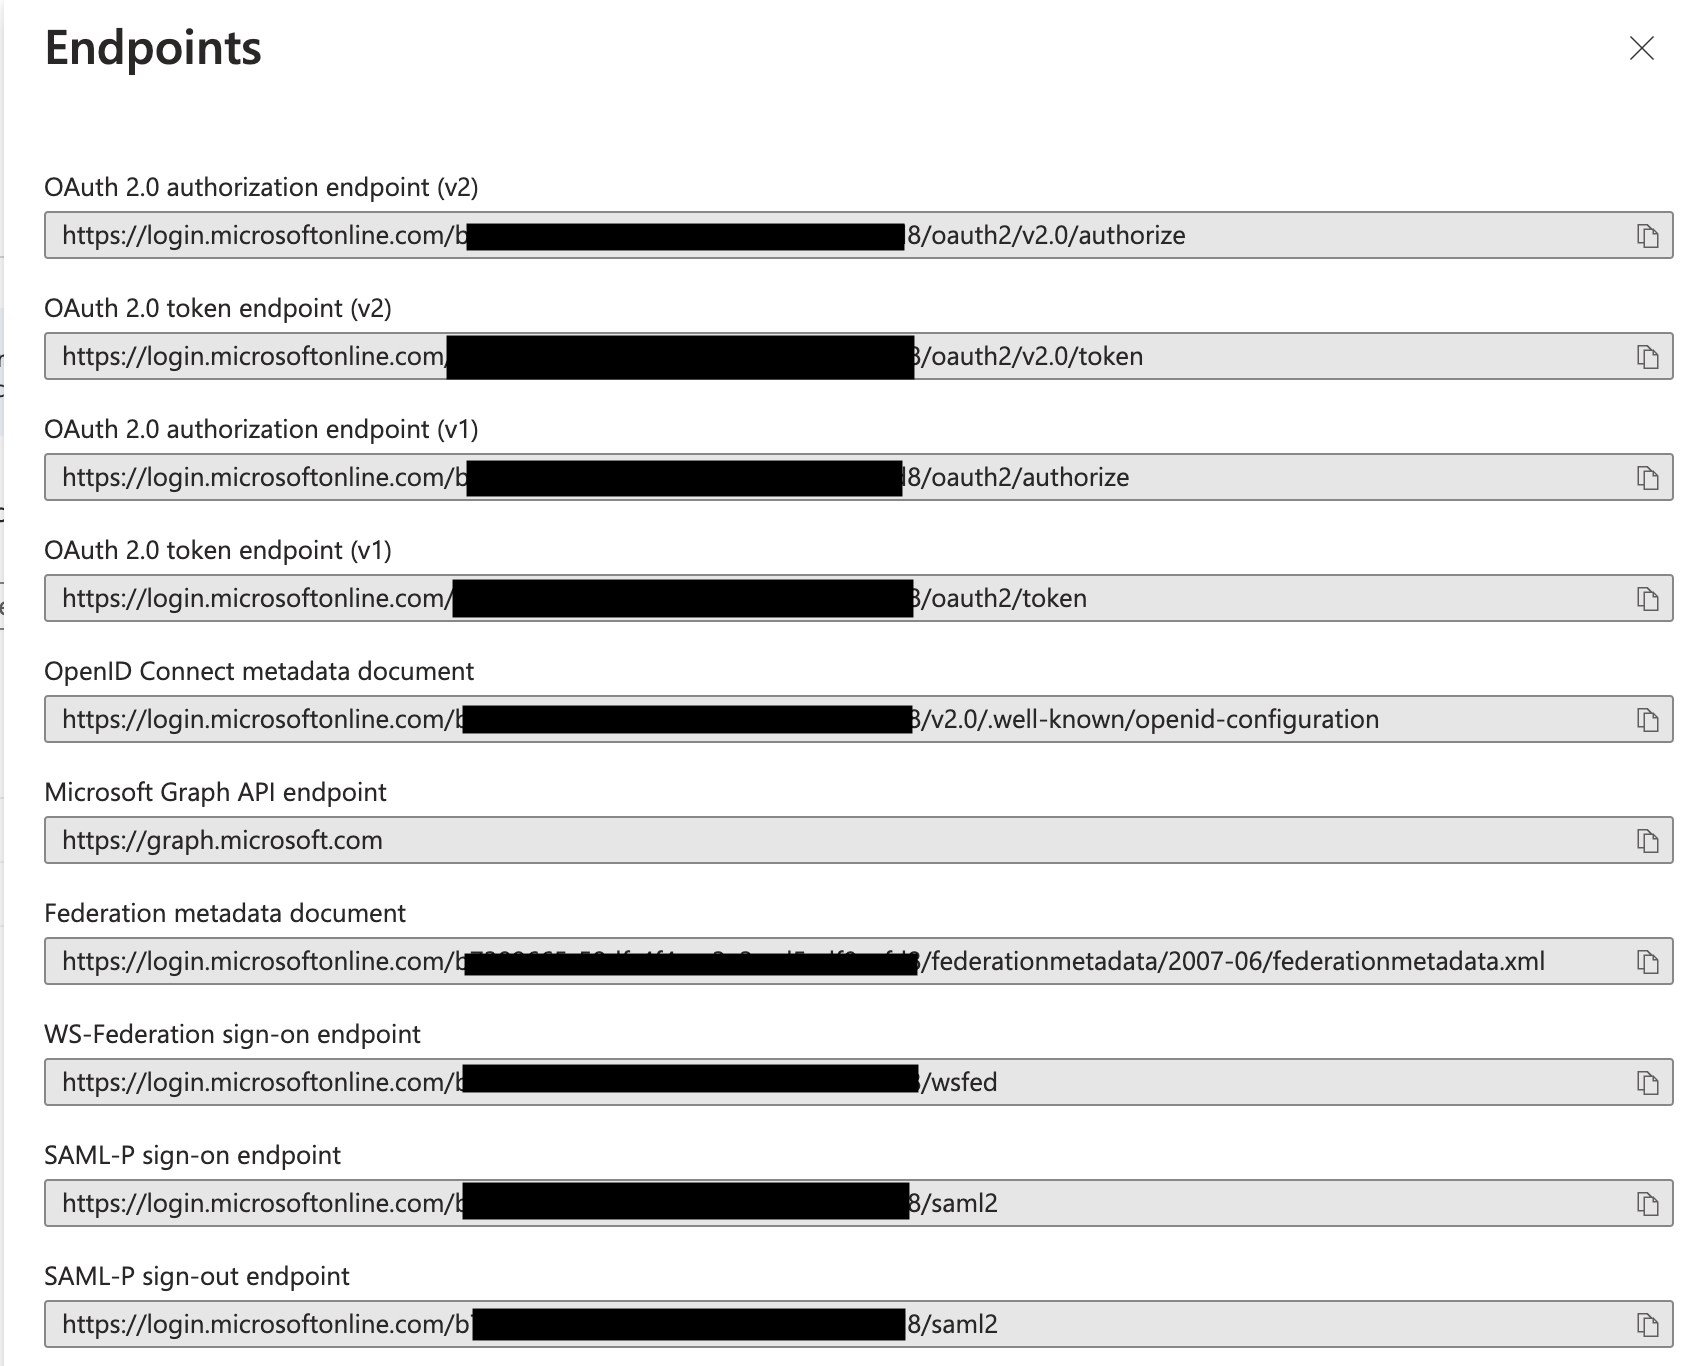
- Click on Endpoints
- It will give you the list of open endpoints for your calls. This will be helpful for our configuration. Provide a copy of that list.
- Note: The hidden part is your tenant ID. You can replace those values by "common" in all the URL below as well.
- Use the OpenID Connect Metadata document link (ends with /openid-configuration). A page will open with your OpenID configuration. You'll use the endpoint on that list to configure DSAPI.
Configure APIM Azure Entra ID Authentication
Next, you'll need to configure authentication on the DSAPI side. Follow these steps:
- Log into the APIM Console as a user with the ADMIN role
- Go to Organization > Authentication
- Click Add an identity provider
- Select OpenID Connect. Configure as follows:
- General section
- Give a Name and a Description to that OIDC Identity Provider
- Check the "Allow portal authentication to use this identity provider" option
- Check the "A public email is required to be able to authenticate"
- Check "Computed during each user authentication"
- Configuration
- clientid: the client ID of <your application representing DSAPI>
- client secret: the client secret of <your application representing DSAPI>
- Edit the fields in the different sections according to the endpoints found in your Entra ID configuration.
- You have to use the following endpoints for Azure v1 (you can replace "common" by the value in your own configuration but "common" should work as well):
- Token Endpoint: https://login.microsoftonline.com/common/oauth2/token
- Token Introspect Endpoint: Azure Entra ID doesn't provide any Introspect endpoint - leave it empty
- Authorize Endpoint: https://login.microsoftonline.com/common/oauth2/authorize
- UserInfo Endpoint: https://login.microsoftonline.com/common/openid/userinfo
- UserInfo Logout Endpoint: https://login.microsoftonline.com/common/oauth2/logout
- Scopes: openid
- Authentication button color: Your color of choice
- You have to use the following endpoints for Azure v1 (you can replace "common" by the value in your own configuration but "common" should work as well):
- User profile mapping
- ID: sub
- First Name: name
- Last Name: name
- Email: upn (this one is tricky, if you leave at a value like email, or anything that is not part of the token provided by Azure, it will fail and likely won't give you any error message)
- Picture: picture (likely a warning in the logs)
- General section
At this point, the IdP should be set up. Feel free to follow the remaining steps to test authentication.
Use your new Identity Provider
Now, let's test your new Identity provider. Follow these steps:
- Log to APIM console
- You should now see Azure AD as an option on the login screen
- Click on the button and follow the steps to login. (might include MFA etc…)
- Once logged in, you'll have restricted access to APIM Console
- You'll need to logout and log again with an ADMIN user, go to Organization > Users and set the correct rights to the newly added user attached to Azure AD.
Reset your cache
It is recommended to reset the cache of your browser so to avoid the use of a previous token or misconfiguration.
Azure regions for SaaS and Hybrid Deployments
This table shows the Azure regions that DSAPI supports:
| North America | Europe |
|---|---|
| Washington - West US 2 | Paris - France Central |
| Netherlands - West Central |
For more information about Azure regions, go to Microsoft Datacenters.
User Management and Permissions
Introduction
This article describes how to set up and manage DSAPI roles, scopes, permissions, users, and user groups.
Roles
A role is a functional group of permissions and can be defined at the Organization, Environment, API, and/or Application level. DSAPI includes pre-built default roles and also allows you to create an unlimited number of custom user roles. Each role:
- Is associated with a group of permissions
- Has a scope, which encompasses the API Management resources available to the user. DSAPI scopes comprise the Organization, Environment, API, and Application levels.
- Defines what you can do with APIM UI components and the APIM Management API
By default, only a System Admin (a role created by DSAPI) can create and edit roles, including custom roles.
The APIM Console allows you to add, see members within, and delete roles in the Organization, Environment, API, and Application scopes. To set up roles:
- Log in to your APIM Console
- Select Organization from the left nav
- Select Roles from the User Management section
- Click + Add a role at your desired scope
- Give the role a name
- Give the role a description (optional)
- Enable the role as a default role for new users by toggling Default role ON or OFF
- Set create, read, update, and delete permissions for the role
- Click Create
Example: Custom "Writer" role
To create a custom "Writer" role:
- Log in to the API Management Console
- Select Organizations from the left-hand nav
- Click Roles under User Management
- At the API scope, click + Add a role
- Enter "Writer" in the Role name text field
- Give the role a description, such as "These users can create, update, read, and delete API documentation."
- (Optional) To make this the default role for new users, toggle Default role ON
- Define the following permissions:
- `Read` permissions on `DEFINITION` and `GATEWAY_DEFINITION`: Allows the user to see the API in the API list
- `CRUD` permissions on `DOCUMENTATION`: Allows the user to write new API documentation
- Click Create
The "Writer" role now appears in the API scope section.
Permissions
The set of permissions a role has is defined by its scope. The following tables list permissions per scope.
| Name | Description |
|---|---|
| ENTRYPOINT | Manages environment entrypoint configuration |
| ENVIRONMENT | Manages environments |
| ROLE | Manages roles |
| TAG | Manages sharding tags |
| TENANT | Manages tenants |
| USER | Manages users |
| Name | Description |
|---|---|
| ALERT | Manages environment alerting |
| API | Manages APIs in general. The CREATE action is used to establish if the user is allowed to create an API or not, and the READ permission is used to allow the user to request the policies and resources lists. |
| API_HEADERS | Manages environment API headers |
| APPLICATION | Manages applications in general. CREATE allows the user to create an application, READ allows the user to list applications. |
| AUDIT | Gets APIM audit. Only READ permission is used. |
| CATEGORY | Manages categories |
| CLIENT_REGISTRATION_PROVIDER | Manages environment client registration configuration |
| DASHBOARD | Manages environment dashboards |
| DICTIONARY | Manages environment dictionaries |
| DOCUMENTATION | Manages APIM Dev Portal documentation |
| GROUP | Manages user groups |
| IDENTITY_PROVIDER | Manages Identity Providers for authentication |
| INSTANCE | Access to API Gateway instance information. Only READ permission is used. |
| MESSAGE | Manages messaging |
| METADATA | Manages APIM metadata |
| NOTIFICATION | Manages global notifications |
| PLATFORM | Gets APIM monitoring metrics. Only READ permission is used. |
| QUALITY_RULE | Manages environment quality rules |
| SETTINGS | Manages environment settings |
| THEME | Manages APIM Portal themes |
| TOP_APIS | Manages top APIs |
| Name | Description |
|---|---|
| ALERT | Manages API alerting |
| ANALYTICS | Manages API analytics. Only the `READ` permission is used. |
| AUDIT | Manages API audits. Only the `READ` permission is used. |
| DEFINITION | Manages the API definition |
| DISCOVERY | Manages service discovery |
| DOCUMENTATION | Manages API documentation |
| EVENT | Manages API events. Only the `READ` permission is used. |
| GATEWAY_DEFINITION | A specific permission used to update the context-path (`UPDATE`) and to give access to sensitive data (`READ`) such as endpoints and paths. |
| HEALTH | Manages API health checks |
| LOG | Manages API logs. Only the `READ` permission is used. |
| MEMBER | Manages API members |
| METADATA | Manages API metadata |
| MESSAGE | Manages messaging |
| NOTIFICATION | Manages API notifications |
| PLAN | Manages API plans |
| QUALITY_RULE | Manages API quality rules |
| RATING | Manages API rating |
| RATING_ANSWERS | Manages API rating answers |
| RESPONSE_TEMPLATES | Manages API response templates |
| REVIEWS | Manages API reviews |
| SUBSCRIPTION | Manages API subscriptions |
| Name | Description |
|---|---|
| ALERT | Manages application alerting |
| ANALYTICS | Manages application analytics. Only the `READ` permission is used. |
| DEFINITION | Manages the application definition |
| LOG | Manages application logs. Only the `READ` permission is used. |
| MEMBER | Manages application members |
| NOTIFICATION | Manages application notifications |
| SUBSCRIPTION | Manages application subscriptions |
Users and user groups
In DSAPI, a user is the profile of an individual who uses the platform. User groups are groupings of users that share the same role(s) for the Environment, Organization, API, and/or Application scopes.
Create users
Users are created in one of two ways:
- System Administrators can create users
- Users can self-register via a registration form
System Administrator flow
To pre-register a user:
- Log in to your APIM Console
- Select Organization from the left nav
- Select Users under User Management
- Click + Add user
- Select User type: Choose between User and Service Account
Pre-register a user
.png)
Add a User user type
- Enter the user's info: First Name, Last Name, Email
- Using the drop-down menu, select the Identity Provider name. See IdP configuration for more details.
Pre-register a service account: Setting up a user as a service account enables somebody from a DSAPI servicer (e.g., partner, consultant) to subscribe to DSAPI email notifications
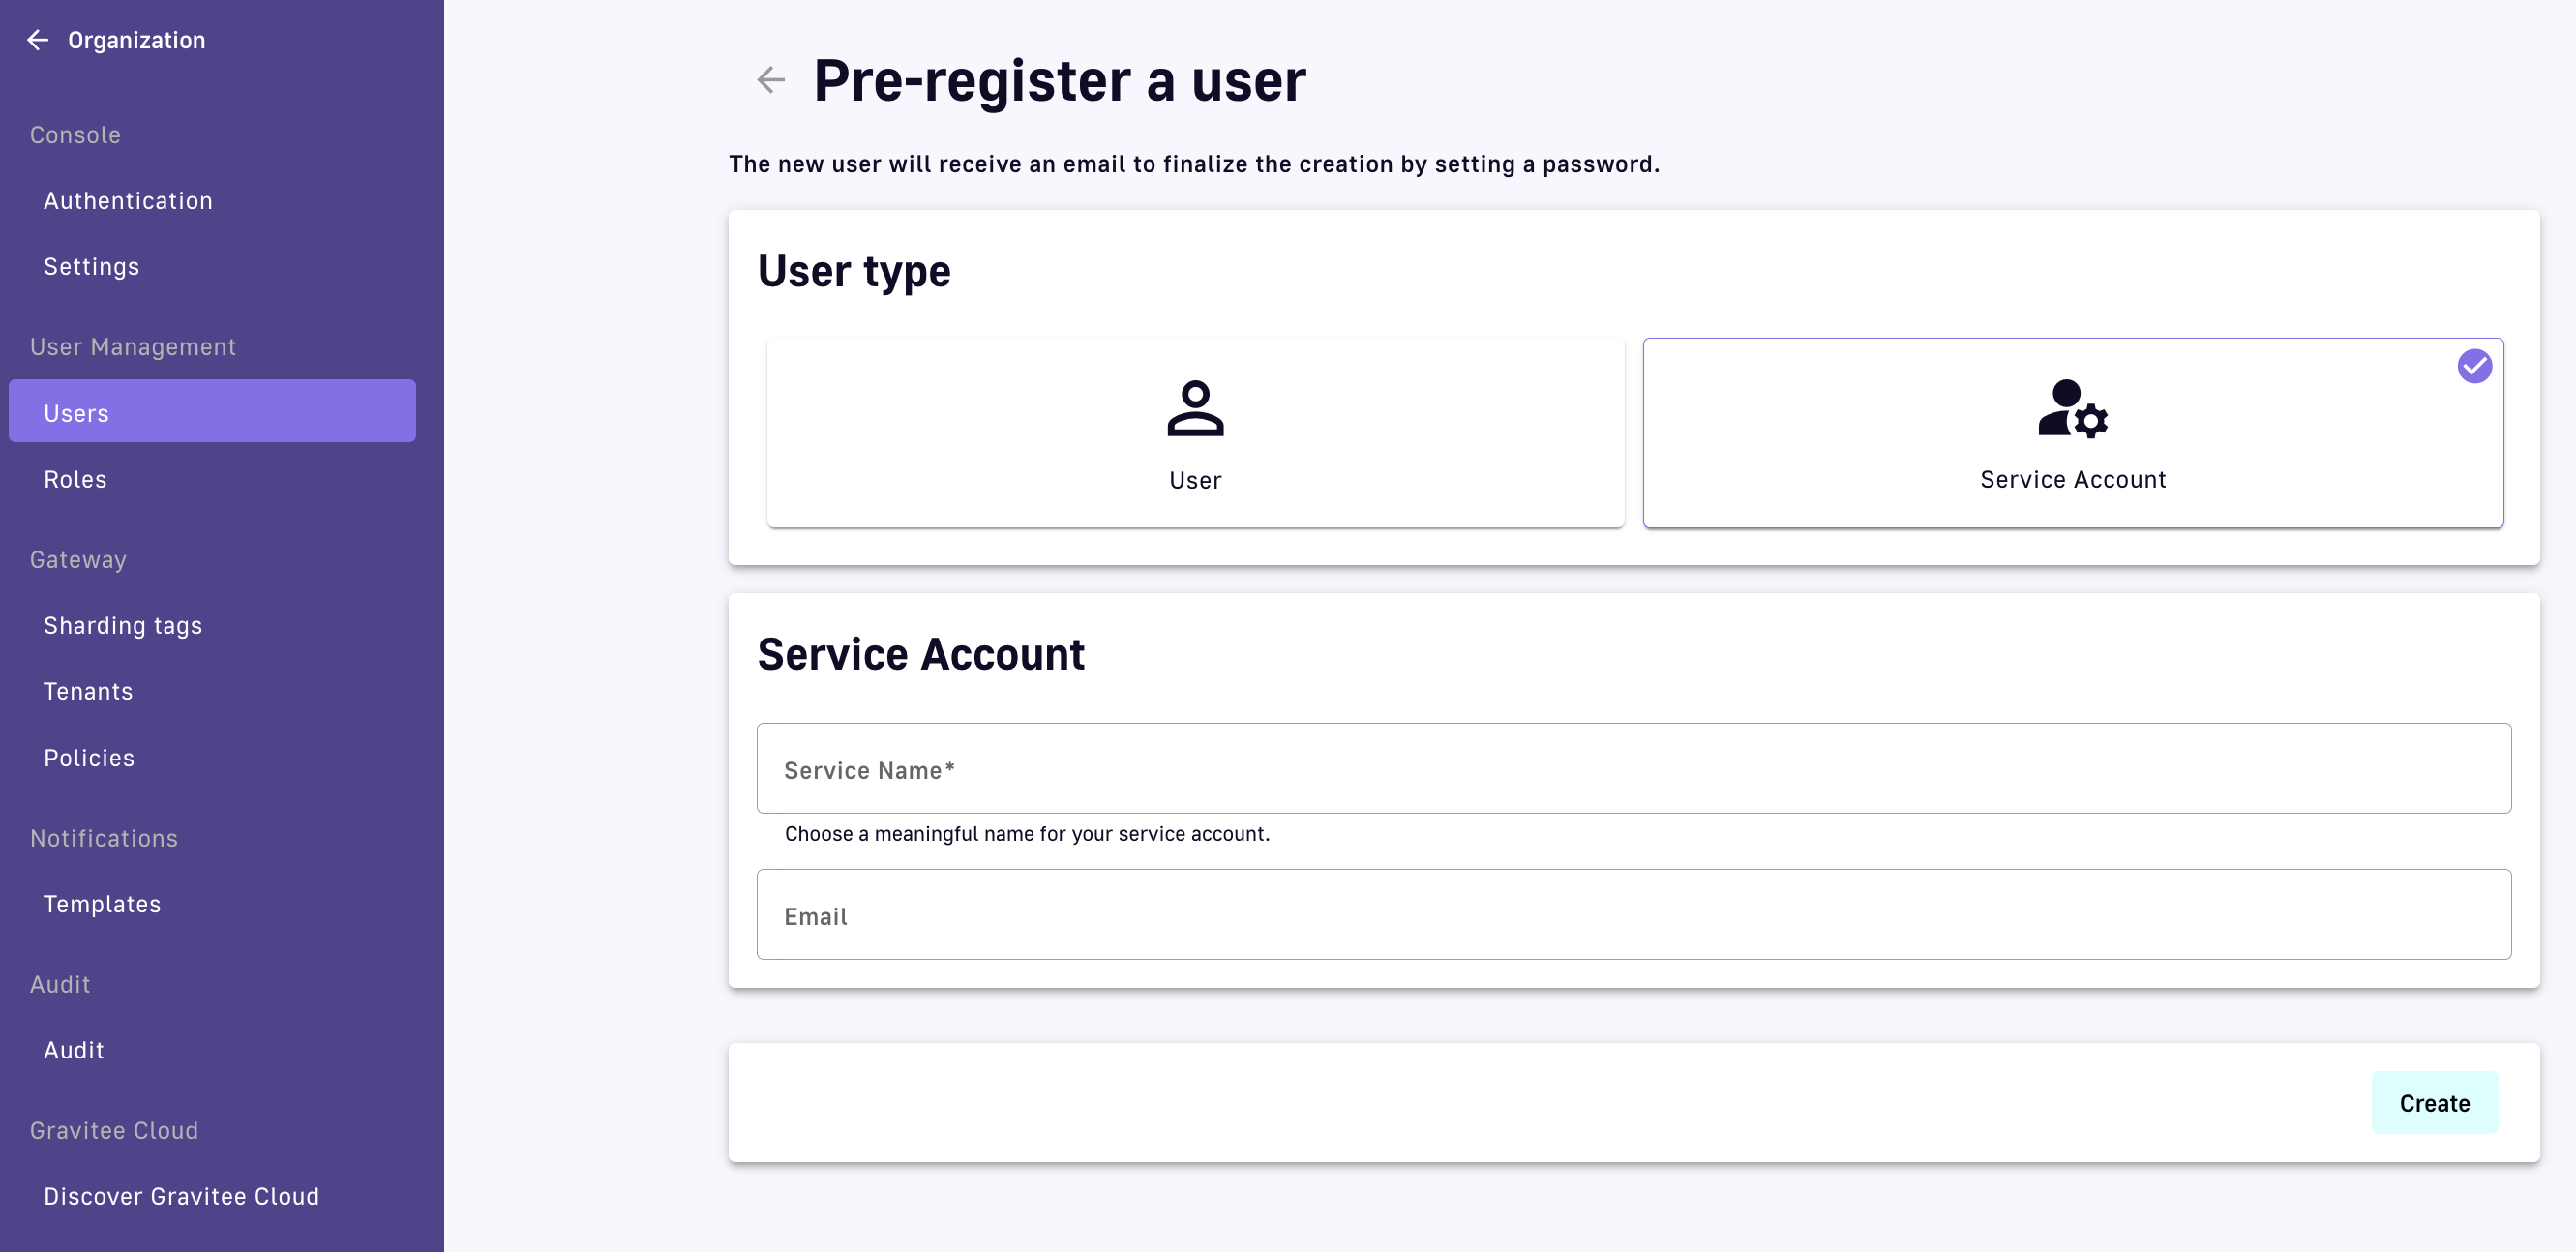
Add a Service Account user type
- Enter a Service Name for the service account
- Enter the service account's email
- Click Create
Manage users
To delete a user from your Organization, select the Delete user icon from the table on the Users page:
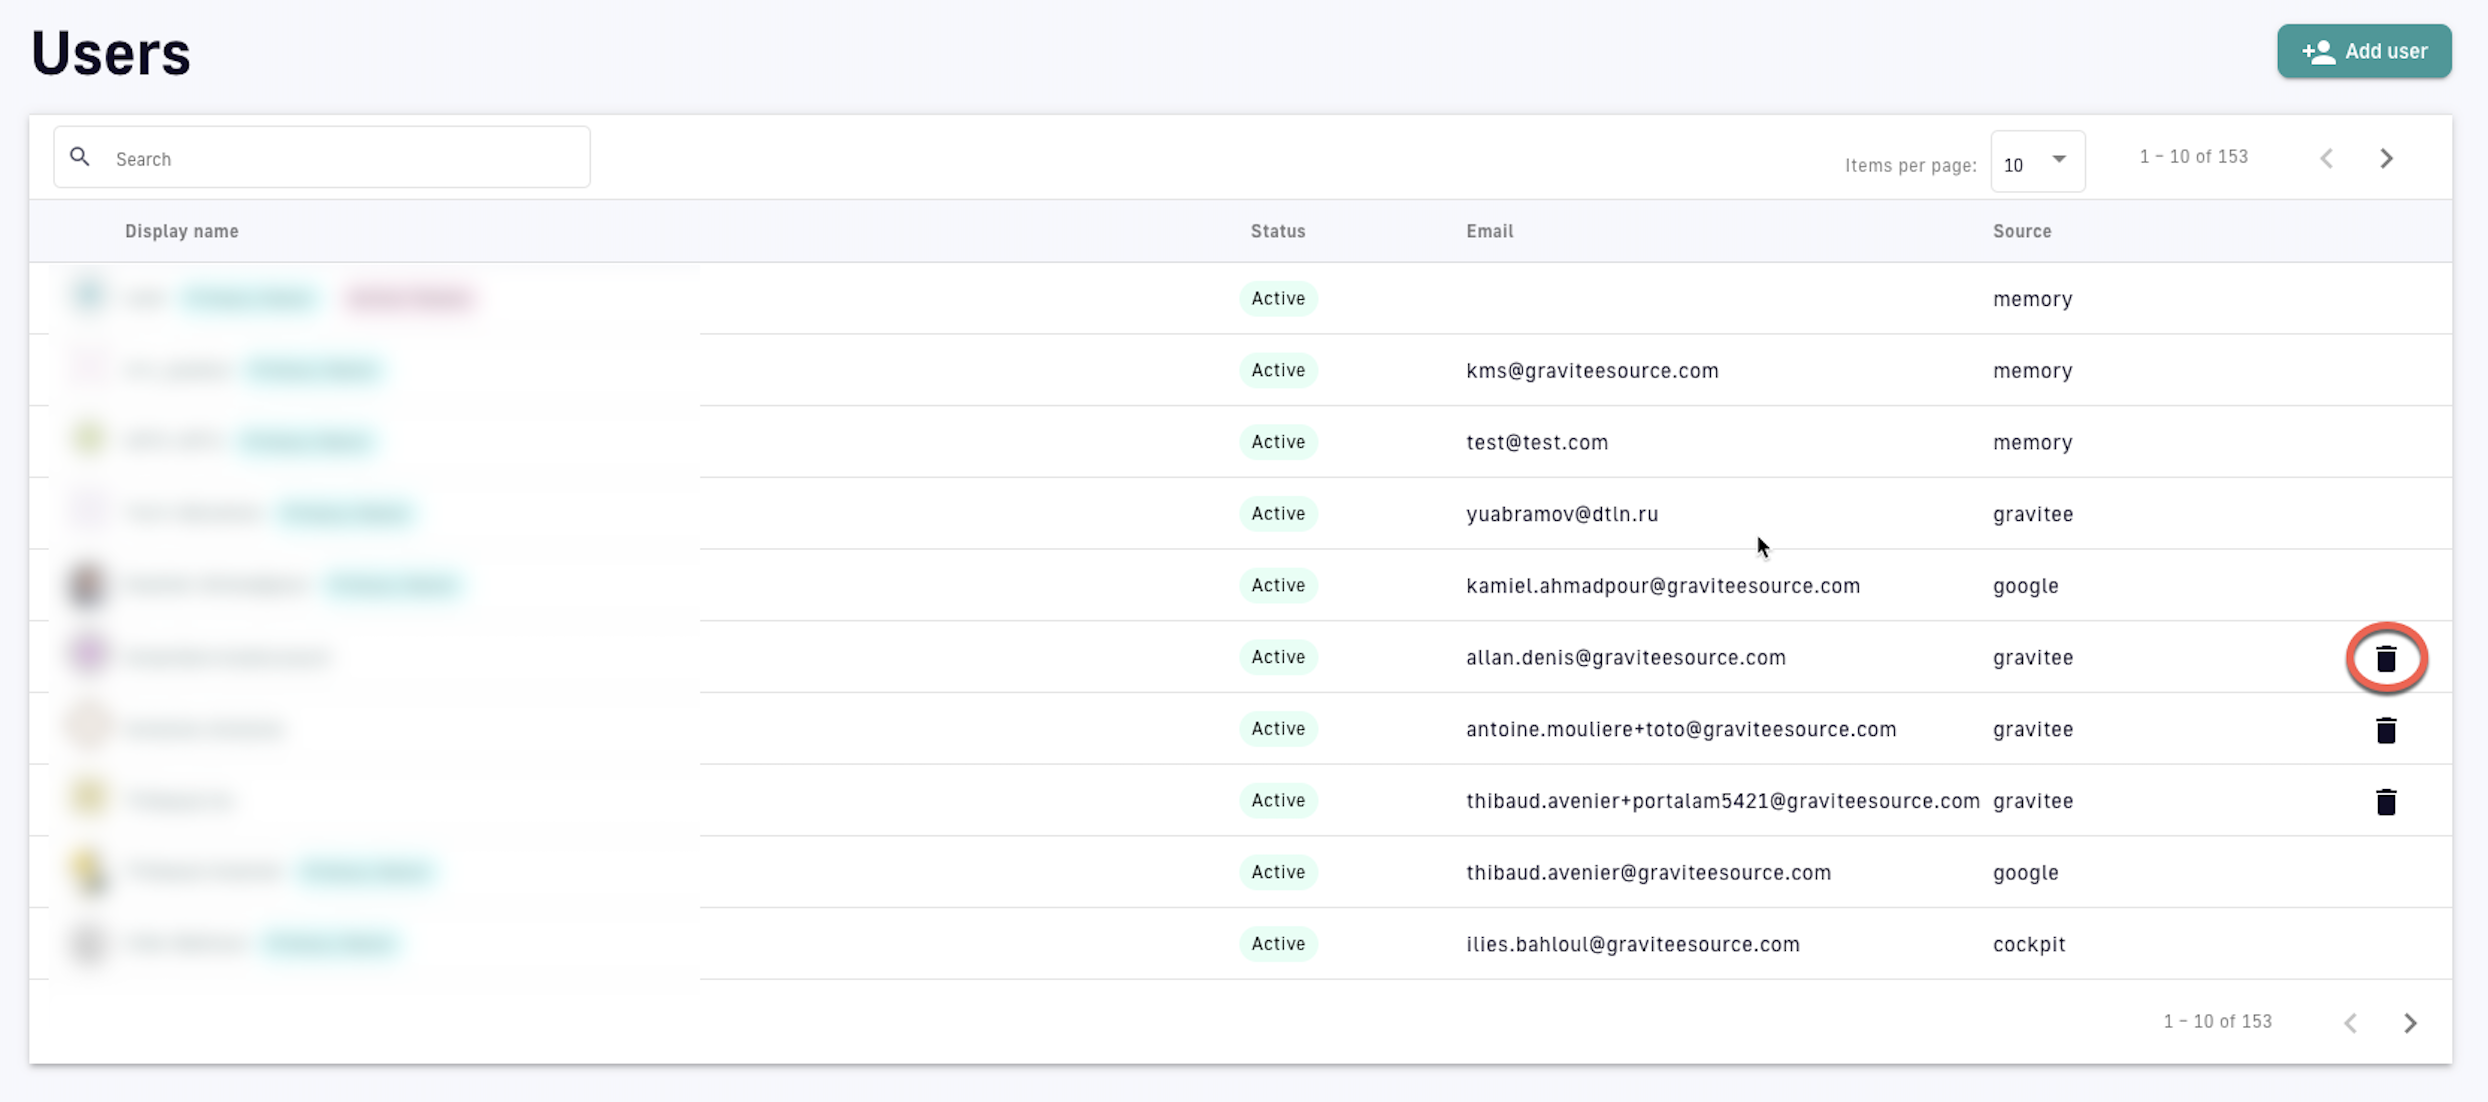
Delete a user
Create user groups
To create a user group:
- Log in to your APIM Console
- Select Settings from the left nav
- Under User Management, select Groups
- Click the plus icon at the bottom of the page
- Configure the user group
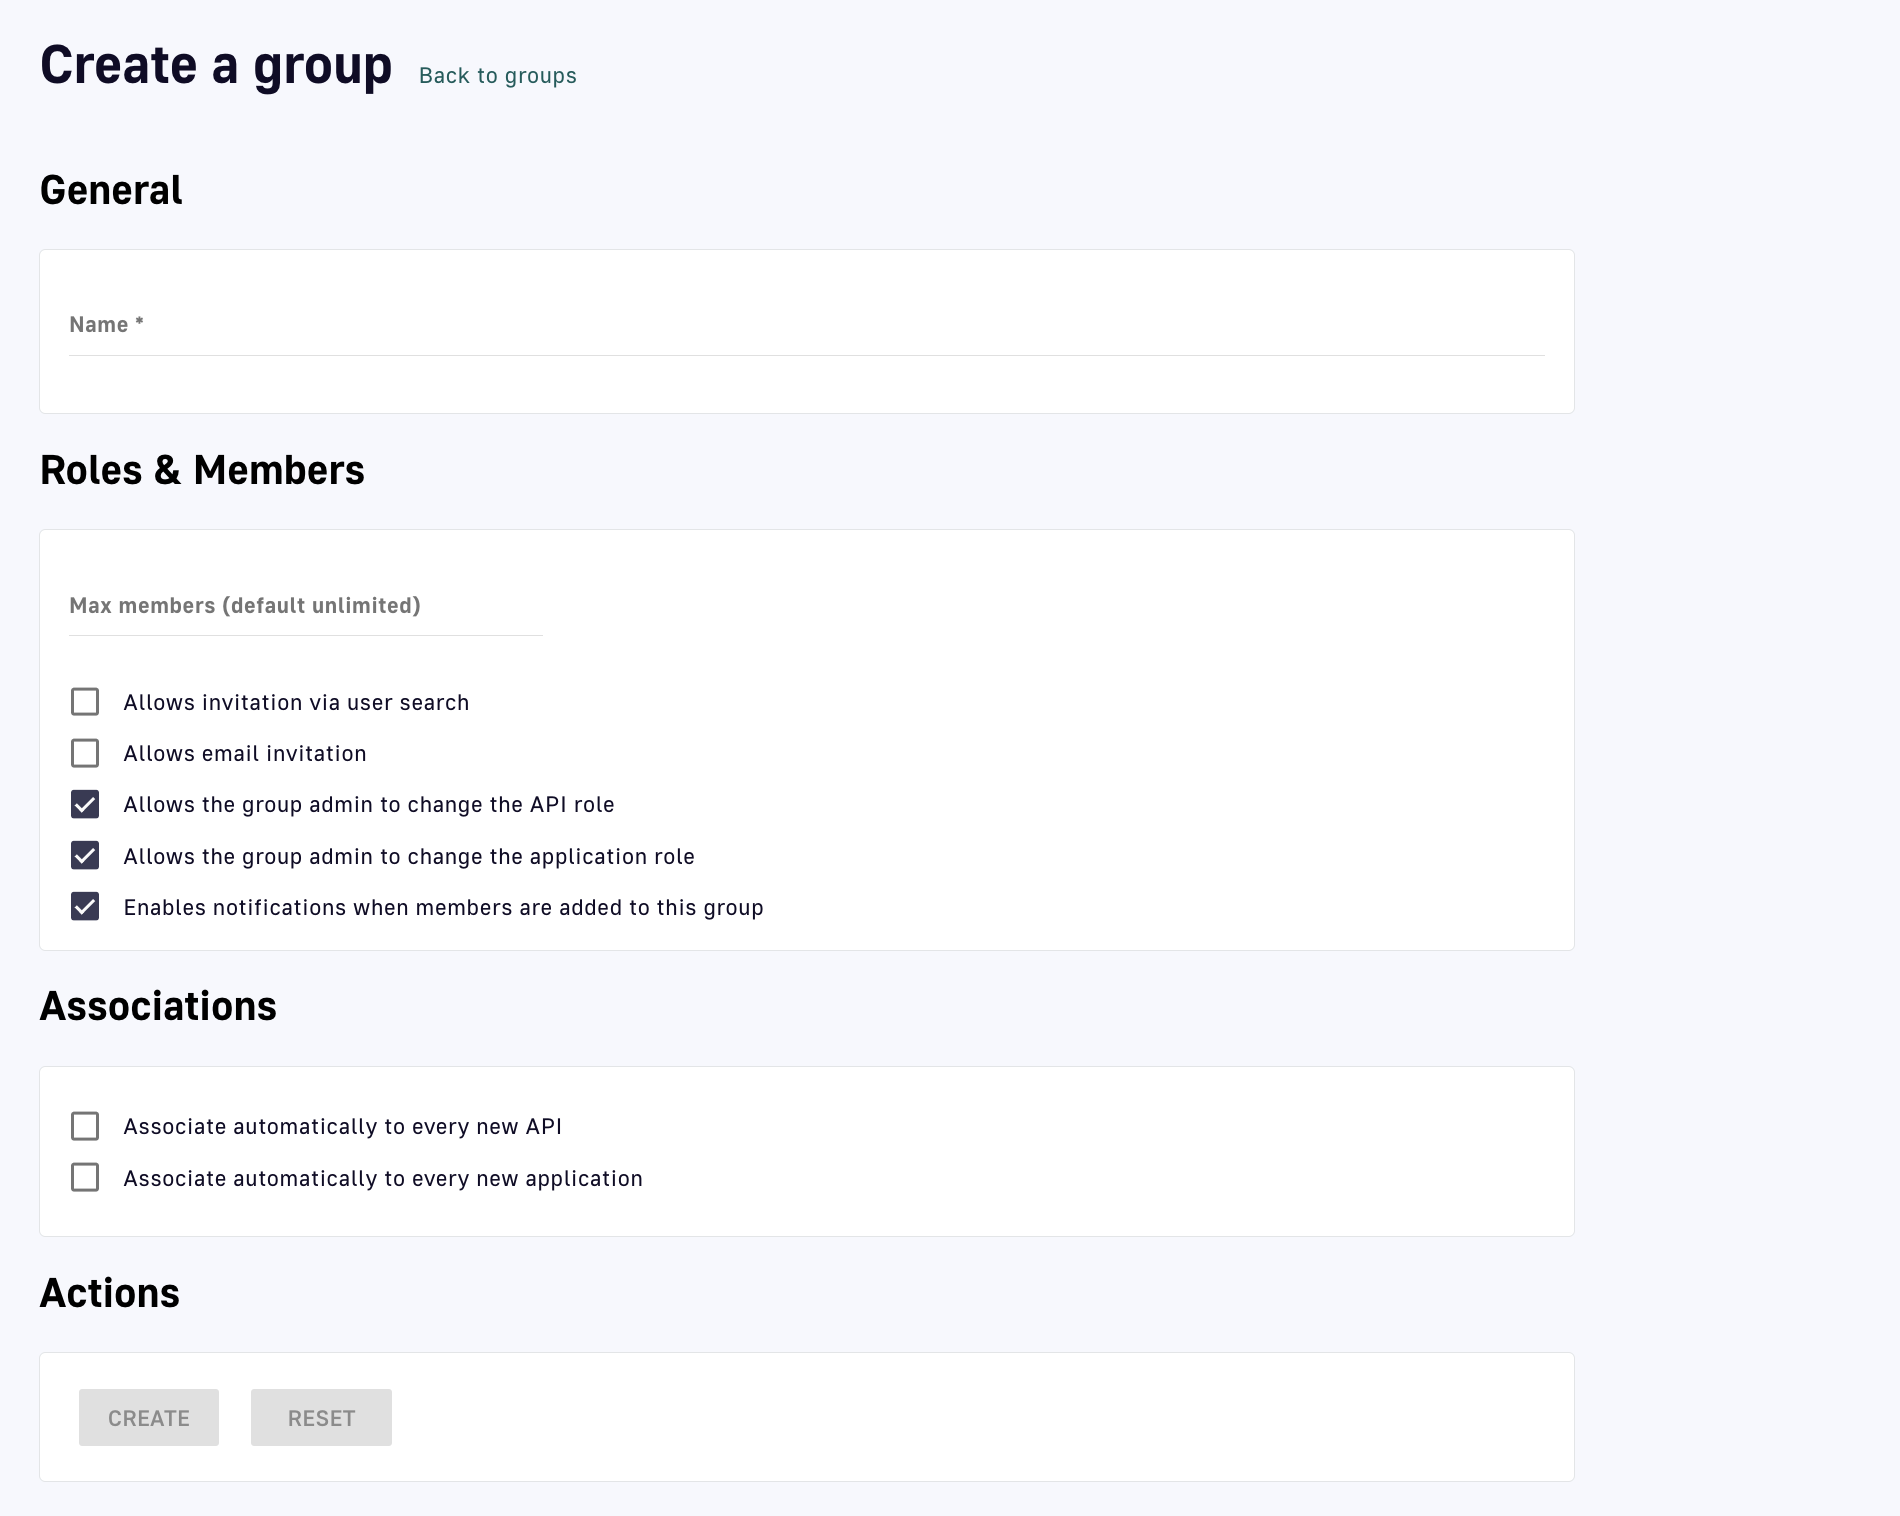
Create a user group
- General: Enter a name for the user group
- Roles & Members: define the maximum number of members and choose whether or not to allow:
- Invitations via user search
- Email invitations
- The group admin to change the API role
- The group admin to change the application role
- Notifications when members are added to this group
- Associations: choose whether or not to associate this group to every new API and/or application
- Actions: CREATE the user group or RESET to the default settings
- Once a user group is created, you will be able to:
- Define a default API role by selecting the role from the Default API Role drop-down menu
- Define default application roles by selecting the role from the Default Application Role drop-down menu
- Choose to associate the user group with existing APIs or Applications by selecting Associate to existing APIs and/or Associate to existing applications
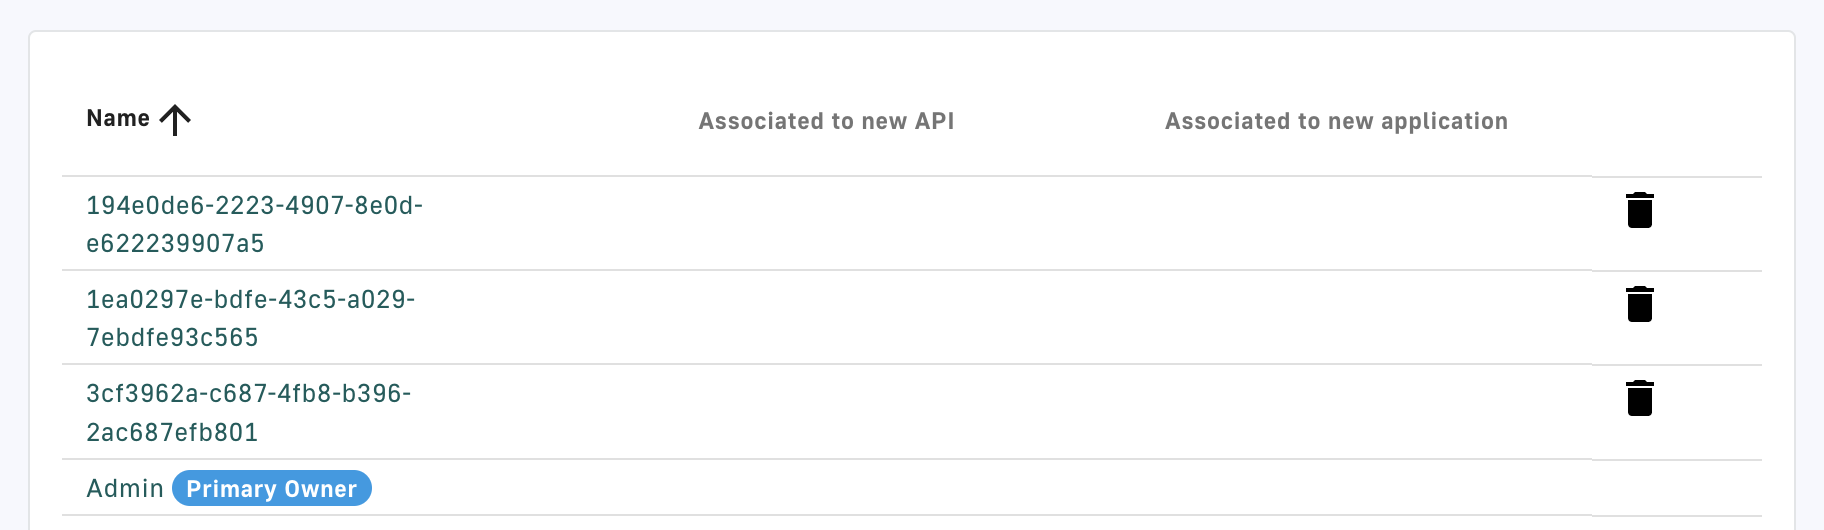
- View all members, associated APIs, and associated applications in the Dependents section
Manage user groups
To manage a user group:
- Log in to your APIM Console
- Select Settings from the left nav
- Under User Management, select Groups
- Edit a user group: Click its hyperlink to make changes, then:
- Reset the user group settings by selecting RESET under Actions
- Update the user group to save new settings by selecting UPDATE under Actions
- Delete a user group: Click the delete icon associated with the user group entry
Manage user groups